Category Archives: Disease – Broad Leafed Woody Ornamental

Purple-Bordered Leaf Spot

Extension Logo

UW Plant Disease Facts


Authors:   Barrett Gruber*, Courtney E. Jahn*, Glen Stanosz and Brian Hudelson, UW-Madison Plant Pathology
Last Revised:   03/01/2024
D-number:   D0089

What is purple-bordered leaf spot?  

Purple-bordered leaf spot (also called eye spot or Phyllosticta leaf spot) is a common, but primarily cosmetic disease that affects maples (in particular Amur, Japanese, red, silver and sugar maple).  Phyllosticta leaf spot is similar in many ways to other foliar diseases of maple such as anthracnose (see UW Plant Disease Facts D0002, Anthracnose) and tar spot (see UW Plant Disease Facts D0110, Tar Spot of Trees and Shrubs).

Purple-bordered leaf spot (l). Within the leaf spots (r), small, black, pimple-like fungal fruiting bodies form (red arrows).

What does purple-bordered leaf spot look like?  

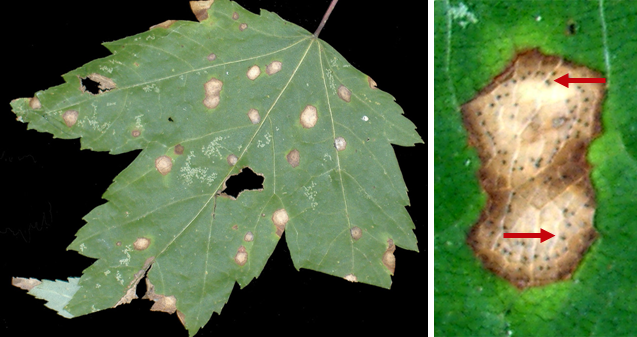
Leaves with purple-bordered leaf spot have roughly circular dead areas (typically less than ¼ inch in diameter).  Spots have tan to brown centers and distinct purple, red, or brown margins.  Tiny, black, pimple-like reproductive structures (called pycnidia) often form within the spots, and are diagnostic.  As spots mature, the centers may fall out, leaving roughly circular holes.

Where does purple-bordered leaf spot come from? 

Purple-bordered leaf spot is caused by the fungus Phyllosticta minima, which overwinters in leaf litter.  In the spring, rain and wind move spores of the fungus from the leaf litter to newly developing maple leaves, where infections occur.  Spores produced on infected leaves can lead to additional infections within the tree canopy throughout the growing season.

How do I save a tree with purple-bordered leaf spot? 

DO NOT PANIC.  Although purple-bordered leaf spot may look unsightly, the disease is usually only a cosmetic problem, rarely causing significant damage to mature and vigorously-growing trees.  Occasionally, purple-bordered leaf spot may defoliate trees early in the growing season, but these trees are typically able to produce new leaves within a few weeks.  Defoliated trees should be watered and properly fertilized.  Established trees require approximately one inch of water per week; newly transplanted trees (i.e., trees planted within approximately the past three years) require approximately two inches of water per week.  If there is insufficient rain, apply water at the drip lines of trees (i.e., the edges of where the branches extend) using a drip or soaker hose.  Only fertilize trees based on a soil nutrient test.

How do I avoid problems with purple-bordered leaf spot in the future?  

If available, select maple varieties that are resistant to purple-bordered leaf spot.  Compost, bury or burn (where allowed by local ordinance) leaf litter from infected trees in the fall or in the spring before trees releaf.  Newly planted maples and established maples that have been severely affected by purple-bordered leaf spot for several years may benefit from treatments with a fungicide containing chlorothalonil, copper, mancozeb, neem oil, sulfur or thiophanate-methyl.  Three treatments may be needed for adequate control:  one at bud break, one when leaves are half expanded, and one when leaves are fully expanded.  DO NOT use the same active ingredient for all treatments (particularly if you are using thiophanate-methyl).  Instead, alternate the use of at least two active ingredients.  This strategy will help minimize problems with fungicide-resistant strains of Phyllosticta minima.  Be sure to read and follow all label instructions of the fungicide(s) that you select to ensure that you use the product(s) in the safest and most effective manner possible.

For more information on purple-bordered leaf spot: 

Contact the University of Wisconsin Plant Disease Diagnostics Clinic (PDDC) at (608) 262-2863 or pddc@wisc.edu.


This Fact Sheet is also available in PDF format:

*Completed as partial fulfillment of the requirements for the graduate course: Plant Pathology 559: Diseases of Economic Crops.

© 2005-2024 the Board of Regents of the University of Wisconsin System doing business as University of Wisconsin-Madison Division of Extension.

An EEO/Affirmative Action employer, University of Wisconsin-Madison Division of Extension provides equal opportunities in employment and programming, including Title IX and ADA requirements. This document can be provided in an alternative format by calling Brian Hudelson at (608) 262-2863 (711 for Wisconsin Relay).

References to pesticide products in this publication are for your convenience and are not an endorsement or criticism of one product over similar products. You are responsible for using pesticides according to the manufacturer’s current label directions. Follow directions exactly to protect the environment and people from pesticide exposure. Failure to do so violates the law.

Thanks to Diana Alfuth, Donna Henderson, and Thad Kohlenberg for reviewing this document.

A complete inventory of UW Plant Disease Facts is available at the University of Wisconsin-Madison Plant Disease Diagnostics Clinic website: https://pddc.qa.webhosting.cals.wisc.edu.

Submit additional lawn, landscape, and gardening questions at https://hort.extension.wisc.edu/ask-a-gardening-question/.

Plum Pox – Pest Alert

Extension Logo

UW Plant Disease Facts


Pest Alert
Authors:   Emma Nelson and Leslie Holland, UW-Madison Department of Plant Pathology
Last Revised:   03/01/2024
D-number:   D0082

What is plum pox? 

Plum pox, also known as “sharka,” is one of the most devastating diseases of stone fruits (plums, peaches, nectarines, and apricots) worldwide.  This viral disease was first discovered on plums in Bulgaria in 1915 and subsequently has been observed in many parts of the world.  There are several variants of plum pox, but only one has been found in the United States.  This variant was first found in peach orchards in Pennsylvania in 1999 (the first report of plum pox in North America).  In 2006, the same variant was identified in Michigan and New York.  Primary hosts of the U.S. plum pox variant are peach, plum, and ornamental Prunus species.  Cherries and almonds are not considered natural hosts of this variant, but they can be artificially infected.  Other plum pox hosts include garden plants (e.g., tomatoes, peas, petunias, zinnias) and weeds (e.g., white clover, lamb’s quarters).  While plum pox does not kill stone fruit trees, it causes serious crop losses by making fruit deformed, discolored, tasteless, and unmarketable.  In 2019, after intense quarantine and destruction of infected trees and orchards, the United States Department of Agriculture declared that plum pox had been eradicated from the United States.

Plum pox symptoms on immature plum fruits (left), and a plum leaf (right). (Photographs courtesy of R. Scorza and obtained from West Virginia University at http://www.caf.wvu.edu/kearneysville/wvufarm1.html)

What does plum pox look like?  

Plum pox symptoms vary widely depending on host plant, plant age, plant nutrient status, environmental conditions, plum pox variant, and timing of infection.  Some infected plants do not exhibit any visible symptoms or may not develop symptoms until years after infection, making plum pox difficult to detect.  Additionally, symptoms may not be visible throughout an entire plant but limited to only a portion of the plant.  Once a plant starts to show symptoms however, it will continue to do so in subsequent years.  Of the stone fruits, plums are generally most severely affected by plum pox and show the most obvious symptoms.  Branches on infected trees may develop spots.  Leaves may develop yellow-green spots or blotches and mild, light-green discoloration near leaf veins (see photo above) that can be difficult to distinguish from other causes (e.g., nutrient deficiencies).  On peach trees, leaf crinkling, puckering, and curling may also occur.  Fruits may develop yellow rings or line patterns and become brown or necrotic (see photo above).  As fruits ripen, symptoms fade, but fruits drop from the tree prematurely.  Seeds may have white rings or line patterns.

Where does plum pox come from?  

Plum Pox is caused by the Plum pox virus (PPV).  PPV-D (one of six PPV variants/strains) is the only strain that has been detected in the United States.   PPV can be moved long distances via infected nursery stock such as infected trees or budwood used for grafting.  Once introduced into an orchard, the virus is spread short distances by aphids.  Aphid transmission occurs more frequently in spring and autumn.  PPV can overwinter in various parts of a tree, including the roots.

How do I save a tree with plum pox?  

Once a tree has been infected with PPV, it cannot be cured.  Timely and complete eradication of infected trees and even entire orchards is the only effective way to prevent further spread.  Diseased trees (including stumps) should be removed and destroyed (i.e., burned and/or buried).  Trees surrounding a problematic area should be monitored frequently for symptom development.  Other potential host plants (see above) should also be monitored for symptoms of disease.  If you see what you believe to be plum pox symptoms, contact your local plant disease diagnostic clinic immediately (see http://npdn.org/ for the lab nearest you).  In Wisconsin, contact the UW-Madison Plant Disease Diagnostics Clinic (PDDC) at (608) 262-283 or pddc@wisc.edu.  PPV is a federally regulated pathogen and if detected, infected plants must be destroyed to prevent further spread.  For more information on the federal regulation of PPV, see https://www.aphis.usda.gov/aphis/ourfocus/planthealth/plant-pest-and-disease-programs/pests-and-diseases/

How do I avoid problems with plum pox in the future?  

After 20 years and elimination of over 1,500 acres of fruit trees, PPV has been eradicated in the United States.  Preventing reintroduction of the PPV in the United States is critical.  To prevent reintroduction of PPV, only use nursery stock that is certified virus-free.  Also consider planting resistant varieties, but keep in mind that existing resistant varieties can still carry the virus and be asymptomatic.  Additional control strategies for plum pox include managing aphids that can transmit PPV, following quarantine regulations, and routinely scouting and surveying orchards for plum pox and PPV.  Ongoing monitoring for plum pox in stone-fruit-producing states and regulating imported trees will help ensure that the United States remains free of PPV.

For more information on plum pox: 

Contact the University of Wisconsin Plant Disease Diagnostics Clinic (PDDC) at (608) 262-2863 or pddc@wisc.edu.


This Fact Sheet is also available in PDF format:

© 2021-2024 the Board of Regents of the University of Wisconsin System doing business as University of Wisconsin-Madison Division of Extension.

An EEO/Affirmative Action employer, University of Wisconsin-Madison Division of Extension provides equal opportunities in employment and programming, including Title IX and ADA requirements. This document can be provided in an alternative format by calling Brian Hudelson at (608) 262-2863 (711 for Wisconsin Relay).

References to pesticide products in this publication are for your convenience and are not an endorsement or criticism of one product over similar products. You are responsible for using pesticides according to the manufacturer’s current label directions. Follow directions exactly to protect the environment and people from pesticide exposure. Failure to do so violates the law.

Thanks to Patty Meister, Josie Russo and Carol Shirk for reviewing this document.

A complete inventory of UW Plant Disease Facts is available at the University of Wisconsin-Madison Plant Disease Diagnostics Clinic website: https://pddc.qa.webhosting.cals.wisc.edu.

Submit additional lawn, landscape, and gardening questions at https://hort.extension.wisc.edu/ask-a-gardening-question/.

Oak Wilt

Extension Logo

UW Plant Disease Facts


Authors:   Jim Olis* and Brian Hudelson, UW-Madison Plant Pathology
Last Revised:   03/20/2024
D-number:   D0075

What is oak wilt? 

Oak wilt is a lethal fungal disease that affects virtually all species of oaks.  Oaks in the red oak group (oaks with pointed leaf lobes) such as red, scarlet, black and Northern pin oak are most susceptible.  Oaks in the white oak group (those with rounded leaf lobes) such as white, bur, post, and swamp white oak are less susceptible.

What does oak wilt look like? 

Initially, single branches on infected trees wilt and die.  Leaves on these branches often bronze, or turn tan or dull green, starting at the tips or outer margins.  Leaves may also droop, curl, or fall from the tree.  Infected trees eventually die.  Oak wilt can kill oaks in the red oak group in less than one month.  Oaks in the white oak group usually have less severe symptoms and rarely die in a single season.

Marginal leaf bronzing or tanning is often an early symptom of oak wilt.

Where does oak wilt come from? 

Oak wilt is caused by the fungus Bretziella fagacearum, which survives in infected living oaks and in oaks recently killed by the disease.  The fungus can also survive in firewood harvested from an infected tree. 

Sap beetles are attracted to mats of the oak wilt fungus in infected trees, pick up spores of the fungus on their bodies, then carry spores to healthy trees.  These beetles are attracted to trees that have been recently wounded by wind or storm damage, or by pruning.  Oak bark beetles such as Pseudopityophthorus minutissimus and Pseudopityophthorus pruinosus are also known to move the oak wilt fungus from tree to tree.  In particular, Pseudopityophthorus minutissimus has been observed more frequently in Wisconsin in recent years.  The relative importance of sap beetles vs. oak bark beetles in the transmission of the oak wilt fungus in Wisconsin is not known at this time. 

Once Bretziella fagacearum has infected an oak tree, natural grafts between roots of oak trees growing near each other serve as a means by which the fungus moves from tree to tree.  Root grafts most commonly form between oak trees in the same oak group (see above for details), but root grafts between red oak group and white oak group oaks can also occur on occasion. 

How do I save a tree with oak wilt? 

Removing infected oaks is often the best way to manage oak wilt.  Before removing trees, be sure to disrupt root grafts between infected and other nearby oaks.  This will help limit tree to tree movement of the fungus during the removal process.  Burn or bury wood from diseased oaks, if possible.  If you decide to keep the wood, remove the bark, pile it in one place and cover it with a heavy tarp, burying the tarp edges with soil until you use it.  This will limit sap or bark beetle access to the pile and reduce the risk that these insects will acquire the oak wilt fungus.  Propiconazole injections can be used for oak wilt management, but these treatments work best when used before, rather than after, oak trees are infected.

How do I avoid problems with oak wilt in the future?  

Prune oak trees only during the dormant season when sap and bark beetles are not active.  If you must prune during the growing season (e.g., due to storm damage) IMMEDIATELY cover wounds with paint.  Sap beetles can visit wounded oaks within 10 minutes of wound formation.  Monitor oaks for oak wilt and remove infected trees promptly. 

For more information on oak wilt: 

Contact the University of Wisconsin Plant Disease Diagnostics Clinic (PDDC) at (608) 262-2863 or pddc@wisc.edu.


This Fact Sheet is also available in PDF format:

*Completed as partial fulfillment of the requirements for a BS in Plant Pathology at the University of Wisconsin Madison.

© 2001-2024 the Board of Regents of the University of Wisconsin System doing business as University of Wisconsin-Madison Division of Extension.

An EEO/Affirmative Action employer, University of Wisconsin-Madison Division of Extension provides equal opportunities in employment and programming, including Title IX and ADA requirements. This document can be provided in an alternative format by calling Brian Hudelson at (608) 262-2863 (711 for Wisconsin Relay).

References to pesticide products in this publication are for your convenience and are not an endorsement or criticism of one product over similar products. You are responsible for using pesticides according to the manufacturer’s current label directions. Follow directions exactly to protect the environment and people from pesticide exposure. Failure to do so violates the law.

Thanks to Ann Joy, Laura Jull and Ann Wied for reviewing this document.

A complete inventory of UW Plant Disease Facts is available at the University of Wisconsin-Madison Plant Disease Diagnostics Clinic website: https://pddc.qa.webhosting.cals.wisc.edu.

Submit additional lawn, landscape, and gardening questions at https://hort.extension.wisc.edu/ask-a-gardening-question/.

Nectria Canker

Extension Logo

UW Plant Disease Facts


Authors:   Ann Joy and Brian Hudelson, UW-Madison Plant Pathology
Last Revised:   03/01/2024
D-number:   D0074

What is Nectria canker? 

Nectria canker is a common and potentially lethal disease that affects many species of trees and shrubs.  This disease can cause significant damage on newly planted, as well as established, trees and shrubs that are under stress.

Nectria canker on a honey locust tree. The site of infection was a pruning wound.

What does Nectria canker look like? 

Nectria canker is characterized by the formation of sunken areas (cankers) that form on twigs, branches, and trunks.  Cankers can form at leaf scars and wherever injuries occur.  Injuries can be caused by pruning (particularly improper pruning), frost, hail, cracking from heavy snow or ice, sunscald, insects, or animals.  Cankers appear first as slightly sunken areas on the bark, but can grow for years, becoming target-shaped or elongated.  Small branches girdled by cankers can wilt suddenly, fail to leaf out, and die.

Where does Nectria canker come from? 

Nectria canker is caused by two fungi, Nectria cinnabarina and Nectria galligena.  These fungi survive in the margins of cankers where they produce numerous fruiting bodies (reproductive structures).  Fruiting bodies can be cream, coral, orange, or red, and eventually darken to brown or black with age.  Spores are dispersed by wind, water, and pruning tools.  Cankers expand slowly, usually when the host is dormant or under stress.  Infected plants may hold the fungus in check by producing wound-closing (callus) tissue around the infected area.

How do I save a tree with Nectria canker? 

There is no cure for Nectria canker.  Remove smaller branch cankers by pruning six to eight inches below the canker.  Disinfect pruning tools after each cut by treating them for at least 30 seconds with 10% bleach solution or (preferably due to its less corrosive properties) 70% alcohol (e.g., rubbing alcohol, certain spray disinfectants).  If you use bleach, be sure to thoroughly rinse and oil your tools after pruning to prevent rusting.  Trees with trunk cankers may live many years with the disease.  Healthy trees are better able to slow the development of Nectria canker, so make sure that trees are watered and fertilized properly.

How do I avoid problems with Nectria canker in the future? 

Choose plants that are well-adapted to your local climate.  Avoid any stresses to your trees and shrubs.  Prune trees and shrubs properly.  See UW-Garden Facts XHT1014, Pruning Deciduous Trees, and XHT1015, Pruning Deciduous Shrubs), and avoid injury to root and trunks from lawnmowers.  Remove grass from around the base of trees and shrubs, mulch properly, and water as needed to avoid drought stress.

For more information on Nectria canker: 

Contact the University of Wisconsin Plant Disease Diagnostics Clinic (PDDC) at (608) 262-2863 or pddc@wisc.edu.


This Fact Sheet is also available in PDF format:

© 2002-2024 the Board of Regents of the University of Wisconsin System doing business as University of Wisconsin-Madison Division of Extension.

An EEO/Affirmative Action employer, University of Wisconsin-Madison Division of Extension provides equal opportunities in employment and programming, including Title IX and ADA requirements. This document can be provided in an alternative format by calling Brian Hudelson at (608) 262-2863 (711 for Wisconsin Relay).

Thanks to Lis Friemoth, Laura Jull, and Bob Tomesh for reviewing this document.

A complete inventory of UW Plant Disease Facts is available at the University of Wisconsin-Madison Plant Disease Diagnostics Clinic website: https://pddc.qa.webhosting.cals.wisc.edu.

Submit additional lawn, landscape, and gardening questions at https://hort.extension.wisc.edu/ask-a-gardening-question/.

Herbicide Damage

Extension Logo

UW Plant Disease Facts


Authors:   Brian Hudelson, UW-Madison Plant Pathology
Last Revised:   03/01/2024
D-number:   D0060

What is herbicide damage? 

Herbicide damage is any adverse, undesired effect on a plant that is caused by exposure of that plant to a pesticide designed for weed control (i.e., an herbicide).  Any plant can be subject to this problem.

Squash leaf distorted due to exposure to a common lawn herbicide.

What does herbicide damage look like? 

Symptoms of herbicide damage vary depending upon the plant affected and the herbicide used.  Common symptoms include stems that are flattened, or that twist or corkscrew.  Leaves may have abnormal shapes, sizes or textures.  In addition, leaves or leaf veins may yellow or redden.  In severe cases, plants may brown and die.  Some plants, such as tomatoes and grapes, are particularly susceptible to herbicide damage and can be used as indicators of unwanted herbicide exposure.

How does herbicide damage occur? 

Herbicide damage results when an herbicide is misapplied.  Herbicides for control of broadleaf weeds are occasionally applied with fertilizers as part of a lawn care program.  If these products are applied too close to ornamentals or vegetables, or are applied when there is too much wind, then the herbicide can drift (move) from the area of application into a non-treated area.  Often, drifting herbicides are difficult to detect by eye because they are extremely fine mists.  They can better be detected by smell.  Some herbicides readily produce vapors that can begin to drift several hours after application.

How do I save a plant that has been damaged by herbicides?  

There is nothing you can do after plants have been exposed.  However, most plants accidentally exposed to broadleaf herbicides applied with lawn fertilizers do not receive a high enough dose to kill them.  Young growth exposed to the herbicide will be distorted and discolored, but subsequent growth will be normal.

How do I avoid problems with herbicide damage in the future?  

When using a lawn herbicide, follow the application directions exactly.  DO NOT apply the product too close to, or in a manner that will cause exposure to, non-target ornamentals or vegetables.  To avoid drift, apply the herbicide when there is as little wind as possible (< 5 mph).  Apply the herbicide at low pressure to minimize production of fine mists.  Finally, use amine forms rather than ester forms of herbicides as amine forms are less likely to produce vapors.

For more information on herbicide damage: 

Contact the University of Wisconsin Plant Disease Diagnostics Clinic (PDDC) at (608) 262-2863 or pddc@wisc.edu.


This Fact Sheet is also available in PDF format:

© 1999-2024 the Board of Regents of the University of Wisconsin System doing business as University of Wisconsin-Madison Division of Extension.

An EEO/Affirmative Action employer, University of Wisconsin-Madison Division of Extension provides equal opportunities in employment and programming, including Title IX and ADA requirements. This document can be provided in an alternative format by calling Brian Hudelson at (608) 262-2863 (711 for Wisconsin Relay).

References to pesticide products in this publication are for your convenience and are not an endorsement or criticism of one product over similar products. You are responsible for using pesticides according to the manufacturer’s current label directions. Follow directions exactly to protect the environment and people from pesticide exposure. Failure to do so violates the law.

Thanks to Sharon Morrisey, John Stier, Ann Wied and Chris Williamson for reviewing this document.

A complete inventory of UW Plant Disease Facts is available at the University of Wisconsin-Madison Plant Disease Diagnostics Clinic website: https://pddc.qa.webhosting.cals.wisc.edu.

Submit additional lawn, landscape, and gardening questions at https://hort.extension.wisc.edu/ask-a-gardening-question/.

Guignardia Leaf Spot

Extension Logo

UW Plant Disease Facts


Authors:   Brian Hudelson, UW-Madison Plant Pathology
Last Revised:   03/01/2024
D-number:   D0057

What is Guignardia leaf spot? 

Guignardia leaf spot is a common fungal leaf disease that affects vining plants such as Boston ivy and Virginia-creeper.  The fungus that causes Guignardia leaf spot also causes a leaf spot and fruit rot of grape called black rot.

Roughly circular, red-bordered spots on Boston ivy typical of Guignardia leaf spot.

What does Guignardia leaf spot look like? 

Symptoms of Guignardia leaf spot include roughly circular, or sometimes angular (i.e., straight-edged), ¼ to ½ inch diameter dead spots on affected leaves.  Spots often have a purple-red border, and the centers may eventually fall out.  Young leaves are more susceptible to infection than mature leaves.  If infections occur before leaves have fully expanded, leaves can become puckered and distorted.  Within the spots, a diffuse ring of black dots (reproductive structures of the fungus) is typically visible.

Where does Guignardia leaf spot come from? 

Guignardia leaf spot is caused by the fungus Phyllosticta ampelicida (formerly Guignardia bidwellii), which survives in leaf litter.  Spores of the fungus are produced under cool, moist conditions and can be dispersed by wind or splashing water.

How do I save a plant with Guignardia leaf spot? 

DO NOT panic!  Guignardia leaf spot is most often a cosmetic disease, making an affected plant look a little ragged, but not killing the plant.  Only occasionally will the disease be more severe, resulting in defoliation.

How do I avoid problems with Guignardia leaf spot in the future?  

Remove and burn (where allowed by local ordinance), bury or hot compost fallen, infected leaves.  Thin plants to increase airflow and promote rapid drying of foliage.  This drier environment is less favorable for disease developments.  Water plants at the base using a soaker or drip hose to minimize wetting of leaves and reduce the movement of spores.  If a plant has been severely defoliated by Guignardia leaf spot for several years, preventative fungicide treatments may be necessary.  Make an initial fungicide application as leaves first begin to emerge.  If the weather is cool and wet, make additional applications at seven to 14 day intervals until hotter, drier weather develops or until leaves are fully expanded and mature.  Chlorothalonil, copper, mancozeb and thiophanate-methyl are labeled for Guignardia leaf spot control.  DO NOT use the same active ingredient for all treatments (particularly if you are using thiophanate-methyl).  Instead, alternate the use of at least two active ingredients.  This strategy will help minimize problems with fungicide-resistant strains of Phyllosticta ampelicida.  Be sure to read and follow all label instructions of the fungicide(s) that you select to ensure that you use the product(s) in the safest and most effective manner possible.

For more information on Guignardia leaf spot: 

Contact the University of Wisconsin Plant Disease Diagnostics Clinic (PDDC) at (608) 262-2863 or pddc@wisc.edu.


This Fact Sheet is also available in PDF format:

© 2003-2024 the Board of Regents of the University of Wisconsin System doing business as University of Wisconsin-Madison Division of Extension.

An EEO/Affirmative Action employer, University of Wisconsin-Madison Division of Extension provides equal opportunities in employment and programming, including Title IX and ADA requirements. This document can be provided in an alternative format by calling Brian Hudelson at (608) 262-2863 (711 for Wisconsin Relay).

References to pesticide products in this publication are for your convenience and are not an endorsement or criticism of one product over similar products. You are responsible for using pesticides according to the manufacturer’s current label directions. Follow directions exactly to protect the environment and people from pesticide exposure. Failure to do so violates the law.

Thanks to Lisa Johnson, Ann Joy and Patti Nagai for reviewing this document.

A complete inventory of UW Plant Disease Facts is available at the University of Wisconsin-Madison Plant Disease Diagnostics Clinic website: https://pddc.qa.webhosting.cals.wisc.edu.

Submit additional lawn, landscape, and gardening questions at https://hort.extension.wisc.edu/ask-a-gardening-question/.

Gray Mold (Botrytis Blight)

Extension Logo

UW Plant Disease Facts


Authors:   Jeffory Schraufnagel*, Milwaukee Area Technical College, Brian Hudelson, UW-Madison Plant Pathology
Last Revised:   03/01/2024
D-number:   D0056

What is gray mold? 

Gray mold (or Botrytis blight) is a common and often serious fungal disease that can affect plants of all kinds.  Gray mold is a particularly serious problem on flowering plants and plants grown in greenhouses.

Severe gray mold can prevent rose blossoms from developing properly.

What does gray mold look like? 

Gray mold causes brown spots on flower petals that enlarge, killing the petals and eventually the rest of the flower.  Early infections may prevent flowers from opening.  On plants such as tulips, crocus, and daffodils, gray mold may spread from flowers into the bulbs leading to bulb decay.  On leaves, Botrytis causes irregularly-shaped necrotic (dead) areas that may have a bull’s-eye pattern.  Botrytis can also cause stem cankers (localized sunken areas) that may eventually enlarge to girdle a stem.

Where does gray mold come from? 

Gray mold is caused by the fungus Botrytis cinerea, which survives on dead plant tissue as dark brown to black, multi-celled structures called sclerotia, and as thick, dark-walled, single-celled spores called chlamydospores.  Botrytis produces large numbers of dusty, gray reproductive spores that are spread by wind or splashing water.  These spores rapidly die when dried.  Botrytis most readily infects delicate tissues such as flower petals.  In order to infect tougher tissues such as healthy leaves, Botrytis spores require an external food source such as nutrients leaking from wounds or dead/dying tissues such as withered flower petals.

How do I save a plant with gray mold? 

Promptly remove diseased leaves and flowers.  Prune diseased branches four to six inches below the infection leaving a clean cut.  Decontaminate pruning tools between cuts by treating them for at least 30 seconds with a 10% bleach solution or (preferably due to its less corrosive properties) 70% alcohol (e.g., rubbing alcohol or certain spray disinfectants).  If you use bleach, thoroughly rinse and oil your tools after pruning to prevent rusting.

How do I avoid problems with gray mold in the future? 

Remove dead or dying tissue from plants and the soil surface.  Avoid wounding plants mechanically, or chemically by overfertilization or misuse of pesticide sprays.  Reduce humidity around plants and germinate seedlings under warm, relatively dry conditions.  Fungicides such as chlorothalonil and mancozeb can be used to prevent infections.  Be sure to read and follow all label instructions of the fungicide that you select to ensure that you use the fungicide in the safest and most effective manner possible.

For more information on gray mold: 

Contact the University of Wisconsin Plant Disease Diagnostics Clinic (PDDC) at (608) 262-2863 or pddc@wisc.edu.


This Fact Sheet is also available in PDF format:

*Completed as partial fulfillment of the requirements for an associate degree in Horticulture at the Milwaukee Area Technical College.

© 2003-2024 the Board of Regents of the University of Wisconsin System doing business as University of Wisconsin-Madison Division of Extension.

An EEO/Affirmative Action employer, University of Wisconsin-Madison Division of Extension provides equal opportunities in employment and programming, including Title IX and ADA requirements. This document can be provided in an alternative format by calling Brian Hudelson at (608) 262-2863 (711 for Wisconsin Relay).

References to pesticide products in this publication are for your convenience and are not an endorsement or criticism of one product over similar products. You are responsible for using pesticides according to the manufacturer’s current label directions. Follow directions exactly to protect the environment and people from pesticide exposure. Failure to do so violates the law.

A complete inventory of UW Plant Disease Facts is available at the University of Wisconsin-Madison Plant Disease Diagnostics Clinic website: https://pddc.qa.webhosting.cals.wisc.edu.

Submit additional lawn, landscape, and gardening questions at https://hort.extension.wisc.edu/ask-a-gardening-question/.

Golden Canker (Cryptodiaporthe Canker)

Extension Logo

UW Plant Disease Facts


Authors:   Brian Hudelson, UW-Madison Plant Pathology
Last Revised:   03/01/2024
D-number:   D0055

What is golden canker? 

Golden canker (officially known as Cryptodiaporthe canker) is a visually distinct and increasingly common disease of alternate-leafed dogwoods such as pagoda dogwood.  This disease can potentially be lethal if infections occur on the main trunk of a tree.

A yellow branch with orange spots typical of golden canker on pagoda dogwood.

What does golden canker look like? 

Initial symptoms of golden canker include wilting and death of leaves on infected branches, followed by branch dieback.  Infected branch tissue turns a bright, golden-yellow color.  Often, orange spots will be visible scattered over this yellow tissue.  These spots are fruiting bodies (reproductive structures) of the fungus that causes the disease.  If unchecked, golden canker can spread from infected branches to the main trunk, resulting in the death of the tree above the point of trunk infection.

Where does golden canker come from? 

Golden canker is caused by the fungus Cryptodiaporthe corni, which survives in infected branches.  The exact means by which this fungus is spread is not known.

How do I save a tree with golden canker? 

The only effective way of managing golden canker, once infections have occurred, is by removing diseased branches.  Prune four to six inches below the golden-yellow tissue on each infected branch.  To prevent accidental spread of the golden canker fungus from branch to branch, and from tree to tree, be sure to decontaminate pruning tools between each cut by treating them for at least 30 seconds with a 10% bleach solution or (preferably due to its less corrosive properties) 70% alcohol (e.g., rubbing alcohol, certain spray disinfectants).  Dispose of infected branches by burning (where allowed by local ordinance) or burying them.  There are no fungicide treatments for this disease.

How do I avoid problems with golden canker in the future?  

Reduce tree stress as much as possible.  When planting a new pagoda dogwood, place it in a cool, shaded site.  Remove turf from around the base of the tree out to at least the drip line of the tree (i.e., the edge of where the branches extend), and apply shredded hardwood, pine or cedar mulch in this area to help keep the tree’s root system cool and moist.  On heavy clay soils, use one to two inches of mulch.  On other soils, use three to four inches of mulch.  Be sure to keep mulch four inches from the main trunk of the tree.  Also, make sure the tree receives sufficient water (approximately two inches per week for newly transplanted trees; approximately one inch per week for established trees).  If rainfall is insufficient, use a drip hose or soaker hose to apply supplemental water at the drip line of the tree.  Fertilize trees as needed, but be sure to base any fertilization on a soil nutrient test.

For more information on golden canker: 

Contact the University of Wisconsin Plant Disease Diagnostics Clinic (PDDC) at (608) 262-2863 or pddc@wisc.edu.


This Fact Sheet is also available in PDF format:

© 2003-2024 the Board of Regents of the University of Wisconsin System doing business as University of Wisconsin-Madison Division of Extension.

An EEO/Affirmative Action employer, University of Wisconsin-Madison Division of Extension provides equal opportunities in employment and programming, including Title IX and ADA requirements. This document can be provided in an alternative format by calling Brian Hudelson at (608) 262-2863 (711 for Wisconsin Relay).

References to pesticide products in this publication are for your convenience and are not an endorsement or criticism of one product over similar products. You are responsible for using pesticides according to the manufacturer’s current label directions. Follow directions exactly to protect the environment and people from pesticide exposure. Failure to do so violates the law.

Thanks to Ann Joy, Mike Maddox and Ann Wied for reviewing this document.

A complete inventory of UW Plant Disease Facts is available at the University of Wisconsin-Madison Plant Disease Diagnostics Clinic website: https://pddc.qa.webhosting.cals.wisc.edu.

Submit additional lawn, landscape, and gardening questions at https://hort.extension.wisc.edu/ask-a-gardening-question/.

Foliar Nematodes

Extension Logo

UW Plant Disease Facts


Authors:   Megan Meyers* and Brian Hudelson, UW-Madison Plant Pathology
Last Revised:   03/01/2024
D-number:   D0053
 
Angular dead areas on Brunnera leaves typical of infections by foliar nematodes. (Photo courtesy of Monica Lewandowski, The Ohio State University Plant Pathology)

What are foliar nematodes? 

Foliar nematodes are microscopic worm-like organisms in the genus Aphelenchoides.  They live in and on the leaves (and other above-ground plants parts) of over 450 plant species in more than 75 plant families.  They are commonly found on hostas, but can affect other herbaceous ornamentals (e.g., African violet, anemone, begonia, chrysanthemum, fern, orchid, veronica) and woody ornamentals (e.g., azalea, elm, privet), as well as fruit crops (e.g., sour cherry, strawberry) and vegetable crops (e.g., broccoli, celery, lettuce, onion, pinto bean, potato, squash, tomato).  Damage from foliar nematode is usually cosmetic and non-lethal making ornamental plants less attractive and less saleable.  In severe cases and on particularly susceptible hosts (e.g., strawberry), foliar nematodes can cause extensive leaf injury and defoliation, and can interfere with and limit flowering.

What does foliar nematode damage look like? 

Unlike most other nematodes, which cause root damage, foliar nematodes cause damage to above-ground plant parts, especially leaves.  In young plants, foliar nematodes can cause new growth to curl, twist, and stunt.  In more mature plants, foliar nematodes cause small, discolored, angular (i.e., straight-edged) blotches on leaves.  The blotchy areas are typically bordered by veins.  Blotches eventually turn brown and dry, and may fall away, giving the leaf a “shot-holed” appearance.  Angular blotches often are not apparent until late in the growing season (e.g., August).

Where do foliar nematodes come from? 

Foliar nematodes are typically first introduced into a garden on infected/infested plants brought from another location.  Foliar nematodes can then be spread from infected/infested plants to healthy plants by water splash from rain or overhead watering.  Infections most often occur during periods of high humidity or when films of water form on leaves allowing for nematode movement.  Foliar nematodes can also be spread when infected/infested plants are vegetatively propagated (i.e., when cuttings are taken from infested plants).  Foliar nematodes can survive in dry leaves, dormant buds, and in soil, but not in plant roots.  They can survive in unfavorable (e.g., dry or freezing) conditions and quickly become active when moisture becomes available.

Striped dead areas on hosta leaves typical of infections by foliar nematodes.

How do I save a plant with foliar nematodes? 

Eliminating foliar nematodes is virtually impossible.  No chemical products are available for foliar nematode control in home gardens.  Hot water treatments have been developed to treat high-value plants but are not recommended for home gardeners.  Exact temperatures/timings for these treatments vary depending on the type of plant being treated, and missteps in timing/temperature can either kill plants or can lead to less than 100% control of the nematodes.  If you have plants infected with foliar nematodes, the best course of action is to dig them up, bag them and remove them from your garden as soon as you notice symptoms to reduce the risk of the nematodes spreading to healthy plants.  After working with infected plants, wash your hands with soap and water and decontaminate anything that has come into contact with the plants (e.g., tools, pots, bench surfaces, etc.) for 30 seconds with either 70% alcohol (e.g., rubbing alcohol, certain spray disinfectants) or 10% bleach.  If you use bleach, be sure to thoroughly rinse and oil metal tools to prevent rusting.  Because soil is virtually impossible to decontaminate, avoid planting susceptible hosts in an area where foliar nematodes have been a problem.

How do I avoid foliar nematode problems in the future? 

The easiest way to avoid problems with foliar nematodes is to not bring them into your garden.  Carefully inspect plants for nematode symptoms before purchase, but keep in mind that plants may not show symptoms early in the growing season.  Avoid using overhead sprinklers, as watering in this manner can splash foliar nematodes from plant to plant and promote spread.  Instead use a soaker or drip hose that applies water directly to the soil, rather than onto leaves.  Space plants far enough apart so that potential spread via water splash during natural rains is minimized, and avoid working with plants when they are wet.  DO NOT use foliar nematode-infected plants or even healthy-looking plants suspected to be infested with foliar nematodes when taking cuttings to propagate plants.

For more information on foliar nematodes: 

Contact the University of Wisconsin Plant Disease Diagnostics Clinic (PDDC) at (608) 262-2863 or pddc@wisc.edu.


This Fact Sheet is also available in PDF format:

*Completed as partial fulfillment of the requirements for a BS in Plant Pathology at the University of Wisconsin Madison.

© 2014-2024 the Board of Regents of the University of Wisconsin System doing business as University of Wisconsin-Madison Division of Extension.

An EEO/Affirmative Action employer, University of Wisconsin-Madison Division of Extension provides equal opportunities in employment and programming, including Title IX and ADA requirements. This document can be provided in an alternative format by calling Brian Hudelson at (608) 262-2863 (711 for Wisconsin Relay).

References to pesticide products in this publication are for your convenience and are not an endorsement or criticism of one product over similar products. You are responsible for using pesticides according to the manufacturer’s current label directions. Follow directions exactly to protect the environment and people from pesticide exposure. Failure to do so violates the law.

Thanks to Bryan Jensen, Anette Phibbs and Ken Williams for reviewing this document.

A complete inventory of UW Plant Disease Facts is available at the University of Wisconsin-Madison Plant Disease Diagnostics Clinic website: https://pddc.qa.webhosting.cals.wisc.edu.

Submit additional lawn, landscape, and gardening questions at https://hort.extension.wisc.edu/ask-a-gardening-question/.

Fire Blight

Extension Logo

UW Plant Disease Facts


Authors:   Ann Joy and Brian Hudelson, UW-Madison Plant Pathology
Last Revised:   03/01/2024
D-number:   D0052

What is fire blight? 

Fire blight is the most destructive bacterial disease affecting plants in the rose family, including apple, pear, crabapple, hawthorn, cotoneaster, mountain ash, quince, rose, firethorn (Pyracantha), and spirea.  It can disfigure or kill a tree or shrub, depending on the susceptibility of the host and weather conditions.

A shepherd’s crook at the end of an apple branch caused by fire blight.

What does fire blight look like? 

Blossoms, leaves, twigs, and branches of plants affected by fire blight can turn dark brown to black, giving them the appearance of having been scorched in a fire.  Blighted blossoms and leaves tend to stay on the tree instead of falling.  The current year’s twigs often wilt and bend approximately 180°, forming a “shepherd’s crook.”  Cankers (sunken, discolored areas) form on branches and stems, and emit a sticky bacterial ooze.  Sapwood under the bark around cankers can become reddish brown in color.  Fruits can develop brown, sunken or shriveled areas that can be sticky.

Where does fire blight come from? 

Fire blight is caused by the bacterium Erwinia amylovora, which overwinters on the margins of branch cankers and starts to multiply when temperatures rise in the spring.  A bacterium-laden ooze seeps from cankers, and splashing rain and insects disperse this material.  In particular, pollinators such as honeybees can feed on the ooze and then transport the fire blight bacterium to flowers as they collect pollen.  The fire blight bacterium multiplies in blossoms and eventually can spread to other plant parts where it penetrates through wounds and natural openings.  Once the bacterium enters a plant, it can spread rapidly through the plant’s water-conducting (vascular) system.

How do I save a plant with fire blight? 

There is no cure for fire blight, but its spread can be limited by pruning out diseased branches.  Because the fire blight bacterium can spread rapidly, prune as soon as possible after symptoms become visible.  Prune when branches are dry and when your local weather service predicts several days of dry weather.  When removing diseased branches, prune at least 12 inches below tissue showing visible symptoms.  Always disinfect pruning tools after each cut by treating them for at least 30 seconds with bleach [diluted to a final concentration of approximately 0.5% sodium hypochlorite (the active ingredient)] or (preferably) 70% alcohol (e.g., rubbing alcohol, certain spray disinfectants).  If you use bleach, be sure to thoroughly rinse and oil your tools after pruning to prevent rusting.  Burn or bury pruned branches.

How do I avoid problems with fire blight in the future? 

By far the most effective strategy is to choose plants with fire blight resistance.  Also, select a well-drained site with a soil pH of 5.5 to 6.5.  Avoid applying high levels of nitrogen fertilizer, as this may stimulate new, succulent growth that is more prone to damage and thus infection.  Consider treating with Bordeaux mixture (copper sulfate + lime) before buds open to reduce the level of the fire blight bacterium present on branches.  Make one or two applications, with four days between applications.

For more information on fire blight: 

Contact the University of Wisconsin Plant Disease Diagnostics Clinic (PDDC) at (608) 262-2863 or pddc@wisc.edu.


This Fact Sheet is also available in PDF format:

© 2002-2024 the Board of Regents of the University of Wisconsin System doing business as University of Wisconsin-Madison Division of Extension.

An EEO/Affirmative Action employer, University of Wisconsin-Madison Division of Extension provides equal opportunities in employment and programming, including Title IX and ADA requirements. This document can be provided in an alternative format by calling Brian Hudelson at (608) 262-2863 (711 for Wisconsin Relay).

Thanks to Teryl Roper, Patricia McManus, and Patti Nagai for reviewing this document.

A complete inventory of UW Plant Disease Facts is available at the University of Wisconsin-Madison Plant Disease Diagnostics Clinic website: https://pddc.qa.webhosting.cals.wisc.edu.

Submit additional lawn, landscape, and gardening questions at https://hort.extension.wisc.edu/ask-a-gardening-question/.