Authors: Carol Groves, Chase Fritz and Damon Smith, UW-Madison Plant Pathology
Last Revised: 03/01/2024
D-number: D0071
What is leaf blotch?
Leaf blotch is a complex of common fungal diseases of small grains (e.g., wheat, barley, oats and rye), and many grasses. In Wisconsin, winter wheat is the most important commercial crop affected by these diseases with potential yield losses of up to a 30%. Leaf blotch diseases are generally favored by cool, wet, windy weather.
In Wisconsin, leaf blotch diseases can lead to yield losses of up to 30% in small grain crops such as winter wheat. (photo courtesy of Craig Grau)
What does leaf blotch look like?
Symptoms of leaf blotch diseases usually first appear between the veins of lower leaves as chlorotic (i.e, yellow), water-soaked flecks that enlarge to become dry, yellow (eventually red-brown), blocky- to oval-shaped lesions, sometimes surrounded by yellow haloes. Some leaf blotch fungi can infect glumes in seed heads as well as leaves, causing a disease known as glume blotch (see UW Plant Disease Facts D0070, Leaf and Glume Blotch of Small Grains). Glume blotch symptoms include small brown to purple lesions on heads and stems. Rows of tiny black specks (reproductive structures of leaf blotch fungi) are often visible in mature leaf and glume blotch lesions.
Where does leaf blotch come from?
Several species of fungi can cause leaf blotch. These include Zymoseptoria tritici, Parastagonospora nodorum and Stagonospora avenae f. sp. triticae. Z. tritici is the primary cause of leaf blotch of wheat. P. nodorum can cause both leaf and glume blotch. These fungi are quite variable, and variants that infect wheat tend not to cause severe disease on other leaf blotch susceptible hosts and vice versa. Wheat leaf blotch fungi survive in infested wheat residues, wheat seeds, and volunteer wheat plants. Initial infections typically occur in the fall as seedlings emerge, and are caused by spores (called ascospores) that are produced on wheat residue from a previous wheat crop. Infested seed can also be a source spores that cause initial infections. Additional infections can occur the following spring and are due to spores (called conidia) that are produced in lesions on infected wheat plants.
How can I save a wheat crop with leaf blotch?
In areas with a history of severe leaf blotch diseases, and on wheat varieties susceptible to leaf blotch, preventative applications of fungicide to protect the flag leaf (Feekes 8 and 9 growth stages) may be necessary. However, any decision to apply fungicides should be based on regular, careful scouting. Because heavy rainfall favors leaf blotch development, rain patterns should be considered when determining the frequency of monitoring for disease development. To assess the need for treatments, scout five locations within a given wheat field. Once two of the five areas have 25% or more of leaves showing symptoms of leaf blotch, scouting should be repeated approximately every 4 days. Once three of five areas have 25% or more of leaves exhibiting symptoms, then fungicide applications should be considered.
Blocky to oval brown lesions, often with yellow haloes, are typical of leaf blotch diseases of small grains. (photo courtesy of Craig Grau)
How can I avoid problems with leaf blotch in the future?
Successful management of leaf blotch can be accomplished through an integrated approach that combines use of resistant varieties, pathogen-free seed, crop rotation, proper crop debris management, volunteer wheat eradication, and fungicide treatments. Several sources of complete resistance to specific variants (called races) of leaf blotch fungi are available in commercial wheat varieties. Some partial resistance to many races is also available. These forms of resistance are limited so it is important to use resistance in combination with other management techniques. Use crop rotations that include non-cereal crops for at least a year between successive wheat crops. When possible, deeply incorporate wheat residues by tillage prior to planting to promote more rapid decay of these residues. Note that residues include not only materials left over from a previous wheat crop, but also wheat straw that has been used as animal bedding and then subsequently disposed of by spreading it onto a field. Deep incorporation of residues will help reduce the levels of leaf blotch pathogens in the soil and will assist in managing volunteer wheat. Use of host resistance and cultural techniques such as tillage can help reduce the need for fungicide applications (as described above).
For more information on leaf blotch diseases of wheat:
Contact the University of Wisconsin Plant Disease Diagnostics Clinic (PDDC) at (608) 262-2863 or pddc@wisc.edu.
An EEO/Affirmative Action employer, University of Wisconsin-Madison Division of Extension provides equal opportunities in employment and programming, including Title IX and ADA requirements. This document can be provided in an alternative format by calling Brian Hudelson at (608) 262-2863 (711 for Wisconsin Relay).
Thanks to Diana Alfuth, Craig Grau and Kevan Klingberg for reviewing this document.
A complete inventory of UW Plant Disease Facts is available at the University of Wisconsin-Madison Plant Disease Diagnostics Clinic website: https://pddc.qa.webhosting.cals.wisc.edu.
Authors: P.J. Liesch, UW-Madison Plant Pathology; Vijai Pandian, UW-Extension Brown County; and Jim Kerns, formerly of UW-Madison Plant Pathology
Last Revised: 03/01/2024
D-number: D0069
Snow Mold
Snow Molds
(Microdochium nivale and Typhula spp.)
Occurrence: Early to late spring Favorable Conditions: Cold wet weather with periods of prolonged snow cover over unfrozen ground often leading to the most severe damage Hosts: Kentucky bluegrass, tall fescue, perennial ryegrass Symptoms: Circular, matted, gray to straw-colored patches ranging from a few inches to a foot or more in diameter Management: Remove leaf litter from lawns. Mow lawns until dormant in the fall. Avoid heavy fertilizer applications (greater than 0.5 lb. N/1,000 sq. ft.) late in the year. Rake and lightly fertilize damaged areas in the spring to encourage recovery. Reseed lawns as needed.
Necrotic Ring Spot
Necrotic Ring Spot
(Ophiosphaerella korrae)
Occurrence: Spring, summer and fall Favorable Conditions: Cool (soil temperatures of 55 to 65oF) and wet conditions for infection, followed by heat and drought stress for symptom development; most severe when soil compaction limits rooting Host: Kentucky bluegrass Symptoms: Circular, straw-colored patches usually less than 12 inches in diameter; regrowth often occurring in the center of patches, creating a “frog-eye” appearance; most common in newly sodded lawns, but also occurring in seeded lawns Management: Reduce soil compaction and improve lawn drainage. Maintain proper fertility.
Fairy Ring
Fairy Rings (many mushroom-forming fungi)
Occurrence: Anytime Favorable conditions: Warm, wet weather; significant thatch accumulation Hosts: All cool-season lawn grasses Symptoms:Type I: a ring or arc (up to several feet in diameter) of lush, dark green grass bordered by a band of dead turf, with or without mushrooms; Type II: a ring or arc of lush dark green grass with no band of dead turf, with or without mushrooms; Type III: a ring or arc of mushrooms with no band of lush green turf or dead turf Management: Lightly fertilize and routinely core aerate lawns.
Summer Patch
Summer Patch (Magnaporthiopsis poae)
Occurrence: Summer Favorable conditions: Hot, moist conditions; alkaline (i.e., high) soil and thatch pH Hosts: Kentucky bluegrass, fine fescues Symptoms: Ring-like patches of wilted turf up to 3 inches in diameter, similar to those of necrotic ring spot (see above), and with rings often merging into larger irregular patches Management: Avoid excessive watering during hot periods. Core aerate to promote root growth and reduce compaction. Use acidifying fertilizers to lower thatch pH to below 6.5.
Dollar Spot
Dollar Spot (Clarireedia jacksonii)
Occurrence: Summer Favorable conditions: High humidity; low nitrogen fertility Hosts: Kentucky bluegrass, perennial ryegrass, fine fescues Symptoms: Bleached patches ranging from a few inches to a foot in diameter, with leaf blades (inset) having bleached, hourglass-shaped areas Management: Water deeply and infrequently early in the morning to minimize prolonged periods of leaf wetness. Apply nitrogen to alleviate symptoms.
Red Thread
Red Thread (Laetisaria fuciformis)
Occurrence: Spring through fall Favorable conditions: Wet, cool conditions Hosts: Kentucky bluegrass, perennial ryegrass, fine fescues Symptoms: Irregular beige patches ranging from a few inches to a few feet in diameter (oftentimes merging into irregular patterns) with red, thread-like filaments among the grass blades Management: Collect clippings when disease is active. Maintain adequate nitrogen fertility.
Rust
Rust (Puccinia spp., Uromyces spp.)
Occurrence: Summer and fall Favorable conditions: High humidity, low soil moisture, low nitrogen fertility, shade Hosts: Kentucky bluegrass, perennial ryegrass Stand Symptoms: Reddish-brown, powdery areas (masses of fungal spores) that can discolor clothing and equipment Management: Maximize light and airflow in lawns by pruning and thinning surrounding landscape plants. Water and lightly fertilize.
For more information on lawn diseases:
Contact the University of Wisconsin Turf Diagnostic Lab (TDL) at (608) 845-2535 or hockemeyer@wisc.edu.
An EEO/Affirmative Action employer, University of Wisconsin-Madison Division of Extension provides equal opportunities in employment and programming, including Title IX and ADA requirements. This document can be provided in an alternative format by calling Brian Hudelson at (608) 262-2863 (711 for Wisconsin Relay).
Thanks to Diana Alfuth, Doug Soldat and Karen Schleis for reviewing this document.
A complete inventory of UW Plant Disease Facts is available at the University of Wisconsin-Madison Plant Disease Diagnostics Clinic website: https://pddc.qa.webhosting.cals.wisc.edu.
Authors: Amanda Gevens, Anna Seidl y Brian Hudelson, Departamento de Patología de Plantas, UW-Madison Traducido por Marisol López
Last Revised: 05/11/2011
D-number: D0068S
Tizón Tardío
¿Qué es el tizón tardío?
El tizón tardío es una enfermedad destructiva de los tomates y de las papas que puede matar a las plantas maduras y causar que los frutos del tomate y los tubérculos de la papa no sean comestibles. Esta enfermedad también afecta, aunque típicamente en menor grado, a las berengenas y a los pimientos así como a malezas relacionadas como la hierba mora. Históricamente, el tizón tardío fue el responsable de la hambruna irlandesa de la papa, que causó la muerte de por lo menos un millón de irlandeses, y la emigración de otro millón de ellos a Gran Bretaña, Estados Unidos, Australia, Canadá y otros países. Recientemente, la enfermedad causó pérdidas graves a productores de tomates frescos para el mercado y a jardineros en Wisconsin.
El tizón tardío puede diezmar a las plantas de tomate y papa en siete a diez días si las condiciones del clima son frescas y húmedas.
¿Cómo es el tizón tardío?
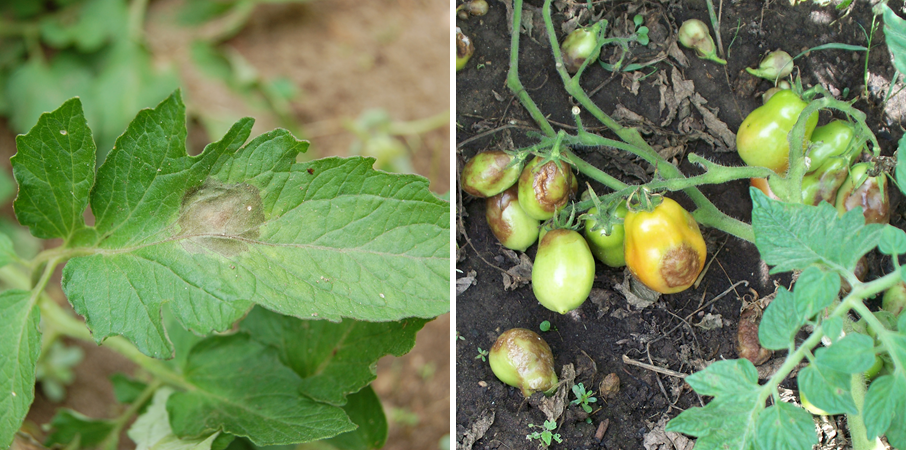
En las hojas del tomate y la papa, el tizón tardío comienza a verse como áreas de color verde claro o verde olivo que rápidamente se agrandan volviendose marrón negruzcas, como empapadas de agua y de apariencia oleosa. Los tallos también pueden exhibir áreas de color marrón oscuro a negro. Si las condiciones del clima son frescas y húmedas, las plantas enteras pueden colapsar y morir de tizón tardío en 7 a 10 días. Los frutos del tomate con tizón tardío desarrollan manchas grandes, firmes, casi siempre hundidas, de color dorado a marrón chocolate y con anillos distintivos. Los tubérculos de papa con la enfermedad, desarrollan áreas con una decoloración rojiza a marrón debajo de la cáscara que pueden después hundirse. El tejido de la hoja, tallo, fruto o tubérculo, afectado con la enfermedad, con el tiempo casi siempre desarrolla un aspecto velloso de blanco a gris, cuando el organismo de tizón tardío comienza a reproducirse. Otras enfermedades del tomate y la papa como la mancha de la hoja causada por Septoria (vea University of Wisconsin Garden Facts XHT1073), tizón temprano (vea University of Wisconsin Garden Facts XHT1074) y marchitez causada por Verticillium pueden ser confundidas con tizón tardío.
¿Cómo evito problemas de tizón tardío en el futuro?
En la primavera, elimine cualquier planta voluntaria de tomate o de papa (y malezas como hierba mora) de la manera descrita anteriormente. Todas estas plantas son fuentes posibles de P. infestans. Por el mismo motivo, NO use los tubérculos de la cosecha de papa de un año anterior como semillas de papa. En lugar de eso, compre cada año semillas de papa certificadas de un proveedor reputable. También considere plantar variedades de tomate resistentes al tizón tardío. Esas variedades incluyen “Better Boy”, “Golden Sweet”, “Green Zebra”, “Juliet”, “Legend”, “Magic Mountain”, “Matt’s Wild Cherry”, “Pruden’s Purple”, “Regal Plum”, “Roma”, “Slava”, “Stupice”, “Sun Sugar”, “Wapsipinicon”, y “Wisconsin 55”. El desempeño de estas variedades puede variar dependiendo de la variante de P. infestans que está presente en una temporada de cultivo en particular, y también dependiendo de las condiciones del clima. Sin embargo, “Magic Mountain” y “Regal Plum” han demostrado una excelente resistencia a muchas variantes del organismo de tizón tardío en un amplio rango de condiciones ambientales.
Los fungicidas también pueden ser usados para reducir el impacto del tizón tardío. Sin embargo, las aplicaciones de fungicidas, para que sean efectivas, deben de hacerse antes de que comience la enfermedad. Las aplicaciones de fungicidas no son necesarias durante períodos de clima caliente y seco porque P. infestans no tiene probabilidades de ser activo bajo estas condiciones. Los fungicidas tienen la mayor probabilidad de ser efectivos durante períodos de clima fresco y húmedo. Sin embargo, si las condiciones del clima son excesivamente frescas y húmedas, aunque el fungicida se aplique en el tiempo apropiado quizás no provea un control adecuado contra el tizón tardío. Si usted decide usar fungicidas, seleccione un producto específico para el uso en tomates (o papas) y que contenga chorotalonil o cobre como ingrediente activo. Algunos, pero no todos, los productos que contienen cobre pueden ser usados para la producción de vegetales orgánicos. Asegúrese de seguir las indicaciones de la etiqueta para garantizar que el producto que usted seleccione sea usado de la manera más segura y efectiva posible.
¿De dónde viene el tizón tardío?
El tizón tardío es causado por el hongo acuático Phytophthorainfestans. Hay varias variantes de este organismo. Algunas variantes causan problemas severos en los tomates; otras son un problema mayor en las papas. P. infestans puede ser introducido cuando las esporangias (es decir, estructuras similares a las esporas) del organismo son transportadas a un área donde prevalecen vientos. P. infestans también puede ser introducido en plantas infectadas (ej. plántulas de tomates) o tubérculos de papas que han sido traídos a un área para la venta. Es improbable que P. infestans sobreviva durante el invierno en los suelos de Wisconsin. Sin embargo, el organismo puede sobrevivir en restos de plantas infectadas que permanecen vivas durante el invierno. Estos restos de plantas pueden incluir plantas de tomate infectadas con P. infestans o frutos mantenidos temperados en acumulaciones de abono, y tubérculos de papas infectados con P. infestans que han quedado en la tierra después de la cosecha o que han sido almacenadas en un lugar cálido.
¿Cómo salvo a una planta con tizón tardío?
Las plantas que muestran síntomas de tizón tardío no pueden ser salvadas y deben de ser eliminadas de forma inmediata para limitar la propagación de P. infestans a otras plantas. Para los jardineros caseros, el método preferido de eliminación es sacar las plantas afectadas (con raíz y todo) y ponerlas en bolsas de plástico. Las bolsas deberán dejarse al sol por algunos días para asegurarse que las plantas, así como cualquier P. infestans, estén totalmente muertos. Las plantas en las bolsas pueden luego ponerse en la basura para ser recogida. Las plantas o partes de plantas enfermas (ej. frutos del tomate o tubérculos de papa) NO deben de ser usados para hacer abono. Los frutos de plantas de tomate afectadas por tizón tardío que se vean saludables se pueden comer o conservar sin peligro. Sin embargo, antes de intentar conservar cualquier fruta o vegetal, contacte a la oficina de UW-Extensión de su condado para obtener las instrucciones más actualizadas sobre la conservación de alimentos. Una vez que los frutos del tomate o los tubérculos de la papa comienzan a presentar los síntomas de tizón tardío, NO deben de ser comidos o enlatados o conservados de alguna otra manera.
En las hojas del tomate (izquierda), el tizón tardío produce áreas de color marrón negruzcas, como empapadas de agua y de apariencia oleosa que pueden tener aspecto velloso de blanco a gris. En los frutos del tomate (derecha), el tizón tardío produce manchas grandes, firmes, casi siempre hundidas, de color dorado a marrón chocolate, con anillos distintivos.
¿Cómo evito problemas de tizón tardío en el futuro?
En la primavera, elimine cualquier planta voluntaria de tomate o de papa (y malezas como hierba mora) de la manera descrita anteriormente. Todas estas plantas son fuentes posibles de P. infestans. Por el mismo motivo, NO use los tubérculos de la cosecha de papa de un año anterior como semillas de papa. En lugar de eso, compre cada año semillas de papa certificadas de un proveedor reputable. También considere plantar variedades de tomate resistentes al tizón tardío. Esas variedades incluyen “Better Boy”, “Golden Sweet”, “Green Zebra”, “Juliet”, “Legend”, “Magic Mountain”, “Matt’s Wild Cherry”, “Pruden’s Purple”, “Regal Plum”, “Roma”, “Slava”, “Stupice”, “Sun Sugar”, “Wapsipinicon”, y “Wisconsin 55”. El desempeño de estas variedades puede variar dependiendo de la variante de P. infestans que está presente en una temporada de cultivo en particular, y también dependiendo de las condiciones del clima. Sin embargo, “Magic Mountain” y “Regal Plum” han demostrado una excelente resistencia a muchas variantes del organismo de tizón tardío en un amplio rango de condiciones ambientales.
Los fungicidas también pueden ser usados para reducir el impacto del tizón tardío. Sin embargo, las aplicaciones de fungicidas, para que sean efectivas, deben de hacerse antes de que comience la enfermedad. Las aplicaciones de fungicidas no son necesarias durante períodos de clima caliente y seco porque P. infestans no tiene probabilidades de ser activo bajo estas condiciones. Los fungicidas tienen la mayor probabilidad de ser efectivos durante períodos de clima fresco y húmedo. Sin embargo, si las condiciones del clima son excesivamente frescas y húmedas, aunque el fungicida se aplique en el tiempo apropiado quizás no provea un control adecuado contra el tizón tardío. Si usted decide usar fungicidas, seleccione un producto específico para el uso en tomates (o papas) y que contenga chorotalonil o cobre como ingrediente activo. Algunos, pero no todos, los productos que contienen cobre pueden ser usados para la producción de vegetales orgánicos. Asegúrese de seguir las indicaciones de la etiqueta para garantizar que el producto que usted seleccione sea usado de la manera más segura y efectiva posible.
Para obtener más información sobre tizón tardío:
Vea el boletín UW-Extensión A3422, o contacte al agente de Extensión de su condado.
An EEO/Affirmative Action employer, University of Wisconsin-Madison Division of Extension provides equal opportunities in employment and programming, including Title IX and ADA requirements. This document can be provided in an alternative format by calling Brian Hudelson at (608) 262-2863 (711 for Wisconsin Relay).
References to pesticide products in this publication are for your convenience and are not an endorsement or criticism of one product over similar products. You are responsible for using pesticides according to the manufacturer’s current label directions. Follow directions exactly to protect the environment and people from pesticide exposure. Failure to do so violates the law.
Gracias a Ann Joy, Kristin Krokowski, Barb Larson, Maria del Pilar Marquez, Patti Nagai y Ann Wied por revisar este documento.
A complete inventory of UW Plant Disease Facts is available at the University of Wisconsin-Madison Plant Disease Diagnostics Clinic website: https://pddc.qa.webhosting.cals.wisc.edu.
Authors: Amanda Gevens, Anna Seidl and Brian Hudelson, UW-Madison Plant Pathology
Last Revised: 03/01/2024
D-number: D0068
What is late blight?
Late blight is a destructive disease of tomatoes and potatoes that can kill plants, and make tomato fruits and potato tubers inedible. This disease also affects, although typically to a lesser extent, weeds such as nightshade. Historically, late blight was responsible, in part, for the Irish potato famine, which led to the death of at least one million Irish, and the emigration of another one million Irish to Great Britain, the United States, Australia, Canada and other countries. The disease routinely causes severe losses for fresh market tomato producers and home gardeners in Wisconsin.
Late blight can decimate tomato and potato plants in seven to 10 days if weather conditions are cool and wet.
What does late blight look like?
On leaves of tomato or potato, late blight begins as pale-green or olive-green areas that quickly enlarge to become brown-black, water-soaked, and oily-looking. Stems can also exhibit dark-brown to black areas. If weather conditions are cool and wet, entire plants can collapse and die from late blight in seven to 10 days. Tomato fruits with late blight develop large, often sunken, golden- to chocolate-brown, firm spots with distinct rings. Potato tubers with the disease develop a reddish-brown discoloration under the skin and these areas may become sunken. Affected leaf, stem, fruit or tuber tissue often eventually develops a white-gray, fuzzy look as the late blight organism begins to reproduce. Other tomato and potato diseases such as Septoria leaf spot (see UW Plant Disease Facts D0100, Septoria Leaf Spot), early blight (see UW Plant Disease Facts D0046, Early Blight) and Verticillium wilt (see UW Plant Disease Facts D0122, Verticillium Wilt of Vegetables) may be misidentified as late blight.
Where does late blight come from?
Late blight is caused by the fungus-like water mold Phytophthora infestans. There are several variants or strains of this organism. Some variants/strains cause more severe problems on tomatoes; others are more of a problem on potatoes. P. infestans can be introduced when sporangia (i.e., spore-like structures) of the organism are blown into an area on prevailing winds. P. infestans can also be introduced on infected plants (e.g., tomato seedlings) or potato tubers that are brought into an area for sale. P. infestans is unlikely to survive over the winter in Wisconsin soils. However, the organism can survive on infected plant material that remains alive through the winter. Such plant materials can include P. infestans-infected tomato plants or fruits kept warm in compost piles, and P. infestans infected potato tubers that have remained in the soil after harvest or have been stored in a warm place.
How do I save a plant with late blight?
Plants showing symptoms of late blight cannot be saved and should be disposed of immediately to limit spread of P. infestans to other plants. For home gardeners, the preferred method of disposal is to pull affected plants (roots and all), and place them in plastic bags. The bags should be left in the sun for a few days to make sure that plants, as well as any P. infestans, are totally killed. Bagged plants should then be put out for trash pickup. Diseased plants or plant parts (e.g., tomato fruits or potato tubers) should NOT be composted. Healthy-looking fruits from late-blight-affected tomato plants are safe to eat or preserve. However, before attempting to preserve any fruit or vegetable, contact your county UW-Extension office for the most current food preservation instructions. Once tomato fruits or potato tubers begin to show symptoms of late blight, they should NOT be eaten, nor should they be canned or otherwise preserved.
On tomato leaves (left), late blight leads to brown-black, water-soaked, oily areas that may have a white-gray fuzzy look. On tomato fruits (right), late blight leads to large, often sunken, golden- to chocolate-brown, firm spots with distinct rings.
How do I avoid problems with late blight in the future?
In the spring, dispose of any volunteer tomato and potato plants (as well as weeds such as nightshade) as described above. All of these plants are potential sources of P. infestans. For the same reason, DO NOT use tubers from a previous year’s potato crop as seed potatoes. Instead purchase certified seed potatoes from a reputable supplier each year. Also, consider planting tomato varieties with late blight tolerance or resistance. Such varieties include ‘Defiant PHR’, ‘Iron Lady’, ‘Jasper’, ‘JTO-545’, ‘Lemon Drop’, ‘Matt’s Wild Cherry’, ‘Mountain Magic’, ‘Mountain Merit’, ‘Mr. Stripey’, ‘Plum Regal’, ‘Pruden’s Purple’, ‘Stellar’ and ‘Wapsipinicon Peach.’ The performance of these varieties may vary depending on the variant or strain of P. infestans that is present in a particular growing season, and depending on the weather conditions. Consider planting several resistant tomato varieties to help ensure that no matter what P. infestans variant is prevalent in a given year, you will have some healthy tomato plants and fruits.
Fungicides also can be used to reduce the impact of late blight. However, fungicide applications must be made prior to the onset of disease or they will be ineffective. Fungicide applications are not needed during periods of hot, dry weather as P. infestans is not likely to be active under these conditions. Fungicides are most likely to be useful during periods of cool, wet weather. However, if weather conditions are excessively cool and wet, even properly-timed fungicide applications may not provide adequate late blight control. If you decide to use fungicides, select a product that is labeled for use on tomatoes (or potatoes) and that contains chlorothalonil or copper as the active ingredient. Certain, but not all, copper-containing products can be used for organic vegetable production. Be sure to follow all label instructions to ensure that you use the product that you select in the safest, most effective means possible. For more information on home garden fungicides for vegetable disease control, see UW Plant Disease Facts D0062, Home Vegetable Garden Fungicides.
For more information on late blight:
Contact the University of Wisconsin Plant Disease Diagnostics Clinic (PDDC) at (608) 262-2863 or pddc@wisc.edu.
An EEO/Affirmative Action employer, University of Wisconsin-Madison Division of Extension provides equal opportunities in employment and programming, including Title IX and ADA requirements. This document can be provided in an alternative format by calling Brian Hudelson at (608) 262-2863 (711 for Wisconsin Relay).
References to pesticide products in this publication are for your convenience and are not an endorsement or criticism of one product over similar products. You are responsible for using pesticides according to the manufacturer’s current label directions. Follow directions exactly to protect the environment and people from pesticide exposure. Failure to do so violates the law.
Thanks to Kristin Krokowski, Barb Larson, Patti Nagai and Ann Wied for reviewing this document.
A complete inventory of UW Plant Disease Facts is available at the University of Wisconsin-Madison Plant Disease Diagnostics Clinic website: https://pddc.qa.webhosting.cals.wisc.edu.
Authors: Ann Joy and Brian Hudelson, UW-Madison Plant Pathology
Last Revised: 03/01/2024
D-number: D0067
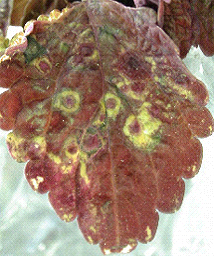
Ringspots on coleus leaf caused by impatiens necrotic spot virus. (Photo courtesy of Margaret Daughtrey)
What is impatiens necrotic spot?
Impatiens necrotic spot is a viral disease that causes considerable losses to greenhouse-grown ornamentals and, to a lesser extent, vegetable crops. In the southern United States, impatiens necrotic spot can also be a problem on field crops. Ornamental crops affected by impatiens necrotic spot include impatiens, gloxinia, cineraria, cyclamen, exacum, petunia, begonia, primrose and ranunculus. Susceptible vegetables include cucumber, tomato and pepper. Impatiens necrotic spot also affects weeds including chickweed, jewelweed, oxalis, and gill-over-the-ground.
What does impatiens necrotic spot look like?
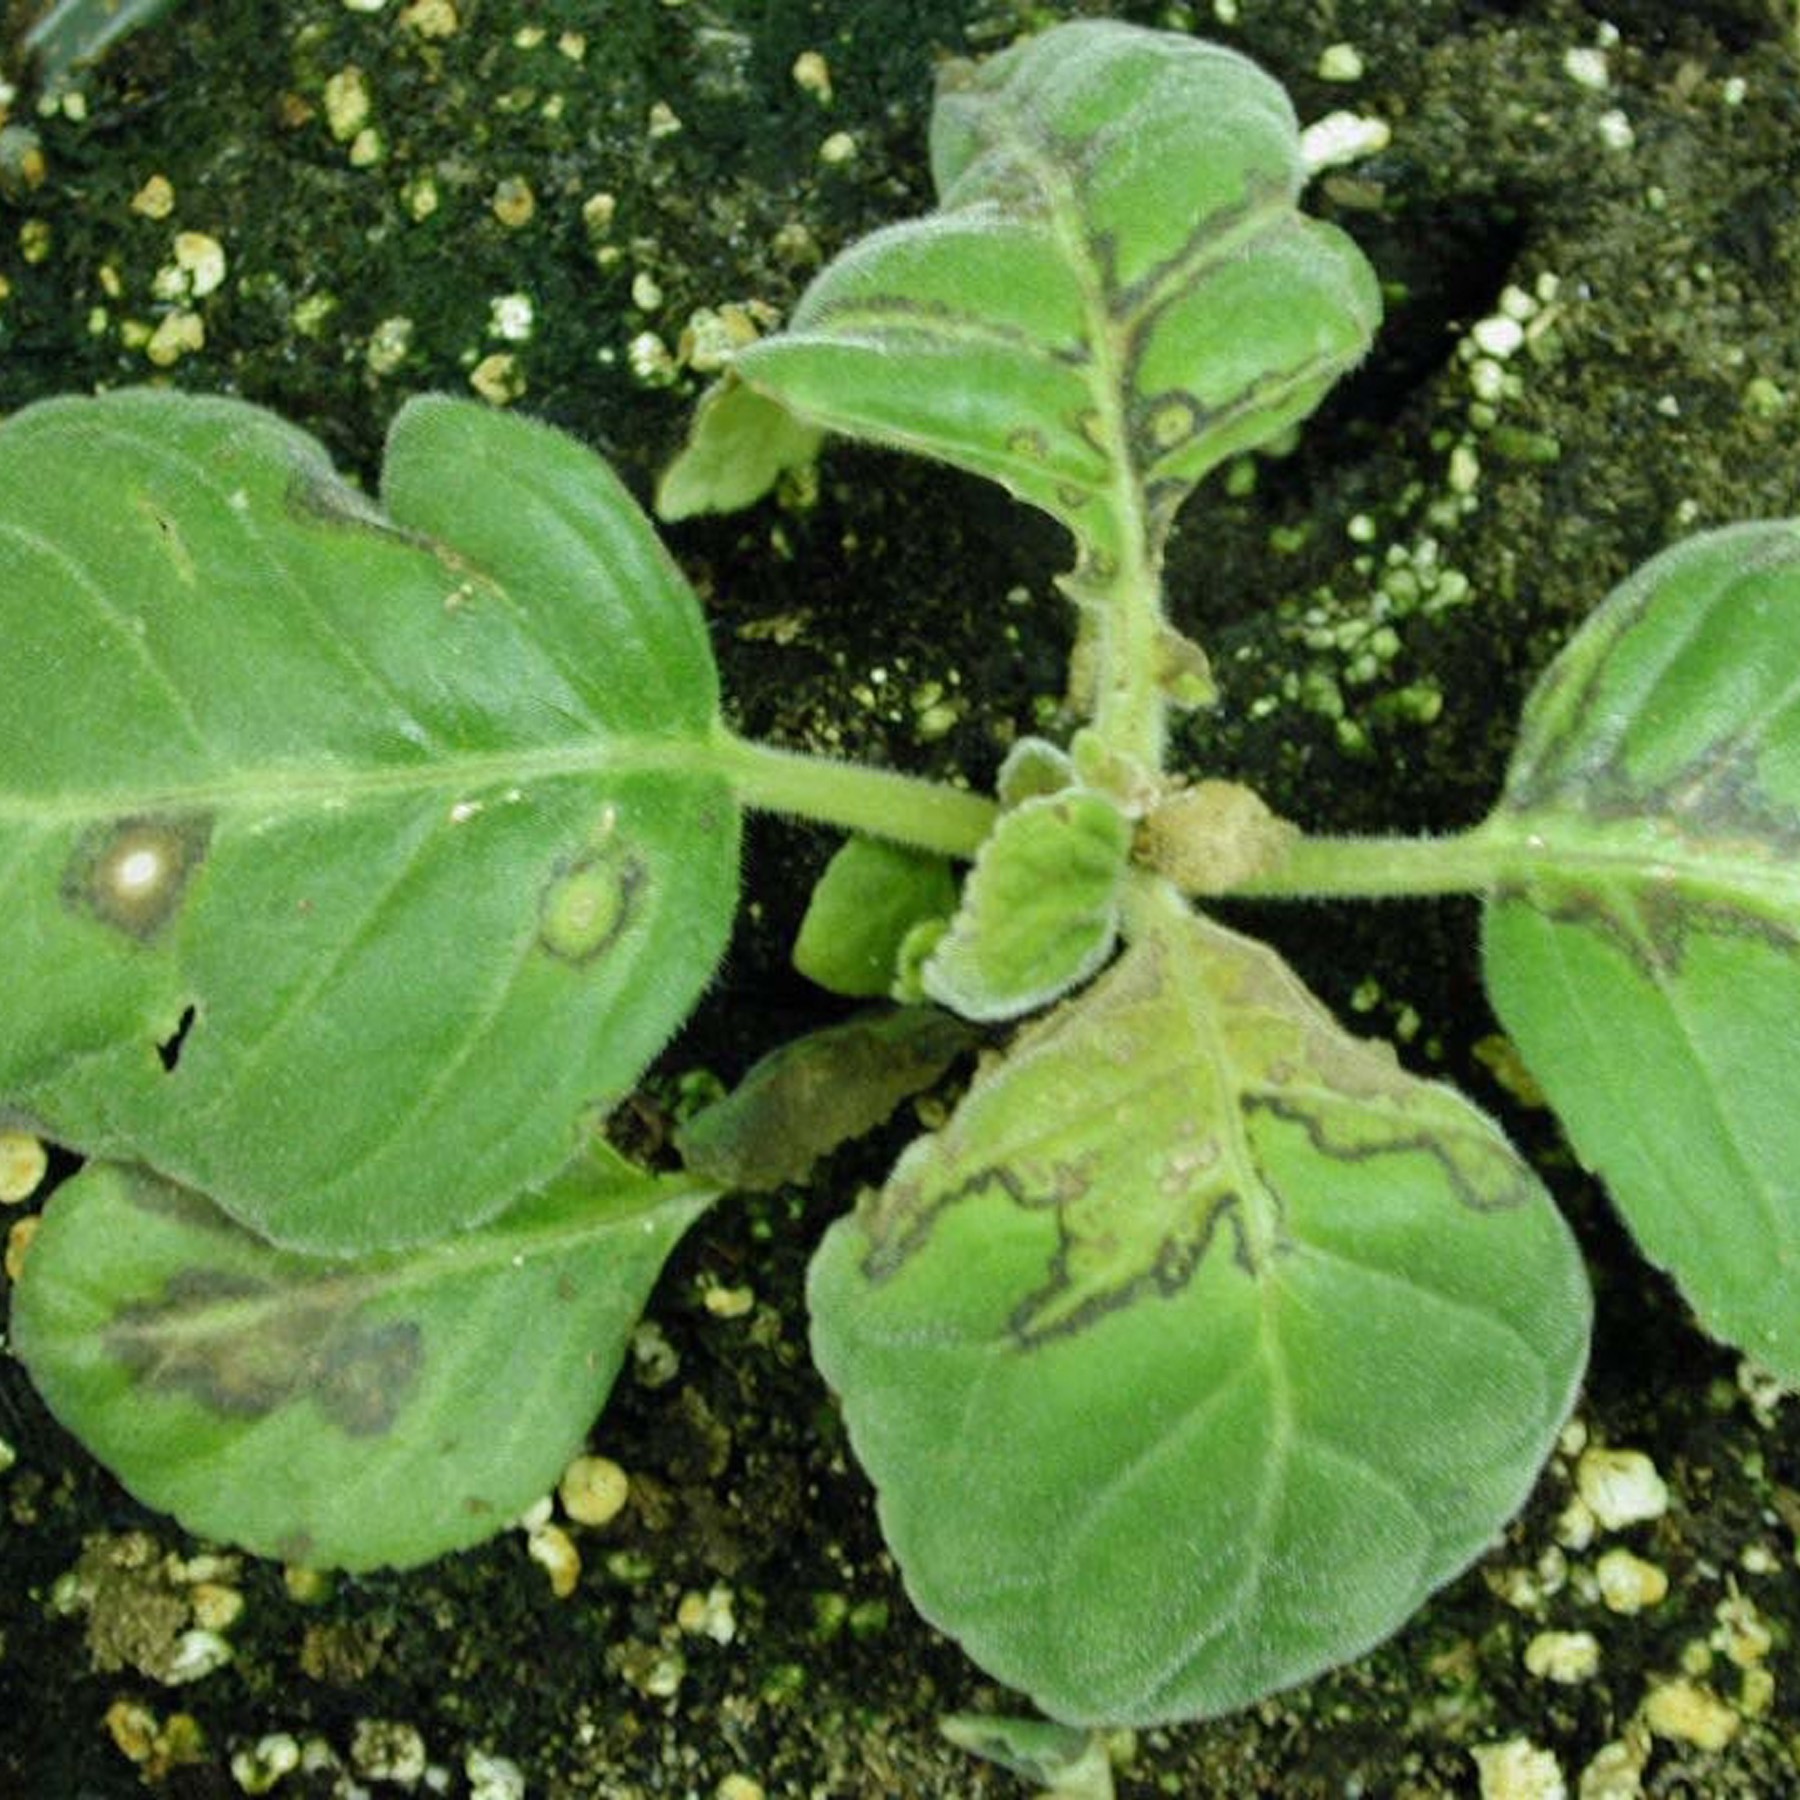
Symptoms vary from species to species and from cultivar to cultivar. Environmental conditions can also influence symptom development. Infected plants may exhibit chlorotic or necrotic spotting; stem, vein or growing point necrosis; ringspots, mosaic or line patterns on leaves; color break in flowers; wilting and collapse. Plants that are infected at a young age tend to exhibit more severe symptoms than those infected at an older age. Some plants may remain symptomless but still can be a source of the causal virus, leading to infection other plants.
Where does impatiens necrotic spot come from?
Impatiens necrotic spot is caused by the Impatiens necrotic spot virus (INSV). The primary means of plant-to-plant spread of INSV is by the western flower thrips (Frankliniella occidentalis). This insect acquires INSV when feeding on infected plant sap, carries the virus to its next feeding site, and transmits the virus to the new plant after 15 to 30 minutes of feeding. Only a few thrips are needed to spread INSV rapidly throughout a greenhouse. Numbers of INSV-infected plants also can be increased simply by taking vegetative cuttings from infected plants.
How do I save a plant with impatiens necrotic spot?
After infection, INSV spreads throughout a plant. Therefore plants remain infected indefinitely. Infected plants cannot be treated to remove the virus and should be destroyed by burning (where allowed by local ordinance), burying or composting.
Symptoms of impatiens necrotic spot on Gloxinia. (Photo courtesy of Margaret Daughtrey)
How do I control impatiens necrotic spot in the future?
Impatiens necrotic spot control focuses on excluding INSV and preventing its spread. Inspect any plants entering a greenhouse (e.g., new plant shipments, plants moved in from outdoors) for viral symptoms and thrips. Isolate new plants until they are determined to be thrips- and virus-free. In commercial settings, isolate breeding and stock plants from production, and do not carry over plants from fall production into the spring. Destroy any symptomatic plants. Control greenhouse weeds, which can be symptomless reservoirs of INSV. Monitor and control thrips populations. Exclude thrips by screening greenhouse vents and doors (screening should have apertures that are ≤0.135 mm). Set up yellow, white or blue sticky traps to monitor for thrips in growing areas and near greenhouse entry points. Indicator plants such as Petunia x hybrida ‘Summer Madness’, ‘Super Magic Coral’, or ‘Red Cloud’ (with flowers removed) can provide early warning signs of a problem with thrips. Petunia leaves on which INSV-free thrips feed will develop whitish feeding scars, while those leaves on which INSV-carrying thrips feed will develop small brown to black spots, turning tan with a dark border. See also University of Wisconsin Garden Facts XHT1022, Managing Thrips in Greenhouses, for additional pointers on thrips control, including insecticide recommendations.
For more information on impatiens necrotic spot:
Contact the University of Wisconsin Plant Disease Diagnostics Clinic (PDDC) at (608) 262-2863 or pddc@wisc.edu.
An EEO/Affirmative Action employer, University of Wisconsin-Madison Division of Extension provides equal opportunities in employment and programming, including Title IX and ADA requirements. This document can be provided in an alternative format by calling Brian Hudelson at (608) 262-2863 (711 for Wisconsin Relay).
References to pesticide products in this publication are for your convenience and are not an endorsement or criticism of one product over similar products. You are responsible for using pesticides according to the manufacturer’s current label directions. Follow directions exactly to protect the environment and people from pesticide exposure. Failure to do so violates the law.
Thanks to Tom German, Andy Witherell and Anna Whitfield for reviewing this document.
A complete inventory of UW Plant Disease Facts is available at the University of Wisconsin-Madison Plant Disease Diagnostics Clinic website: https://pddc.qa.webhosting.cals.wisc.edu.
Impatiens downy mildew is a serious threat wherever impatiens are grown, including Wisconsin. Impatiens downy mildew has been so destructive in the past that it has made impatiens unusable as a garden ornamental. The disease affects garden impatiens (Impatiens walleriana and I. balsamina), as well as native jewelweeds (I. pallida and I. capensis). New Guinea impatiens (I. hawkerii) and its hybrids appear to be either resistant to or tolerant of the disease. Other common garden ornamentals are immune to impatiens downy mildew and thus not affected by the disease.
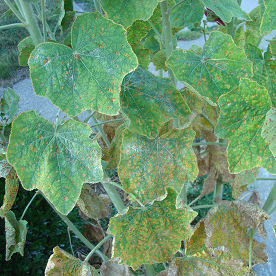
White, fuzzy growth on the lower leaf surfaces of impatiens leaves is typical of impatiens downy mildew. (Photo courtesy of Kelly Ivors)
What does impatiens downy mildew look like?
Symptoms of impatiens downy mildew often first occur on leaves near the tips of branches. Initial symptoms include an irregular yellow-green discoloration of leaves that can be confused with spider mite feeding injury. Affected leaves often curl downwards. Stunting and reduced flowering are other common symptoms. As the disease progresses, leaves and flowers drop off, leaving a bare stem. Eventual death of affected plants can occur. The most distinctive characteristic of impatiens downy mildew is the presence of a fuzzy white material (actually the organism that causes the disease) that develops on stems, buds and particularly the under sides of leaves.
Where does impatiens downy mildew come from?
Impatiens downy mildew is caused by the fungus-like water mold Plasmopara obducens. This organism is commonly first introduced into a garden on infected impatiens transplants. It can also be introduced by windborne spore-like structures called sporangia. Once established in a garden, P. obducens can spread from plant to plant by wind or splashing water (e.g., rain, overhead sprinkling). Cool, wet/humid weather favors disease development. P. obducens can potentially overwinter in a garden in the form of specialized spores called oospores. These spores can be found in soil and in infested plant debris. Whether P. obducens can be introduced via impatiens seed is unclear.
How can I save a plant with impatiens downy mildew?
Plants with impatiens downy mildew are unlikely to recover and can be a source of sporangia that can infect other impatiens plants, as well as a source of oospores that can allow P. obducens to overwinter in a garden. If you see impatiens downy mildew, remove symptomatic plants (roots and all), place them in sealed plastic bags and throw them away in the garbage; DO NOT compost these plants. Also consider removing all impatiens within a three-foot radius of symptomatic plants. These plants are likely infected but not yet showing downy mildew symptoms. DO NOT use fungicides on plants that are showing symptoms as such treatments will not be effective.
How can I avoid problems with impatiens downy mildew in the future?
Use a wide variety of bedding plants in your garden. A diverse plant selection can limit the spread of disease-causing organisms (like P. obducens) and limit the impact of diseases when they occur. Plants such as alternanthera, begonia, coleus, iresine and torenia are possible alternatives to impatiens.
If you decide to plant impatiens in your garden, consider using New Guinea impatiens or one its hybrids (e.g., ‘Sunpatiens’), which appear to be resistant or at least tolerant to downy mildew. Newer varieties of garden impatiens (the Beacon and Imara XDR series) that have been bred for downy mildew resistance are also now available. Keep in mind however that even resistant varieties can potentially develop downy mildew, and the severity of the disease will depend on environmental conditions. Inspect impatiens plants carefully for symptoms of downy mildew prior to purchase. DO NOT buy infected plants. Once you have purchased your impatiens, DO NOT plant them right away. Keep them in a holding area and watch them for symptom development. Obvious symptoms of impatiens downy mildew may not appear for five to 14 days. Keep plants from different sources (e.g., different greenhouses) as far apart as possible. That way, if impatiens plants from one source are infected, you can limit spread to other plants.
When planting your beds, DO NOT use impatiens in the same areas as you did last year; remember that P. obducens can potentially overwinter as oospores in soil and old impatiens debris. Space impatiens plants as far apart as possible. This will promote good air flow and promote drier conditions that are less favorable for downy mildew development. For the same reason, avoid overhead watering (e.g., watering with a sprinkler). Instead, use a soaker or drip hose to apply water gently to the soil without splashing it onto leaves.
As a last resort, consider applying fungicide treatments for control. Use a fungicide that contains the active ingredient mancozeb and that is labeled for use on impatiens. Start applications before symptoms are present, and be sure to read and follow all label instructions of the fungicide that you select to ensure that you use the product in the safest and most effective manner possible. Apply the fungicide per label directions as long as weather conditions (i.e., wet or humid weather) are favorable for disease development.
For more information on impatiens downy mildew:
Contact the University of Wisconsin Plant Disease Diagnostics Clinic (PDDC) at (608) 262-2863 or pddc@wisc.edu.
An EEO/Affirmative Action employer, University of Wisconsin-Madison Division of Extension provides equal opportunities in employment and programming, including Title IX and ADA requirements. This document can be provided in an alternative format by calling Brian Hudelson at (608) 262-2863 (711 for Wisconsin Relay).
Thanks to Diana Alfuth, Bill Halfman, Karen Lind, Tom Lind, Patti Nagai, Isael Rubio and José Pablo Soto-Arias for reviewing this document.
A complete inventory of UW Plant Disease Facts is available at the University of Wisconsin-Madison Plant Disease Diagnostics Clinic website: https://pddc.qa.webhosting.cals.wisc.edu.
Huitlacoche can be an excellent source of carbohydrates, proteins, fats, vitamins and minerals. (photo courtesy of CIMMYT)
What is huitlacoche?
Huitlacoche is the Native American name for the mushroom-like masses found on the ears of corn and corn relatives (collectively called teosinte). Huitlacoche can be a major problem for sweet corn growers where it is referred to as common corn smut (see UW Plant Disease Facts D0031,Common Corn Smut), causing yield and quality losses. However, huitlacoche is also considered a culinary delicacy in many cultures. In Mexico, huitlacoche is considered a gift from the gods, and is commercially available in many markets. In the United States, huitlacoche is less common commercially, but can be found in the ethnic sections of some grocery stores.
What does huitlacoche look like?
Huitlacoche is a tumor-like growth (called a gall) that forms from corn kernels. Galls can swell to ½ to 11 inches in diameter. Huitlacoche initially has a streaked, silvery appearance, but eventually develops a scorched, blackened look. Huitlacoche galls remain smooth until they rupture releasing a black, inky material that eventually becomes sooty, coarse and dry.
Where does huitlacoche come from?
Huitlacoche is actually a corn disease, caused by the fungus Ustilago maydis. The black, inky material released by huitlacoche is a mass of spores produced by the causal fungus. These spores can be easily moved by wind and can survive for many years in soil. Normally U. maydis infects unpollinated corn silks, but the fungus also can infect through wounds caused by heavy wind, heavy rain, or hail.
What can I do with huitlacoche if I find it?
Huitlacoche is edible, has a smoky, earthy taste, and is an excellent source of carbohydrates, proteins, fats, vitamins and minerals. To enjoy the flavor of huitlacoche to its fullest, harvest galls before they begin to dry, but after they have turned dark grey. DO NOT use galls that are powdery inside when split open. If you prefer not to harvest your own huitlacoche, you can purchase canned hutlacoche at your local Mexican market. Although use of hutlacoche as a food originated in Mesoamerica (i.e., parts of Mexico and Central America), like many other gourmet mushrooms, chefs have begun to incorporate huitlacoche into non-traditional dishes including macaroni and cheese, and even ice cream. See http://www.sweetcorn.illinois.edu/Common-smut/Recipes.htm for sample huitlacoche recipes.
How do I encourage more huitlacoche to form?
huitlacoche can be harvested from naturally infected ears of corn, you can increase your yield by artificial inoculation. Prior to pollination, soak corn silks with huitlacoche spores mixed with water. After inoculation, water and fertilize corn plants for optimal growth. If your inoculation is successful, galls should start to form within two weeks. Galls are usually best if harvested 16 to18 days after inoculation.
For more information on huitlacoche:
Contact the University of Wisconsin Plant Disease Diagnostics Clinic (PDDC) at (608) 262-2863 or pddc@wisc.edu.
An EEO/Affirmative Action employer, University of Wisconsin-Madison Division of Extension provides equal opportunities in employment and programming, including Title IX and ADA requirements. This document can be provided in an alternative format by calling Brian Hudelson at (608) 262-2863 (711 for Wisconsin Relay).
References to pesticide products in this publication are for your convenience and are not an endorsement or criticism of one product over similar products. You are responsible for using pesticides according to the manufacturer’s current label directions. Follow directions exactly to protect the environment and people from pesticide exposure. Failure to do so violates the law.
Thanks to Erica Arcibal, Cary Miao, Aracely Portillo, Mike Rankin, Robyn Roberts, Mary Stys and Trisha Wagner for reviewing this document.
A complete inventory of UW Plant Disease Facts is available at the University of Wisconsin-Madison Plant Disease Diagnostics Clinic website: https://pddc.qa.webhosting.cals.wisc.edu.
Hosta virus X (HVX) is a viral disease that causes serious problems on many hosta cultivars, including, but not limited to, ‘Gold Standard’, ‘Guacamole’, ‘June’, ‘Patriot’, ‘Paul’s Glory’, ‘Regal Splendor’, ‘Sagae’, Striptease’, ‘So Sweet’, and ‘Sum and Substance’. Since its identification in 1996, nursery owners and gardeners in the United States have voluntarily destroyed large numbers of hostas to help prevent the spread of HVX.
Blotchy leaf coloring (called mottling), discoloration along leaf veins and puckering of leaf tissue are typical symptoms of Hosta virus X. (Photo courtesy of Anette Phibbs)
What does Hosta virus X look like?
All cultivars of hosta can become infected with HVX, but the type and severity of symptoms that eventually develop depend on the cultivar. Not all hosta cultivars show symptoms and in some cultivars, symptoms do not develop until after the first year of growth. When symptoms are present, they can include light or dark green discolorations along leaf veins, green and yellow mottling of leaf blades, puckering, circular discolored areas (called ringspots), and in some cases, wilting and tissue death (necrosis). Symptoms are easier to distinguish in gold-colored hosta cultivars than in green cultivars. When symptoms are subtle, holding an infected leaf up to the light and comparing it to a healthy leaf can make symptom identification easier.
Where does Hosta virus X come from?
HVX is caused by a plant virus of the same name (i.e., Hosta virus X). This virus only affects hostas. HVX is typically introduced into a garden on new, often asymptomatic hosta transplants. The virus can then be spread from hosta to hosta by use of garden tools (e.g., pruners, shovels, knives, string edgers) and other items that have become contaminated with the sap of infected plants. Many growers are unaware that their hostas are infected and because of this, unknowingly move HVX from hosta to hosta in their garden or nursery.
How do I save a plant with Hosta virus X?
Once a plant has become infected with HVX, it is infected for the remainder of its life. There are no chemical treatments to eliminate the virus. Although a grower’s first instinct is to prune diseased leaves from a symptomatic plant, this can lead to spread of the virus if contaminated pruners are then used to trim other plants. The only way to eliminate the disease is to destroy infected plants (and any associated plant debris) by burning (where allowed by local ordinance) or landfilling. DO NOT compost hostas with HVX.
How do I avoid problems with Hosta virus X in the future?
Carefully inspect hostas prior to purchase, and avoid buying any plants with symptoms of HVX. Remember that even asymptomatic plants may carry HVX, and symptoms may (or may not) develop after you bring plants home. When purchasing hostas (especially expensive ones), consider requesting that the seller provide proof that the plants are HVX-free. Virus testing kits are available for HVX testing and are relatively inexpensive. Note that several other plant viruses can affect hostas; therefore a negative HVX test result does not guarantee that your plants are totally virus-free. Whether or not your new hostas are pretested for HVX, keep them isolated from other hostas in your garden for several weeks, and watch new plants for symptom development as they adapt to their new environment. Once hostas are established in your garden, try to minimize any wounding that could release sap and provide an entry point for HVX. After working with individual hosta plants, wash your hands thoroughly with soap and water. Also, decontaminate any items (e.g., pruners, shovels, knives, pots, work surfaces) that may have come in contact with hosta plants by treating them for a minimum of one minute with a solution of one of the following:
2.75 tablespoons of Alconox® (a type of lab detergent) plus 2.5 tablespoons of sodium lauryl sulfate (SLS), also known as sodium dodecyl sulfate (SDS), in one gallon of water, or
14 dry ounces of trisodium phosphate in one gallon of water.
These ingredients can be ordered on the internet. If you opt to use SLS, be sure to wear gloves and safety goggles, and mix the solution in a well-ventilated area as SLS is a known skin and eye irritant. Once treated, rinse items with sufficient water to remove any residues. Proper sanitation is critical for preventing the spread of HVX, as well as other plant viruses.
For more information on Hosta virus X:
Contact the University of Wisconsin Plant Disease Diagnostics Clinic (PDDC) at (608) 262-2863 or pddc@wisc.edu.
An EEO/Affirmative Action employer, University of Wisconsin-Madison Division of Extension provides equal opportunities in employment and programming, including Title IX and ADA requirements. This document can be provided in an alternative format by calling Brian Hudelson at (608) 262-2863 (711 for Wisconsin Relay).
References to pesticide products in this publication are for your convenience and are not an endorsement or criticism of one product over similar products. You are responsible for using pesticides according to the manufacturer’s current label directions. Follow directions exactly to protect the environment and people from pesticide exposure. Failure to do so violates the law.
Thanks to Lisa Johnson, Patti Nagai and Anette Phibbs for reviewing this document.
A complete inventory of UW Plant Disease Facts is available at the University of Wisconsin-Madison Plant Disease Diagnostics Clinic website: https://pddc.qa.webhosting.cals.wisc.edu.
Authors: Amanda Gevens, UW-Madison Plant Pathology with contributions by UW-Madison Plant Pathology undergraduates Ken Cleveland and Lauren Thomas
Last Revised: 03/01/2024
D-number: D0062
Diseases of vegetable plants can pose a challenge for the home gardener. Typically, cultural methods are the preferred options for disease management in home vegetable gardens. Cultural methods include proper site selection, plant spacing, staking, watering, fertilization, and perhaps most importantly, use of disease-resistant vegetable cultivars. However, if diseases become especially problematic, fungicide treatments are also an option for home gardeners.
This guide is intended to help identify some of the common, and most suitable, fungicides available for disease control in home vegetable gardens. All of the fungicides listed on this fact sheet have been found on shelves at southern Wisconsin home garden centers. This listing is not intended to be exhaustive, but references fungicides that, when used properly, can be effective in controlling the most common diseases of vegetables grown in home gardens. When selecting a product from this list, be sure to note the product name carefully, as several products can have very similar names and contain similar active ingredients. Check that the active ingredient on the label of the product that you select is the ingredient that you are looking for. Also, be sure to read and follow all label instructions of the fungicide that you select to ensure that you use the product in the safest and most effective manner possible.
VEGETABLE
DISEASE(S)
ACTIVE INGREDIENT
BRAND NAMES
asparagus
rust
chlorothalonil
Daconil, Fung-onil,
Ortho Max Disease Control
mancozeb
Mancozeb Flowable
myclobutanil
Spectracide Immunox
propiconazole
Monterey Fungi Fighter, Infuse
tebuconazole
Bayer Advanced 3 in 1,
Bayer Advanced Disease Control
bean
rust
chlorothalonil
Daconil, Fung-onil,
Ortho Max Disease Control
myclobutanil
Spectracide Immunox
propiconazole
Monterey Fungi Fighter, Infuse
tebuconazole
Bayer Advanced 3 in 1, Bayer Advanced Disease Control
An EEO/Affirmative Action employer, University of Wisconsin-Madison Division of Extension provides equal opportunities in employment and programming, including Title IX and ADA requirements. This document can be provided in an alternative format by calling Brian Hudelson at (608) 262-2863 (711 for Wisconsin Relay).
References to pesticide products in this publication are for your convenience and are not an endorsement or criticism of one product over similar products. You are responsible for using pesticides according to the manufacturer’s current label directions. Follow directions exactly to protect the environment and people from pesticide exposure. Failure to do so violates the law.
Thanks to Russell Groves, Stephen Jordan, James Kerns and Patti Nagai for reviewing this document.
A complete inventory of UW Plant Disease Facts is available at the University of Wisconsin-Madison Plant Disease Diagnostics Clinic website: https://pddc.qa.webhosting.cals.wisc.edu.
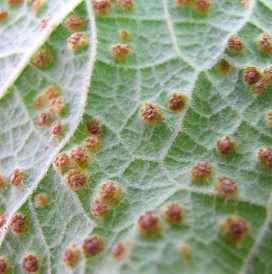
Hollyhock rust causes orange to yellow spots on leaves of hollyhock and other plants in the mallow family. (Photo courtesy of Stephanie Porter)
What is hollyhock rust?
Hollyhock rust is the most common fungal leaf disease of hollyhocks (Alcea rosea). Many other ornamentals (e.g., flowering maple, rose mallow) and weeds (e.g., common mallow) in the mallow family are also susceptible. Hollyhock rust can quickly spread, causing stunting of plants and premature leaf drop. In rare instances, hollyhock rust can result in plant death.
What does hollyhock rust look like?
Initial symptoms of hollyhock rust are orange to yellow spots (roughly ⅛ to ¼ inches in diameter) on lower leaves. Irregular brown areas may also develop on stems. As the disease progresses, brown to dark-red raised “bumps” (fungal reproductive structures called pustules) develop on the undersides of leaves beneath the orange/yellow spots. Severely affected leaves often develop holes that give them a lacy appearance. These leaves may eventually shrivel and die.
Where does hollyhock rust come from?
Hollyhock rust is caused by the fungus, Leptopuccinia malvacearum which can be introduced into a garden by windborne spores or on infected transplants. Further localized spread of spores is possible by wind, by splashing rain, or by splashing water from a sprinkler. Warm and humid temperatures favor the growth of the fungus. L. malvacearum can survive the winter in hollyhock leaf and stem debris.
How do I save a plant with hollyhock rust?
Once symptoms of hollyhock rust appear, control can be difficult. If you observe the disease very early in its development, remove symptomatic leaves and dispose of them in your municipal garbage (where allowed) or by deep burying them. Consider follow-up fungicide treatments, although such treatments will be most effective when applied before any symptoms appear. If you decide to use fungicides for control, select products that are labeled for use on hollyhocks (or more generally on ornamental flowering plants) and contain the active ingredients chlorothalonil, mancozeb, myclobutanil, tebuconazole, or triticonazole. When making more than one application, DO NOT use the same active ingredient for all treatments. Instead, alternate the use of at least two active ingredients with different modes of action to help minimize problems with fungicide-resistant variants of the hollyhock rust fungus. Myclobutanil, tebuconazole and triticonazole have similar modes of action and should NOT be alternated with one another. Be sure to read and follow all label instructions of the fungicides that you select to ensure that you use products in the safest and most effective manner possible.
Brown to dark-red bumps on the undersurface of leaves is typical of hollyhock rust. (Photo courtesy of Tom Creswell, Purdue University)
How do I avoid problems with hollyhock rust in the future?
Remove weedy mallow plants (especially common mallow) from your garden; they can serve as a source of L. malvacearum spores. Also, be sure to remove all hollyhock debris in the fall to eliminate another place where the fungus can overwinter. Weeds and plant debris can be disposed of as described above. DO NOT use seeds from infected plants, and inspect new hollyhock plants for rust symptoms prior to purchase.Some hollyhock varieties are resistant to some, but not all, variants of L. malvacearum. Thus use of resistant varieties may not be a reliable method for control of hollyhock rust in all situations. Avoid planting hollyhocks densely to allow better air circulation that will promote more rapid drying of plants, as well as reduced humidity. Water and fertilize properly to promote optimal growth of your hollyhocks. DO NOT water with a sprinkler as this will wet leaves; use a soaker or drip hose that applies water directly to the soil. Fertilize only when needed based on a soil fertility test.
For more information on hollyhock rust:
Contact your county Extension agentContact the University of Wisconsin Plant Disease Diagnostics Clinic (PDDC) at (608) 262-2863 or pddc@wisc.edu.
An EEO/Affirmative Action employer, University of Wisconsin-Madison Division of Extension provides equal opportunities in employment and programming, including Title IX and ADA requirements. This document can be provided in an alternative format by calling Brian Hudelson at (608) 262-2863 (711 for Wisconsin Relay).
Thanks to Diana Alfuth, Adam Chanto, Lisa Johnson, Allison Pfeifer, Scott Reuss, Hilda Uelman and Johnny Uelman for reviewing this document.
A complete inventory of UW Plant Disease Facts is available at the University of Wisconsin-Madison Plant Disease Diagnostics Clinic website: https://pddc.qa.webhosting.cals.wisc.edu.