All posts by hudelson

Rose Rust

Extension Logo

UW Plant Disease Facts


Authors:   Robyn Roberts*, UW-Madison Plant Pathology
Last Revised:   03/01/2024
D-number:   D0098

What is rose rust? 

Rose rust is a common fungal disease found in much of North America (including the continental United States) and Europe.  Rose rust affects many varieties of rose, though some varieties (e.g., hybrids) are more prone to the disease.  Rose rust has been a perennial problem along the Pacific Coast of the United States where mild temperatures and high moisture are favorable for rust development.  In the Midwest, extremes in winter and summer temperatures have historically tended to be less favorable for the disease.  However, recent climate changes in Wisconsin have led to rose rust becoming more commonplace in the state.

Yellow spots on upper leaf surfaces with corresponding powdery, orange to black spots on lower leaf surfaces are typical of rose rust.

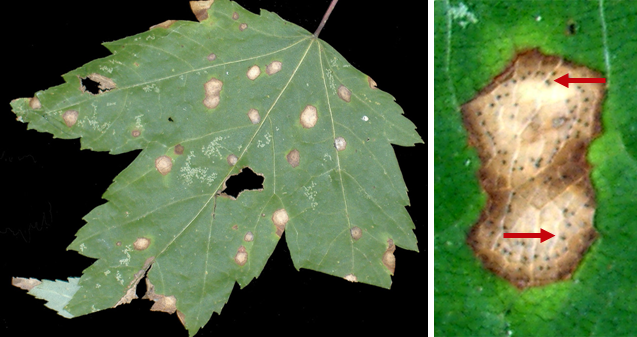
What does rose rust look like? 

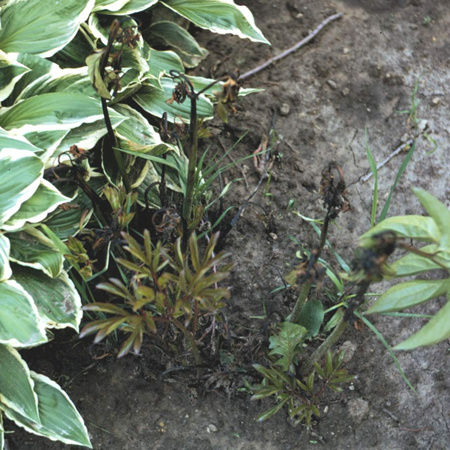
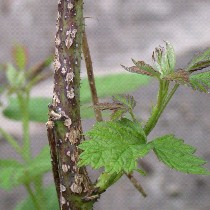
Rose rust often first appears on lower leaves, but eventually an entire plant can be affected.  Typical symptoms include general yellowing of leaves followed by eventual leaf death.  Affected rose stems (i.e., canes) can become curled and distorted.  As the disease progresses, powdery orange or black, circular spots (called pustules) containing spores of the fungus that causes the disease form on the undersides of leaves.  Corresponding yellow spots are visible on upper leaf surfaces above the pustules.  Pustules may also form on stems and green flower parts (sepals).  Rose rust usually develops in the spring and fall (when favorable mild temperatures and wet conditions are more common), but the disease can affect roses during the summer months as well.

Where does rose rust come from? 

Rose rust is caused by several species of fungi in the genus Phragmidium.  These fungi specifically infect roses.  Rose rust is often introduced into a garden on infected shrubs purchased from a nursery or other rose supplier.  Once introduced into a garden, rose rust fungi can overwinter in rose leaf debris, as well as on infected rose canes.  In the spring, spores produced in debris and on canes can blow to newly emerging rose foliage, leading to new infections.

How do I save a plant with rose rust? 

Control of rose rust is difficult once symptoms develop.  Prune out affected canes and remove leaves as symptoms develop to prevent the spread of rust fungi to other rose shrubs.  Destroy these materials by burning (where allowed by local ordinances) or burying them.  In the fall, remove and destroy any remaining dead leaves and other rose debris to eliminate places where rose rust fungi can overwinter.  If you notice a rust problem very early (before there are many symptoms), fungicide treatments may be useful for managing the disease; however, most fungicides work best when applied before any symptoms appear.  If you decide to use fungicides for rust control, select products that are labeled for use on roses and that contains the active ingredients chlorothalonil, mancozeb, myclobutanil, propiconazole, sulfur or triforine.  Treat every seven to 10 days, and DO NOT use the same active ingredient for all treatments, particularly if you decide to use myclobutanil, propiconazole or triforine.  Instead, alternate use of the two active ingredients listed above to help minimize potential problems with fungicide-resistant strains of rose rust fungi.  DO NOT alternate myclobutanil, propiconazole or triforine, as these active ingredients are chemically related.  Be sure to read and follow all label instructions of the fungicides that you select to ensure that you use these products in the safest and most effective manner possible.

How do I avoid problems with rose rust in the future?  

Whenever possible, plant rose varieties that are less susceptible to rose rust (i.e., avoid hybrid varieties).  Always inspect new rose shrubs for rose rust (and other diseases) prior to purchase.  DO NOT bring diseased shrubs into your garden.  Plant rose shrubs far enough apart so that their foliage does not overlap, and thin your roses on a regular basis.  Proper planting and pruning promote good air circulation that will facilitate rapid drying of leaves and canes, thus making the environment less favorable for rust development.  Avoid working with your roses when they are wet as you are more likely to spread rust spores under these conditions.  Fertilize and water roses appropriately.  Well-cared-for plants tend to be less susceptible to disease.  When watering, apply water at the base of your shrubs (e.g., with a soaker or drip hose) rather than over the leaves (e.g., with a sprinkler).  Watering with a sprinkler tends to spread rust spores and wets leaves and canes, thus providing a more favorable environment for rust infections to occur.

For more information on rose rust: 

Contact the University of Wisconsin Plant Disease Diagnostics Clinic (PDDC) at (608) 262-2863 or pddc@wisc.edu.


This Fact Sheet is also available in PDF format:

*Completed as partial fulfillment of the requirements for Plant Pathology 558 at the University of Wisconsin Madison.

© 2013-2024 the Board of Regents of the University of Wisconsin System doing business as University of Wisconsin-Madison Division of Extension.

An EEO/Affirmative Action employer, University of Wisconsin-Madison Division of Extension provides equal opportunities in employment and programming, including Title IX and ADA requirements. This document can be provided in an alternative format by calling Brian Hudelson at (608) 262-2863 (711 for Wisconsin Relay).

References to pesticide products in this publication are for your convenience and are not an endorsement or criticism of one product over similar products. You are responsible for using pesticides according to the manufacturer’s current label directions. Follow directions exactly to protect the environment and people from pesticide exposure. Failure to do so violates the law.

Thanks to Erica Arcibal, Rosemarie Bugs, Lisa Johnson, Cyndy King, Janet Roberts, Jillian Roberts and Rose Roberts for reviewing this document.

A complete inventory of UW Plant Disease Facts is available at the University of Wisconsin-Madison Plant Disease Diagnostics Clinic website: https://pddc.qa.webhosting.cals.wisc.edu.

Submit additional lawn, landscape, and gardening questions at https://hort.extension.wisc.edu/ask-a-gardening-question/.

Root-Knot Nematode

Extension Logo

UW Plant Disease Facts


Authors:   Nolan Bornowski*, UW-Madison Plant Pathology
Last Revised:   03/01/2024
D-number:   D0097
 

Root-knot nematodes (Meloidogyne spp.) are small, soilborne, worm-like organisms that infect many agricultural and horticultural plants.  Root-knot nematodes are found worldwide, and are named for the swellings (called “galls” or “knots”) that they cause on plant roots.  Economically-important species of Meloidogyne include M. arenaria, M. hapla, M. incognita, and M. javanica.  Of these, M. hapla (commonly known as Northern root-knot nematode) is most likely to be found in Wisconsin soils.

Root-knot nematodes cause swollen, distorted roots that can interfere with movement of water and nutrients within a plant.

Appearance:  

Root-knot nematodes are about 1/10 the size of a pinhead and are typically embedded inside roots.  They are impossible to see with the naked eye.  Juvenile root-knot nematodes (both males and females), as well as adult males, are vermiform (i.e., worm-shaped) and live in the soil.  Adult females are spherical in shape and live inside roots.  Both males and females possess a thin, tube-like structure called a stylet that they use for penetrating root tissue.

Symptoms and Effects: 

When root-knot nematodes enter roots, they release chemicals that cause nearby root cells to enlarge.  This leads to the formation of swollen, distorted areas in roots known as galls or knots.  The number and size of galls varies depending on plant species and cultivar, and the number of root-knot nematodes in the soil.  On some hosts (e.g., grasses) root swelling can be very difficult to detect.  Nematode feeding interferes with proper root function (e.g., water and nutrient movement).  Thus, infected plants may be stunted and wilted, may exhibit discolorations (e.g., yellowing) typical of plants with nutrient deficiencies, and ultimately (in field or vegetable crops) may have lower yields.  Because root-knot nematodes tend not to be uniformly distributed in the soil, symptomatic plants often occur in patches and are typically surrounded by plants of normal height and appearance.  Environmental factors such as slope, soil type, or soil moisture can cause similar patchy patterns, so identification of a root-knot nematode problem requires examination of symptomatic plants at a lab qualified to perform nematode diagnostics.

Life Cycle: 

Root-knot nematodes (i.e., M. hapla) are native to Wisconsin and can be spread whenever contaminated soil or infected plants are moved.  Root-knot nematodes survive the winter as eggs in the soil.  Like insects, root-knot nematodes have several juvenile stages and the nematodes molt (i.e., shed their outer layers) as they grow.  The second juvenile stage of root-knot nematode is the most important, because at this stage the nematode seeks out and infects plant roots.  Once it has entered a root, a root-knot nematode molts three more times before becoming an adult.  A male root-knot nematode is able to move about freely and can leave a root.  A female root-knot nematode remains and feeds in a given location within a root.  Eventually, a female enlarges to the point where a portion of her body extends to the root surface and this allows her to lay her eggs in the soil.  In some hosts, eggs can also be found within the galls.

Control: 

If you are having a root-knot nematode problem in your garden, consider crop rotation and the use of cover crops as management tools.  See University of Wisconsin Garden Facts XHT1210, Crop Rotation in the Home Vegetable Garden and XHT1209, Using Cover Crops and Green Manures in the Home Vegetable Garden for details.  If used properly, these techniques can be effective in reducing the number of root-knot nematodes in the soil.  M. hapla, the root-knot nematode species most common in Wisconsin, does not infect corn, wheat, oats or rye, so use of these crops in a rotation or as cover crops often provides great benefit.

Cover crops of French marigolds (Tagetes patula) also have been shown to reduce the number of root-knot nematodes in soil.  This common garden ornamental releases a chemical (alpha-terthienyl) that is highly toxic to root-knot nematodes and prevents their eggs from hatching.  As an added bonus, root-knot nematodes are not able to develop properly in marigold roots.  When using crop rotation or cover crops, proper broadleaf weed control is critical because weeds can provide a place for root-knot nematodes to survive and reproduce.

Finally, consider amending the soil in your garden with organic matter such as compost or leaf mulch.  Such amendments tend to increase the diversity of microorganisms in the soil and can encourage the growth of certain soilborne fungi that ensnare and feed on root knot nematodes, and parasitize their eggs.

For more information on root-knot nematode: 

Contact the University of Wisconsin Plant Disease Diagnostics Clinic (PDDC) at (608) 262-2863 or pddc@wisc.edu.


This Fact Sheet is also available in PDF format:

*Completed as partial fulfillment of the requirements for Plant Pathology 558 at the University of Wisconsin Madison.

© 2015-2024 the Board of Regents of the University of Wisconsin System doing business as University of Wisconsin-Madison Division of Extension.

An EEO/Affirmative Action employer, University of Wisconsin-Madison Division of Extension provides equal opportunities in employment and programming, including Title IX and ADA requirements. This document can be provided in an alternative format by calling Brian Hudelson at (608) 262-2863 (711 for Wisconsin Relay).

References to pesticide products in this publication are for your convenience and are not an endorsement or criticism of one product over similar products. You are responsible for using pesticides according to the manufacturer’s current label directions. Follow directions exactly to protect the environment and people from pesticide exposure. Failure to do so violates the law.

Thanks to Freddie Bornowski, Ashley Ellinghuysen, Amy Kispert, Ian McCue , Ann MacGuidwin, Scott Reuss and Ken Schroeder for reviewing this document.

A complete inventory of UW Plant Disease Facts is available at the University of Wisconsin-Madison Plant Disease Diagnostics Clinic website: https://pddc.qa.webhosting.cals.wisc.edu.

Submit additional lawn, landscape, and gardening questions at https://hort.extension.wisc.edu/ask-a-gardening-question/.

Root Rots on Houseplants

What is root rot?

Root rot is a general term that describes any disease where the pathogen (causal organism) causes the deterioration of a plant’s root system. Most plants are susceptible to root rots, including both woody and herbaceous ornamentals. Root rots can be chronic diseases or, more commonly, are acute and can lead to the death of the plant.

Wilting of poinsettia associated with Pythium root rot.

How do you know if your plant has a root rot?

Homeowners often become aware of root rots when they note that a plant is wilted, even though the soil is wet. Plants with root rots are also often stunted, and may have leaves with a yellow or red color, symptoms that suggest a nutrient deficiency. Careful examination of the root systems of these plants reveals roots that are soft and brown. These roots may have a bad odor.

Where does root rot come from?

A large number of soil-borne fungi cause root rots. Pythium spp., Phytophthora spp., Rhizoctonia solani, and Fusarium spp. are the most common root rot fungi. These fungi have wide host ranges, and thus can cause root rots on a wide variety of plants. Most root rot fungi prefer wet soil conditions and some, such as Pythium and Phytophthora produce spores that can survive for long periods in soil or plant debris.

How do I save a plant with root rot?

Often the best and most cost effective way of dealing with a plant with root rot is to throw it out. If you decide to keep a plant with root rot, REDUCE SOIL MOISTURE! Provide enough water to fulfill the plant’s growth needs and prevent drought stress, but DO NOT over-water. We DO NOT recommend use of chemical fungicides for control of root rots on houseplants because of the limited availability of products for use by homeowners, and because those products that are available tend to be expensive.

How do I avoid problems with root rots?

First, buy plants from a reputable source and make sure they are root rot-free prior to purchase. Second, replant your houseplants properly. Use a pot with drainage holes, but DO NOT put rocks or gravel at the bottom of the pot. The presence of rocks or gravel can actually inhibit drainage. Use a pasteurized commercial potting mix, NOT soil from your garden. Garden soils often contain root rot fungi. Add organic material (e.g., peat moss) to heavy potting mixes to increase drainage. Third, minimize potential contamination of your plants with root rot fungi. DO NOT reuse potting mix from your houseplants, or water that has drained from your plants, as both potentially can contain root rot fungi. After working with plants with root rot problems, disinfest tools, working surfaces and clay pots with a 10% bleach or detergent solution, or alcohol. DO NOT reuse plastic pots as they are often difficult to disinfest adequately. Finally and most importantly, moderate plant moisture. Provide enough water to fulfill your plants’ needs for growth and prevent drought stress, but DO NOT over-water. In particular, DO NOT allow plants to sit in drainage water. REMEMBER, root rot fungi grow and reproduce best in wet soils.

For more information on root rots:

Contact the University of Wisconsin Plant Disease Diagnostics Clinic (PDDC) at (608) 262-2863 or pddc@wisc.edu

Root Rots in the Garden

Extension Logo

UW Plant Disease Facts
 
Authors:   Brian Hudelson, UW-Madison Plant Pathology and Laura Jull, UW-Madison Horticulture
Last Revised:   03/01/2024
D-number:   D0095
 
Brown discoloration of roots typical of root rots.

What is root rot? 

Root rot is a general term that describes any disease where the pathogen (causal organism) attacks and leads to the deterioration of a plant’s root system.  Most plants are susceptible to root rots, including both woody and herbaceous ornamentals.  Root rots can be chronic diseases or, more commonly, are acute and can lead to the death of the plant.

What does root rot look like? 

Gardeners often become aware of root rot problems when they see above ground symptoms of the disease.  Plants with root rot are often stunted, wilted, or have top-down dieback.  They may also have leaves with a yellow or red color, suggesting a nutrient deficiency.  Examination of the roots of these plants reveals tissue that is soft and brown.

Where does root rot come from? 

Several soil-borne water molds (i.e., fungi-like organisms) and true fungi can cause root rots, including (most frequently) Phytophthora spp. and Pythium spp. (both water molds), and Rhizoctonia solani and Fusarium spp. (both true fungi).  These organisms have wide host ranges, and prefer wet soil conditions.  Water mold root rot organisms such as Pythium and Phytophtora produce thick-walled spores (called oospores) that can survive for long periods (years to decades) in soil.

How do I save a plant with root rot? 

REDUCE SOIL MOISTURE!  Provide enough water to fulfill a plant’s growth needs and prevent drought stress, but DO NOT over-water.  Remove excess mulch (greater than four inches) that can lead to overly wet soils.

Stunting, top-down dieback, and red or yellow foliage can indicate a root rot problem.

Chemical fungicides (PCNB, mefenoxam, metalaxyl, etridiazole, thiophanate-methyl and propiconazole) and biological control agents (Gliocladium, Streptomyces, and Trichoderma) are labeled for root rot control.  However, DO NOT use these products unless you know exactly which root rot pathogen(s) is(are) affecting your plants.  Contact your county Extension agent for details on obtaining an accurate root rot diagnosis and for advice on which, if any, fungicides you should consider using.

How do I avoid problems with root rots? 

Buy plants from a reputable source and make sure they are root rot-free prior to purchase.  Establish healthy plants in a well-drained site.  Moderate soil moisture; add organic material (e.g., leaf litter or compost) to heavy soils to increase soil drainage, and DO NOT over-water.  Provide just enough water to fulfill a plant’s needs for growth and prevent drought stress.  Also, DO NOT apply more than three inches of mulch in flowerbeds.  Excessive mulching can lead to over wet soils, which favor root rot fungi growth and reproduction.  Finally, minimize movement of root/crown rot fungi in your garden.  DO NOT move soil or plants from areas where plants are having root rot problems.  DO NOT water plants with water contaminated with soil (and thus potentially with root rot organisms).  After working with plants with root rot, decontaminate tools and footwear by treating for at least 30 seconds with a 10% bleach solution or 70% alcohol (e.g., rubbing alcohol, certain spray disinfectants).  If you use bleach to decontaminate metal tools, be sure to thoroughly rinse and oil your tools after you are done gardening to prevent rusting.

For more information on root rots: 

Contact the University of Wisconsin Plant Disease Diagnostics Clinic (PDDC) at (608) 262-2863 or pddc@wisc.edu.


This Fact Sheet is also available in PDF format:

© 2000-2024 the Board of Regents of the University of Wisconsin System doing business as University of Wisconsin-Madison Division of Extension.

An EEO/Affirmative Action employer, University of Wisconsin-Madison Division of Extension provides equal opportunities in employment and programming, including Title IX and ADA requirements. This document can be provided in an alternative format by calling Brian Hudelson at (608) 262-2863 (711 for Wisconsin Relay).

References to pesticide products in this publication are for your convenience and are not an endorsement or criticism of one product over similar products. You are responsible for using pesticides according to the manufacturer’s current label directions. Follow directions exactly to protect the environment and people from pesticide exposure. Failure to do so violates the law.

Thanks to Karen Delahaut, Ann Joy and Sharon Morrisey for reviewing this document.

A complete inventory of UW Plant Disease Facts is available at the University of Wisconsin-Madison Plant Disease Diagnostics Clinic website: https://pddc.qa.webhosting.cals.wisc.edu.

Submit additional lawn, landscape, and gardening questions at https://hort.extension.wisc.edu/ask-a-gardening-question/.

Root and Crown Rots

Extension Logo

UW Plant Disease Facts


Authors:   Brian Hudelson, UW-Madison Plant Pathology and Laura Jull, UW-Madison Horticulture
Last Revised:   03/01/2024
D-number:   D0094
 
Discoloration of maple crown and roots typical of Phytophthora root/crown rot.

What is root/crown rot? 

Root/crown rot is a general term that describes any disease of woody ornamentals where the pathogen (causal organism) attacks and leads to the deterioration of a plant’s root system and/or lower trunk or branches near the soil line.  Root rots can be chronic diseases or, more commonly, are acute and can lead to the death of the plant.

What does root/crown rot look like? 

Gardeners often become aware root/crown rot when they see above ground symptoms.  Affected plants are often slow-growing or stunted and may show signs of wilting.  Often the canopy of an affected tree or shrub is thin, with foliage that is yellow or red, suggesting a nutrient deficiency.  Careful examination of the roots/crowns of these plants reveals tissue that is soft and brown.

Where does root/crown rot come from? 

Several soil-borne water molds (i.e., fungi-like organisms) and true fungi can cause root/crown rots, including (most frequently) Phytophthora spp. and Pythium spp. (both water molds), and Rhizoctonia solani and Fusarium spp. (both true fungi).  These organisms have wide host ranges, and prefer wet soil conditions.  Water mold root rot organisms such as Pythium and Phytophtora produce thick-walled spores (called oospores) that can survive for long periods (years to decades) in soil.

How do I save a plant with root/crown rot?  

REDUCE SOIL MOISTURE!  Provide enough water to fulfill a plant’s growth needs and prevent drought stress, but DO NOT over-water.  Remove excess mulch (greater than four inches) around trees and shrubs.  Excessive mulch can lead to overly wet soils.

A thinning canopy with red or yellow leaves can indicate a root/crown rot problem.

Chemical fungicides (e.g., PCNB, mefenoxam, metalaxyl, etridiazole, thiophanate-methyl and propiconazole) and biological control agents (e.g., Gliocladium, Streptomyces, and Trichoderma) are labeled for root/crown rot control.  However, DO NOT use these products unless you know exactly which root/crown rot pathogen(s) is(are) affecting your trees and shrubs.  Contact your county Extension agent for details on obtaining an accurate root/crown rot diagnosis and for advice on which, if any, fungicides you should consider using.

How do I avoid problems with root/crown rots?  

Buy plants from a reputable source, and make sure they are root/crown rot-free prior to purchase.  Establish healthy plants in a well-drained site, and when planting, place the root collar just at the soil surface.  To moderate soil moisture, add organic material (e.g., leaf litter or compost) to heavy soils to increase soil drainage, and DO NOT over-water.  Also, DO NOT apply more than three inches of mulch around trees and shrubs, and keep mulch from directly contacting the base of trunks and stems.  Prevent physical damage (e.g., lawnmower injury) that can provide entry points for root/crown rot pathogens.  Finally, minimize movement of root/crown rot fungi in your garden.  DO NOT move soil or plants from areas where plants are having root/crown rot problems.  DO NOT water plants with water contaminated with soil (and thus potentially with root/crown rot organisms).  After working with plants with root/crown rot, decontaminate tools and footwear by treating for at least 30 seconds with a 10% bleach solution or 70% alcohol (e.g., rubbing alcohol, certain spray disinfectants).  If you use bleach to decontaminate metal tools, be sure to thoroughly rinse and oil your tools after you are done gardening to prevent rusting.

For more information on root/crown rots: 

Contact the University of Wisconsin Plant Disease Diagnostics Clinic (PDDC) at (608) 262-2863 or pddc@wisc.edu.


This Fact Sheet is also available in PDF format:

© 2000-2024 the Board of Regents of the University of Wisconsin System doing business as University of Wisconsin-Madison Division of Extension.

An EEO/Affirmative Action employer, University of Wisconsin-Madison Division of Extension provides equal opportunities in employment and programming, including Title IX and ADA requirements. This document can be provided in an alternative format by calling Brian Hudelson at (608) 262-2863 (711 for Wisconsin Relay).

References to pesticide products in this publication are for your convenience and are not an endorsement or criticism of one product over similar products. You are responsible for using pesticides according to the manufacturer’s current label directions. Follow directions exactly to protect the environment and people from pesticide exposure. Failure to do so violates the law.

Thanks to Karen Delahaut, Ann Joy and Sharon Morrisey for reviewing this document.

A complete inventory of UW Plant Disease Facts is available at the University of Wisconsin-Madison Plant Disease Diagnostics Clinic website: https://pddc.qa.webhosting.cals.wisc.edu.

Submit additional lawn, landscape, and gardening questions at https://hort.extension.wisc.edu/ask-a-gardening-question/.

Red Thread

Extension Logo

UW Plant Disease Facts


Authors:   Benjamin Van Ryzin*, UW-Madison Plant Pathology
Last Revised:   03/01/2024
D-number:   D0092

What is red thread? 

Red thread is a foliar disease of cool-season turfgrasses.  Grass species affected by this disease include fine fescues (the species most commonly affected), tall fescue, perennial ryegrass and Kentucky bluegrass.  These grasses are commonly used for home lawns, golf course roughs, parks and athletic fields in the Midwest.  Although red thread is not lethal, it can cause unsightly bleaching of large areas of a lawn.

Bleached grass blades with fuzzy, pink to red masses of spider web-like strands are typical of red thread. (Photo courtesy of R. Latin, Purdue University)

What does red thread look like? 

Red thread is often misdiagnosed as pink patch, another turf disease that develops under similar environmental conditions.  Both diseases cause tan, pink, or red circular patches ranging in size from a few inches to two feet in diameter.  In addition, both diseases are noted for the formation of pink to red, spiderweb-like threads along the edges of diseased areas when leaves are wet.  Leaf blades affected by both diseases die starting at the tip, becoming a tan, light-gray or bleached-white color.  Red thread can be distinguished from pink patch by the presence of thick, red tendrils that protrude from affected leaf blades.  These tendrils are the “red threads” that give the disease its name.

Where does red thread come from? 

The fungus, Laetisaria fuciformis, causes red thread.   The fungus grows from the red, thread-like structures (called sclerotia) that survive the winter in infected grass blades, thatch and soil.  Sclerotia and infested leaf blades can be moved by water, wind and mowing equipment to other locations where they can cause new infections.  Red thread most often develops in wet, cool (59 to 77°F) weather in the spring and fall.  The disease is most severe on fine fescues (although other turfgrass species also can be affected) that are growing slowly due to cool weather or inadequate fertilization.

How do I save turf with red thread? 

Red thread is a cosmetic disease that does not affect either the crown or roots of infected plants.  Thus, turf with red thread typically recovers after environmental conditions favorable for growth return and conditions favorable for disease development have passed.

Red thread-like structures, called sclerotia, protrude from leaf blades infected by the red thread fungus. (Photo courtesy of Paul Koch)

How do I avoid problems with red thread in the future?  

When seeding or sodding a lawn, choose grasses that are less susceptible to red thread (e.g., Kentucky bluegrass and hard fescue).  If you use susceptible grass species (e.g., fine fescues and perennial ryegrass), be sure fertilize your lawn optimally in the fall and spring to maintain its growth and vigor.  See UW Bulletin A3435, Lawn Maintenance (available at https://learningstore.extension.wisc.edu/), for recommendations on routine lawn fertilization.  On lawns with a history of red thread, apply nitrogen fertilizer in mid to late spring to reduce disease severity and promote healthy turf.  Under dry conditions, water your lawn between midnight to 6 am when dew naturally forms, thus reducing the length of time that your lawn remains wet.  Red thread often develops when turfgrass is watered frequently, so DO NOT water your lawn unless you observe wilting.

Fungicide use is not generally recommended for control of red thread due to the cosmetic nature of the disease, the fact that infected turfgrass typically quickly recovers from the disease and the cost of chemical control.  However, if you feel that fungicide treatments are needed, products containing strobilurins (e.g., azoxystorbin, trifloxystrobin and fluoxastrobin), as well as flutolanil are currently labeled in Wisconsin for managing red thread and can be very effective when applied before symptoms appear.  When using fungicides, DO NOT apply the same active ingredient for all treatments.  Instead, alternate the use of at least two ingredients with different modes of action (i.e., DO NOT only use strobilurins) to help minimize problems with fungicide-resistant strains of the red thread fungus.  Be sure to read and follow all label instructions of the fungicides that you select to ensure that you use the fungicides in the safest and most effective manner possible.

For more information on red thread: 

Contact the University of Wisconsin Turf Diagnostic Lab (TDL) at (608) 845-2535 or hockemeyer@wisc.edu.


This Fact Sheet is also available in PDF format:

*Completed as partial fulfillment of the requirements for Plant Pathology 558 at the University of Wisconsin Madison.

© 2013-2024 the Board of Regents of the University of Wisconsin System doing business as University of Wisconsin-Madison Division of Extension.

An EEO/Affirmative Action employer, University of Wisconsin-Madison Division of Extension provides equal opportunities in employment and programming, including Title IX and ADA requirements. This document can be provided in an alternative format by calling Brian Hudelson at (608) 262-2863 (711 for Wisconsin Relay).

References to pesticide products in this publication are for your convenience and are not an endorsement or criticism of one product over similar products. You are responsible for using pesticides according to the manufacturer’s current label directions. Follow directions exactly to protect the environment and people from pesticide exposure. Failure to do so violates the law.

Thanks to Paul Koch, P. J. Liesch, Doug Soldat, Gary Van Ryzin and Pamela Van Ryzin for reviewing this document.

A complete inventory of UW Plant Disease Facts is available at the University of Wisconsin-Madison Plant Disease Diagnostics Clinic website: https://pddc.qa.webhosting.cals.wisc.edu.

Submit additional lawn, landscape, and gardening questions at https://hort.extension.wisc.edu/ask-a-gardening-question/.

Raspberry Anthracnose

Extension Logo

UW Plant Disease Facts


Authors:   Chen Zhang*, UW-Madison Plant Pathology
Last Revised:   03/01/2024
D-number:   D0091
 
Anthracnose on raspberry canes. Note the sunken, gray centers and raised, purple edges. (Photo courtesy of Patricia McManus)

What is raspberry anthracnose? 

Raspberry anthracnose is a common disease that causes significant reductions of yield and fruit quality on raspberries in the United States.  Black and purple raspberries (oftentimes misidentified as blackberries) are particularly susceptible to anthracnose, while red raspberries are less susceptible to the disease.  True blackberries are also occasionally affected by anthracnose.

What does raspberry anthracnose look like? 

Anthracnose can affect any part of a raspberry plant; however, canes are most commonly affected.  Watch for scattered, purple, roundish spots (up to ⅜ inch in diameter) that are characteristic of the disease.  Over time, the spots develop ash-colored, sunken centers and raised purple margins.  When anthracnose is severe and develops early in the growing season, these sunken spots can merge and girdle raspberry canes, resulting in cane death.  When anthracnose develops later in the season spots may not develop sunken centers, but will overlap and merge.  If a large enough portion of a cane is affected, the bark may split.  This symptom is called “gray bark”.  Canes severely affected by anthracnose are more prone to winter injury.  On leaves, anthracnose symptoms typically appear in early to mid-summer as irregularly-shaped, yellow spots that are approximately 1/16 inch in diameter.  These spots enlarge and develop gray centers with reddish-purple borders.  Over time, the gray centers may fall out, giving the spots a “shot-hole” effect.

Where does raspberry anthracnose come from? 

Anthracnose is caused by the fungus Elsinoe necator.  The fungus can be introduced into a raspberry patch on infected plants or by spores that are blown from other raspberry patches or from wild raspberry relatives (such as brambles).  Once established in a raspberry patch, E. necator can overwinter on diseased raspberry canes.  In the spring, spores of the fungus spread to new canes (which are more susceptible to infection due to their lack of a hard bark) and leaves by wind, rain splash, and insects.  Infections are more likely to occur during long periods of wet weather.  Additional spores produced as a result of these early season infections can lead to additional infections late in the summer (e.g., in late August and September).

How do I save a plant with raspberry anthracnose? 

Anthracnose is difficult to manage once symptoms have developed.  Pruning symptomatic canes as they appear may provide some benefit, but only when disease levels are relatively low.  Prune four to six inches below where symptoms have appeared and decontaminate pruning tools between cuts by treating them for at least 30 seconds with 10% bleach or preferably (because of its less corrosive properties) 70% alcohol.  Rubbing alcohol and many spray disinfectants typically contain approximately 70% alcohol and are easy to use.  Canes can be burned (where allowed by local ordinance) or buried.  Fungicides are not effective for controlling anthracnose once infections have occurred and should be only be used preventatively (see below).

How do I avoid problems with raspberry anthracnose in the future?  

When establishing your raspberry patch, choose a sunny, open area with a well-drained soil.  Remove plants related to raspberries (e.g., brambles) from the vicinity of your patch as these plants can potentially be a source of the anthracnose fungus.  Purchase disease-free raspberry plants from a reputable nursery or other raspberry supplier, and space these plants in rows that are 12 to 18 inches apart to promote good air flow, and rapid drying of plants.  Fertilize your raspberries appropriately [see UW Bulletin A1610, Growing Raspberries in Wisconsin (available at https://learningstore.extension.wisc.edu/) for details], but DO NOT overfertilize with nitrogen.  Heavy nitrogen fertilization will stimulate excessive growth of tender canes that are more susceptible to infection by the anthracnose fungus.  When watering, DO NOT use a sprinkler; instead use a soaker or drip hose that applies water to the soil rather than to onto leaves and canes.  Keep weeds under control so that they do not block air movement.

Once your raspberry patch is established, prune raspberries routinely (see UW Bulletin A1610 for details) to remove diseased and winter-injured canes as well as to promote better air flow.  If anthracnose has been a chronic problem in your raspberry patch, consider using a preventative fungicide treatment for control.  Use a single application of liquid lime sulfur (1⅓ cups per gallon of water) when leaf buds show ¼ to ½ inch of green tissue.  Be sure to read and follow all label instructions to ensure that you use the fungicide in the safest and most effective manner possible.

For more information on raspberry anthracnose: 

Contact the University of Wisconsin Plant Disease Diagnostics Clinic (PDDC) at (608) 262-2863 or pddc@wisc.edu.


This Fact Sheet is also available in PDF format:

*Completed as partial fulfillment of the requirements for Plant Pathology 558 at the University of Wisconsin Madison.

© 2014-2024 the Board of Regents of the University of Wisconsin System doing business as University of Wisconsin-Madison Division of Extension.

An EEO/Affirmative Action employer, University of Wisconsin-Madison Division of Extension provides equal opportunities in employment and programming, including Title IX and ADA requirements. This document can be provided in an alternative format by calling Brian Hudelson at (608) 262-2863 (711 for Wisconsin Relay).

References to pesticide products in this publication are for your convenience and are not an endorsement or criticism of one product over similar products. You are responsible for using pesticides according to the manufacturer’s current label directions. Follow directions exactly to protect the environment and people from pesticide exposure. Failure to do so violates the law.

Thanks to Diana Alfuth, Erica Arcibal, Ken Frost, Kristin Krokowski, Patricia McManus, Anna Seidl, and Pauline Zhu for reviewing this document.

A complete inventory of UW Plant Disease Facts is available at the University of Wisconsin-Madison Plant Disease Diagnostics Clinic website: https://pddc.qa.webhosting.cals.wisc.edu.

Submit additional lawn, landscape, and gardening questions at https://hort.extension.wisc.edu/ask-a-gardening-question/.

Purple-Bordered Leaf Spot

Extension Logo

UW Plant Disease Facts


Authors:   Barrett Gruber*, Courtney E. Jahn*, Glen Stanosz and Brian Hudelson, UW-Madison Plant Pathology
Last Revised:   03/01/2024
D-number:   D0089

What is purple-bordered leaf spot?  

Purple-bordered leaf spot (also called eye spot or Phyllosticta leaf spot) is a common, but primarily cosmetic disease that affects maples (in particular Amur, Japanese, red, silver and sugar maple).  Phyllosticta leaf spot is similar in many ways to other foliar diseases of maple such as anthracnose (see UW Plant Disease Facts D0002, Anthracnose) and tar spot (see UW Plant Disease Facts D0110, Tar Spot of Trees and Shrubs).

Purple-bordered leaf spot (l). Within the leaf spots (r), small, black, pimple-like fungal fruiting bodies form (red arrows).

What does purple-bordered leaf spot look like?  

Leaves with purple-bordered leaf spot have roughly circular dead areas (typically less than ¼ inch in diameter).  Spots have tan to brown centers and distinct purple, red, or brown margins.  Tiny, black, pimple-like reproductive structures (called pycnidia) often form within the spots, and are diagnostic.  As spots mature, the centers may fall out, leaving roughly circular holes.

Where does purple-bordered leaf spot come from? 

Purple-bordered leaf spot is caused by the fungus Phyllosticta minima, which overwinters in leaf litter.  In the spring, rain and wind move spores of the fungus from the leaf litter to newly developing maple leaves, where infections occur.  Spores produced on infected leaves can lead to additional infections within the tree canopy throughout the growing season.

How do I save a tree with purple-bordered leaf spot? 

DO NOT PANIC.  Although purple-bordered leaf spot may look unsightly, the disease is usually only a cosmetic problem, rarely causing significant damage to mature and vigorously-growing trees.  Occasionally, purple-bordered leaf spot may defoliate trees early in the growing season, but these trees are typically able to produce new leaves within a few weeks.  Defoliated trees should be watered and properly fertilized.  Established trees require approximately one inch of water per week; newly transplanted trees (i.e., trees planted within approximately the past three years) require approximately two inches of water per week.  If there is insufficient rain, apply water at the drip lines of trees (i.e., the edges of where the branches extend) using a drip or soaker hose.  Only fertilize trees based on a soil nutrient test.

How do I avoid problems with purple-bordered leaf spot in the future?  

If available, select maple varieties that are resistant to purple-bordered leaf spot.  Compost, bury or burn (where allowed by local ordinance) leaf litter from infected trees in the fall or in the spring before trees releaf.  Newly planted maples and established maples that have been severely affected by purple-bordered leaf spot for several years may benefit from treatments with a fungicide containing chlorothalonil, copper, mancozeb, neem oil, sulfur or thiophanate-methyl.  Three treatments may be needed for adequate control:  one at bud break, one when leaves are half expanded, and one when leaves are fully expanded.  DO NOT use the same active ingredient for all treatments (particularly if you are using thiophanate-methyl).  Instead, alternate the use of at least two active ingredients.  This strategy will help minimize problems with fungicide-resistant strains of Phyllosticta minima.  Be sure to read and follow all label instructions of the fungicide(s) that you select to ensure that you use the product(s) in the safest and most effective manner possible.

For more information on purple-bordered leaf spot: 

Contact the University of Wisconsin Plant Disease Diagnostics Clinic (PDDC) at (608) 262-2863 or pddc@wisc.edu.


This Fact Sheet is also available in PDF format:

*Completed as partial fulfillment of the requirements for the graduate course: Plant Pathology 559: Diseases of Economic Crops.

© 2005-2024 the Board of Regents of the University of Wisconsin System doing business as University of Wisconsin-Madison Division of Extension.

An EEO/Affirmative Action employer, University of Wisconsin-Madison Division of Extension provides equal opportunities in employment and programming, including Title IX and ADA requirements. This document can be provided in an alternative format by calling Brian Hudelson at (608) 262-2863 (711 for Wisconsin Relay).

References to pesticide products in this publication are for your convenience and are not an endorsement or criticism of one product over similar products. You are responsible for using pesticides according to the manufacturer’s current label directions. Follow directions exactly to protect the environment and people from pesticide exposure. Failure to do so violates the law.

Thanks to Diana Alfuth, Donna Henderson, and Thad Kohlenberg for reviewing this document.

A complete inventory of UW Plant Disease Facts is available at the University of Wisconsin-Madison Plant Disease Diagnostics Clinic website: https://pddc.qa.webhosting.cals.wisc.edu.

Submit additional lawn, landscape, and gardening questions at https://hort.extension.wisc.edu/ask-a-gardening-question/.

Powdery Scab – Pest Alert

Extension Logo

UW Plant Disease Facts


Pest Alert
Authors:   Ann Joy and Brian Hudelson, UW-Madison Plant Pathology
Last Revised:   03/01/2024
D-number:   D0088

What is powdery scab? 

Powdery scab is a potentially serious disease of potatoes that occurs worldwide in regions where potatoes are grown, including Wisconsin.  Although powdery scab primarily causes cosmetic, if unsightly, skin blemishes of potato tubers, the pathogen that causes the disease can transmit another, more serious potato pathogen, Potato mop-top virus (PMTV).  PMTV was first detected in Wisconsin in 2020.  This virus can cause severe losses and can limit a seed potato producer’s ability to sell to certain foreign markets.  In addition, blemishes caused by powdery scab can serve as entry points for other pathogens, such as those that cause late blight (see UW Plant Disease Facts D0068, Late Blight, pink rot, dry rot and black dot.

Powdery scab can lead to development of crater-like lesions on the surface of potato tubers. (Photo courtesy of Anette Phibbs)

What does powdery scab look like? 

Tubers are infected through lenticels, eyes, or wounds.  Initial symptoms of tuber infection are sunken purple-brown lesions that are followed by pimple-like swellings.  As lesions mature, they break through the potato skin and develop into shallow depressions that contain a mass of powdery spore balls (called cystosori) surrounded by thin, raised remnants of the outer tuber skin.  When infections develop in wet soils, the lesions deepen and become open cankers.  Infections of roots and stolons can also occur, and first appear as necrotic spots, that later become small, white to tan-colored galls.  As galls mature, they enlarge, turn brown and finally break open releasing cystosori into the soil.  Because powdery scab symptoms appear on below-ground parts of the potato, infections may not be noticed until harvest.  If symptoms have not fully developed by harvest, they may continue to develop in storage.  At various stages of development, powdery scab can be mistaken for common scab (see UW Plant Disease Facts D0083, Potato Scab), potato wart, black scurf, and root-knot nematode damage (see UW Plant Disease Facts D0097, Root-Knot Nematode).

Where does powdery scab come from? 

Powdery scab is caused by the soil-borne slime mold, Spongospora subterranea f. sp. subterranea.  The pathogen can be introduced into a non-infested field on infected seed tubers; on equipment, shoes, and other clothing contaminated with infested soil; or in infested manure (cystosori can survive passage through animal guts).  S. subterranea f. sp. subterranea cystosori can survive for at least 6 years in the soil.  In addition, S. subterranea f. sp. subterranea can survive on a variety of solanaceous vegetables and weeds including volunteer potatoes, tomatoes, peppers, nightshade, ground cherry and jimsonweed.  Cool temperatures (52ºF to 64ºF) and wet conditions favor disease development.  When free water is available, cystosori release motile spores (called zoospores) that swim to and infect root hairs, stolons and tubers.  Alternating periods of wet and dry weather produce repeated cycles of zoospore release.  Environmental conditions appear to be more important in disease development than initial inoculum level.

Powdery scab symptoms on a red-skinned variety of potato. (Photo courtesy of Anette Phibbs)

How do I control powdery scab? 

The best way to manage powdery scab is to prevent introduction of the pathogen into potato fields.  The introduction of the powdery scab pathogen into Wisconsin is thought to have occurred when growers planted infected seed tubers.  Therefore, carefully inspect seed tubers for powdery scab symptoms and be sure to plant disease-free seed potatoes into non-infested fields.  Once fields become infested, avoid these fields if possible, particularly those with poorly drained soils.  Contaminated fields should be rotated away from potatoes (and other susceptible hosts, such as tomatoes) for three to 10 years.  During this period, be sure to keep solanaceous weeds (e.g., nightshade, ground cherry) under control as these plants can serve as alternate hosts for the pathogen.  Once potato production resumes in infested fields, be sure not to over-irrigate, especially during tuber set.  Adopting a later planting date to take advantage of warmer temperatures may help reduce the level of powdery scab, but this may not be possible given other management constraints.  When attempting to dispose of infected tubers, do not compost these tubers.  If you decide to use infected tubers as feed, do not use manure from animals that have been fed the tubers, as cystosori can survive passage through animal guts.  Research by USDA-ARS scientists indicates that some mustard family crops (e.g., white mustard, rape, canola) that produce high levels of glucosinolates, when grown as green manures (fall-planted, spring-incorporated), may reduce levels of powdery scab.  Fungicides containing the active ingredient fluazinam have shown some efficacy against powdery scab, but results have been variable.  If you decide to use fungicides for control, be sure to select a product that is labeled for use on potatoes, and be sure to read and follow all label instructions of the fungicide that you select to ensure that you use the product in the safest and most effective manner possible.

For more information on powdery scab: 

SContact the University of Wisconsin Plant Disease Diagnostics Clinic (PDDC) at (608) 262-2863 or pddc@wisc.edu.


This Fact Sheet is also available in PDF format:

© 2005-2024 the Board of Regents of the University of Wisconsin System doing business as University of Wisconsin-Madison Division of Extension.

An EEO/Affirmative Action employer, University of Wisconsin-Madison Division of Extension provides equal opportunities in employment and programming, including Title IX and ADA requirements. This document can be provided in an alternative format by calling Brian Hudelson at (608) 262-2863 (711 for Wisconsin Relay).

References to pesticide products in this publication are for your convenience and are not an endorsement or criticism of one product over similar products. You are responsible for using pesticides according to the manufacturer’s current label directions. Follow directions exactly to protect the environment and people from pesticide exposure. Failure to do so violates the law.

Thanks to Adrian Barta, Anette Phibbs, Walt Stevenson and Ken Williams for reviewing this document.

A complete inventory of UW Plant Disease Facts is available at the University of Wisconsin-Madison Plant Disease Diagnostics Clinic website: https://pddc.qa.webhosting.cals.wisc.edu.

Submit additional lawn, landscape, and gardening questions at https://hort.extension.wisc.edu/ask-a-gardening-question/.

Powdery Mildew of Wheat

Extension Logo

UW Plant Disease Facts


Authors:   Damon Smith, UW-Madison Plant Pathology
Last Revised:   03/01/2024
D-number:   D0085

What is powdery mildew? 

Powdery mildew is a common fungal disease of wheat in Wisconsin.  The disease interferes with photosynthesis, thereby reducing plant growth, heading, and grain fill.  In extreme cases, powdery mildew can result in leaf, and even plant, death.  When weather is favorable and the disease occurs at flag leaf emergence or during heading, yield losses of up to 40% can occur.

Cottony, white growth on wheat leaves is characteristic of powdery mildew. (Photo courtesy of Craig Grau)

What does powdery mildew look like?  

Powdery mildew typically appears as white, cottony patches (masses of fungal threads and spores of the causal fungus) on the upper surfaces of leaves.  Patches also can occur on lower leaf surfaces, as well as on stems, seed heads and awns.  Fungal growth is confined primarily to the plant surface, with only limited penetration of the fungus into plant tissue.  As the fungal growth ages, it turns from white to dull gray or light brown.  When fully mature, the fungus forms reproductive structures called chasmothecia, which resemble small black dots or tiny seeds, among the fungal threads.

Where does powdery mildew come from? 

Powdery mildew is caused by the fungus Blumeria graminis, which most commonly overwinters as ascospores (a type of spore) inside chasmothecia on wheat residue.  During mild winters or when sufficient snow cover is present to provide good insulation, the fungus also survives on wheat residue as fungal threads or as conidia (a second type of spore).  In the spring, both ascospores and conidia are blown onto actively growing wheat plants where infection occurs followed by development of typical cottony fungal threads.  New conidia that form on infected plants can lead to additional infections throughout the wheat growing season.  Once a wheat crop is harvested, volunteer wheat plants serve as a reservoir for the fungus until the next wheat crop is planted and begins to grow in the fall.  The wheat powdery mildew fungus does not infect other small grains or weed grasses and these plants do not serve as a reservoir for the fungus.  Similarly, fungi that cause powdery mildew on small grains other than wheat and weed grasses are unlikely to infect wheat.  Moist, humid weather with widely fluctuating temperatures favors the development of powdery mildew.  Long periods of excessive rain inhibit powdery mildew development by washing spores from plants before infection can occur.

How can I save wheat plants with powdery mildew? 

Careful, routine scouting of a wheat crop throughout the growing season is important to detect powdery mildew as early as possible.  Frequent scouting allows for assessment of the likely impact of the disease on a wheat crop and helps to determine if and when fungicide applications are warranted.  If you scout only once for powdery mildew, be sure to scout just prior to flag leaf emergence.  Yield losses due to powdery mildew are greatest when the disease occurs prior to and at flag leaf emergence.  Therefore, protecting the flag leaf is critical in preserving proper head development and grain fill.  If powdery mildew is present at flag leaf emergence and weather is favorable for further disease development, consider applying a fungicide for control.  While there are a wide variety of fungicides available labeled for control of wheat powdery mildew, products or premixes containing demethylation inhibitor group active ingredients (FRAC 3) have performed particularly well in university research trials.  When using fungicides, be sure to read and follow all label instructions of the product that you select to ensure that you use it in the safest and most effective manner possible.

How can I avoid problems with powdery mildew in the future? 

Consider using wheat cultivars with powdery mildew resistance, but keep in mind that the level of powdery mildew resistance can vary widely from cultivar to cultivar.  To reduce the amount of powdery mildew fungus in a field, use tillage practices (where feasible) to bury infested wheat residue, remove volunteer wheat plants, and routinely rotate wheat with other crops (e.g., corn, soybeans).  Powdery mildew tends to be more severe in fields that have excess nutrients (particularly nitrogen).  Therefore, fertilize (especially with nitrogen, potassium, and phosphorus) for optimal plant growth, but DO NOT overfertilize.

For more information on powdery mildew of wheat:  

Contact the University of Wisconsin Plant Disease Diagnostics Clinic (PDDC) at (608) 262-2863 or pddc@wisc.edu.


This Fact Sheet is also available in PDF format:

© 2015-2024 the Board of Regents of the University of Wisconsin System doing business as University of Wisconsin-Madison Division of Extension.

An EEO/Affirmative Action employer, University of Wisconsin-Madison Division of Extension provides equal opportunities in employment and programming, including Title IX and ADA requirements. This document can be provided in an alternative format by calling Brian Hudelson at (608) 262-2863 (711 for Wisconsin Relay).

References to pesticide products in this publication are for your convenience and are not an endorsement or criticism of one product over similar products. You are responsible for using pesticides according to the manufacturer’s current label directions. Follow directions exactly to protect the environment and people from pesticide exposure. Failure to do so violates the law.

Thanks to Matt Akins , Bryan Jensen and Jamie Patton for reviewing this document.

A complete inventory of UW Plant Disease Facts is available at the University of Wisconsin-Madison Plant Disease Diagnostics Clinic website: https://pddc.qa.webhosting.cals.wisc.edu.

Submit additional agriculture-related questions at https://extension.wisc.edu/agriculture/ask-an-agriculture-question/.