Authors: Brian Hudelson, UW-Madison Plant Pathology
Last Revised: 03/01/2024
D-number: D0093
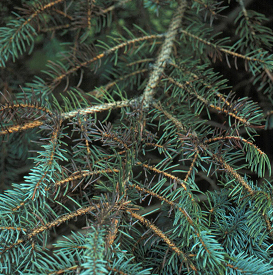
Browning of interior spruce needles caused by Rhizosphaera needle blight.
What is Rhizosphaera needle cast?
Rhizosphaera needle cast is the most common disease of Colorado blue spruce in Wisconsin, making Colorado blue spruce unsightly and unusable in many landscape settings. The disease also affects other conifers including black, Engelmann, Serbian, Sitka, and white (e.g., Black Hills) spruce; Austrian, mugo and eastern white pine; Douglas-fir, balsam fir and western hemlock.
What does Rhizosphaera needle cast look like?
The first noticeable symptom of Rhizosphaera needle cast is purpling or browning and loss of the innermost needles on lower branches of spruce trees. Often, the youngest needles at the tips of branches remain healthy. Rows of small, black spheres form along the length of infected needles and are visible with a 10X hand lens. These black spheres are fruiting bodies (i.e., reproductive structures) of the fungus that causes the disease and are diagnostic.
Where does Rhizosphaera needle cast come from?
Rhizosphaera needle cast is typically caused by the fungus Rhizosphaera kalkhoffii, although other species of Rhizosphaera can be involved depending on the host. Infected needles, including those that are still attached to branches and those that have fallen to the ground, produce spores that can be blown or splashed to healthy needles.
How do I save a tree or shrub with Rhizosphaera needle cast?
Consider treating affected trees with fungicides labeled for use on evergreens and containing copper or chlorothalonil. Treatments will not cure existing infections, but can prevent additional infections. Apply treatments every three to four weeks starting as new needles emerge each spring. Continue applications through periods of wet weather. For fungicide treatments to be effective, thoroughly cover all needles. This may be difficult on large trees. Be sure to read and follow all label instructions of the fungicide that you select to ensure that you use the product in the safest and most effective manner possible.
How do I avoid problems with Rhizosphaera needle cast in the future?
The easiest way to avoid Rhizosphaera needle cast is to avoid planting Colorado blue spruce. If you do plant this tree, consider using dwarf varieties, and allow adequate spacing between trees so that branches will not overlap when they are full size. Dwarf varieties and properly spaced larger spruce varieties will have better air penetration and needles will dry more quickly. Dry needles are less likely to be infected. Check existing spruce trees for the disease, and remove and destroy any diseased branches and needles by burning (where allowed by local ordinance), burying or hot composting.
For more information on Rhizosphaera needle cast:
Contact the University of Wisconsin Plant Disease Diagnostics Clinic (PDDC) at (608) 262-2863 or pddc@wisc.edu.
An EEO/Affirmative Action employer, University of Wisconsin-Madison Division of Extension provides equal opportunities in employment and programming, including Title IX and ADA requirements. This document can be provided in an alternative format by calling Brian Hudelson at (608) 262-2863 (711 for Wisconsin Relay).
References to pesticide products in this publication are for your convenience and are not an endorsement or criticism of one product over similar products. You are responsible for using pesticides according to the manufacturer’s current label directions. Follow directions exactly to protect the environment and people from pesticide exposure. Failure to do so violates the law.
Thanks to Diana Alfuth, Jean Ferdinandsen, Lisa Johnson, Scott Reuss and Amy Sausen for reviewing this document.
A complete inventory of UW Plant Disease Facts is available at the University of Wisconsin-Madison Plant Disease Diagnostics Clinic website: https://pddc.qa.webhosting.cals.wisc.edu.
Authors: Brian Hudelson, UW-Madison Plant Pathology
Last Revised: 03/01/2024
D-number: D0090
What is Ralstonia wilt?
Ralstonia wilt (also sometimes known as Southern wilt) is a typically lethal disease that affects over 250 plants in over 40 plant families. Susceptible greenhouse-grown ornamentals include, but are not limited to, plants in the genera Capsicum, Cosmos, Cyclamen, Dahlia, Fuschsia, Gerbera, Hydrangea, Impatiens, Lantana,Nasturtium and Pelargonium. Vegetables such as eggplant, pepper, potato and tomato, as well as tobacco, are also susceptible. Ralstonia wilt was first reported on geraniums (Pelargonium spp.) in Wisconsin in 1999. In 2020, the disease was reported on Fantasia® ‘Pink Flare’ geraniums in Michigan. Potentially infected ‘Pink Flare’ geraniums were also distributed to 38 other states including Wisconsin.
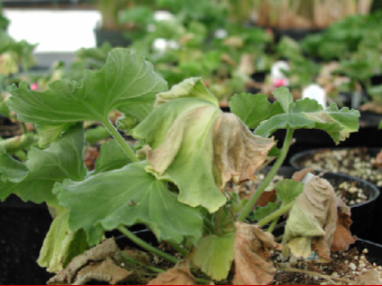
Yellowing and wilting characteristic of Ralstonia wilt. Photo courtesy of WI DATCP
What does Ralstonia wilt look like?
Symptoms of Ralstonia wilt in geraniums are similar to those associated with bacterial blight (caused by Xanthomonas campestris pv. pelargonii). Initially, lower leaves of infected plants yellow and wilt, then die. Yellowing and death of upper leaves follow. Symptoms may initially occur on only one side of the plant. Internally, the water-conducting tissue of the plant browns, and then the entire stem rots from the inside out. Eventually, infected plants die.
Where does Ralstonia wilt come from?
Ralstonia wilt is caused by the bacterium Ralstonia solanacearum (formerly Pseudomonas solanacearum). This bacterium is commonly found in tropical, sub-tropical and warm temperate climates, but it is not believed to survive cold temperatures such as those typical of Wisconsin winters. The bacterium can be moved in symptomless plants or cuttings, or in contaminated soil and plant debris (where the pathogen can remain dormant for many years). Several subgroups (i.e., races and biovars) of R. solanacearum have been recognized, each with a different host range. R. solanacearum race 3, biovar 2 is of particular concern because it causes a serious disease of potato called brown rot. In addition, this race/biovar has been listed as a select agent by the U.S. government and is considered to have potential to be developed as a bioterrorist weapon against U.S. agriculture.
How do I save plants with Ralstonia wilt?
There are no known treatments that will save plants affected by Ralstonia wilt. If you believe your plants are suffering from this disease, immediately contact your local department of agriculture or county Extension agriculture or horticulture agent to arrange for confirmatory testing. If you live in Wisconsin, you can contact the UW-Madison Plant Disease Diagnostics Clinic (see below for contact information) for assistance. If your plants test positive for R. solanacearum race 3, biovar 2 the United States Department of Agriculture Animal and Plant Health Inspection Service (USDA APHIS) must be notified and this organization will provide guidance on proper disposal of contaminated plants, as well as decontamination of greenhouses or other sites where contaminated plants have been grown.
How do I avoid problems with Ralstonia wilt in the future?
Start by purchasing and growing pathogen-free plant cuttings. Keep plants from different suppliers physically separated by at least four feet to minimize the risk of cross contamination should a shipment of plants prove to be contaminated. Because R. solanacearum is easily moved with soil or water, minimize splashing or any other movement of water or soil from plant to plant when watering. When taking cuttings or trimming plants, be sure to clean cutting tools between cuts using an approved disinfectant. For a complete list of such products, contact the UW-Madison Plant Disease Diagnostics Clinic (see below for contact information). Also wear disposable gloves (nitrile are best) when handling plants, and change gloves between working with different geranium varieties. This will minimize the possibility of moving R. solanacearum by touch. If gloves are not available, wash your hands frequently and thoroughly (especially between geranium varieties) with lots of soap and water or with an alcohol-based hand sanitizer. Remove and destroy weeds or weed debris as these can harbor the pathogen. Finally, do not grow plants in a greenhouse where the disease has occurred unless it has been properly decontaminated.
For more information on Ralstonia wilt:
Contact the University of Wisconsin Plant Disease Diagnostics Clinic (PDDC) at (608) 262-2863 or pddc@wisc.edu.
An EEO/Affirmative Action employer, University of Wisconsin-Madison Division of Extension provides equal opportunities in employment and programming, including Title IX and ADA requirements. This document can be provided in an alternative format by calling Brian Hudelson at (608) 262-2863 (711 for Wisconsin Relay).
References to pesticide products in this publication are for your convenience and are not an endorsement or criticism of one product over similar products. You are responsible for using pesticides according to the manufacturer’s current label directions. Follow directions exactly to protect the environment and people from pesticide exposure. Failure to do so violates the law.
Thanks to Alemu Mengistu, Julie Tans-Kersten and Laurie Weiss for reviewing this document.
A complete inventory of UW Plant Disease Facts is available at the University of Wisconsin-Madison Plant Disease Diagnostics Clinic website: https://pddc.qa.webhosting.cals.wisc.edu.
Authors: Ann Joy and Brian Hudelson, UW-Madison Plant Pathology
Last Revised: 03/02/2024
D-number: D0103
The Southern blight fungus produces large numbers of spherical, light tan to dark red resting structures called sclerotia.
What is Southern blight?
Southern blight is a lethal fungal disease that is most common in the tropics and subtropics. This disease causes damage in the southern United States and can even cause problems in temperate locations like Wisconsin during periods of warm, moist weather. Southern blight has a wide host range, affecting over 500 plant species. Vegetable and fruit hosts include tomato, pepper, onion, beet, rhubarb, strawberry, lettuce, cucumber, melon, carrot, asparagus and parsley. Ornamental hosts include aster, black-eyed Susan, dahlia, daylily, gladiolus, hosta, impatiens, peony, petunia, rose, salvia, sedum and viola. Small woody trees and shrubs can be affected as well.
What does Southern blight look like?
Southern blight initially leads to a water-soaked appearance on lower leaves or water-soaked lesions (spots) on lower stems. Any plant part that is near or in contact with the soil may become infected. Infected plants yellow and wilt, often within days of infection, particularly when the weather is moist and warm (80 to 95°F). Fruit rots, crown rots and root rots are also typical symptoms of the disease. Thick mats of white fungal threads (called mycelia) may grow from infected tissue, radiating from the plant onto the soil surface. Sclerotia (small spherical structures that are about the size of mustard seeds) develop on infected tissue and on the soil surface. Sclerotia range in color from light tan to dark reddish-brown to black.
Where does Southern blight come from?
Southern blight is caused by the fungus Athelia rolfsii (formerly Sclerotium rolfsii), which lives in soil, on plants (including weeds), and in plant debris. The fungus can be spread through movement of infested soil and plant debris, on infected plants, in contaminated irrigation water, and through use of contaminated tools. In Wisconsin, A. rolfsii most likely enters gardens on infected nursery stock or infested mulch. Freezing temperatures will kill A. rolfsii mycelia, but sclerotia can survive temperatures as low as approximately 14ºF.
Southern blight can be a serious disease of vegetables, including tomatoes, leading to wilting and plant death. (Photo courtesy of Gary E. Vallad, University of Florida)
How can I save a plant with Southern blight?
Identify the extent of an infestation based on visible dead/dying plants, fungal mycelia and sclerotia. Remove all plants (including roots), as well as three inches of soil, from at least 12 inches beyond the infested area. Start at the edge of the infested area and work toward the center. Bag all plants and soil and dispose of these materials in a landfill. Turn any remaining soil in the infested area eight to 12 inches to bury any sclerotia that you may have missed. This will reduce the length of time that the sclerotia will survive. Grow non-susceptible plants (e.g., larger woody ornamentals) in the affected area for two to three years to allow time for sclerotia to die naturally. Fungicides containing azoles (e.g., propiconazole, tebuconazole), fludioxonil, flutolanil, mancozeb, PCNB, strobilurins (e.g., azoxystrobin, fluoxastrobin), thiophanate-methyl, and triadimefon are all labeled for Southern blight control, but may have varying levels of effectiveness. All of these products will likely be more effective if applied as preventive treatments rather than in an attempt to “cure” existing disease. If you decide to use fungicides, DO NOT use one active ingredient for all treatments. Instead, alternate the use of two or more unrelated active ingredients to help minimize problems with fungicide-resistant strains of A. rolfsii. DO NOT alternate active ingredients that are chemically related (e.g., propiconazole and tebuconazole, or azoxystrobin and fluoxastrobin). Be sure to read and follow all label instructions of the fungicide(s) that you select to ensure that you use the product(s) in the safest and most effective manner possible.
How can I prevent Southern blight in the future?
Inspect new plants for sclerotia and mycelia of A. rolfsii prior to transplanting. Bag and dispose of diseased plants as described above. Use high-quality mulches (e.g., shredded oak bark mulch, red cedar mulch) in your garden and avoid any mulches that you suspect might be contaminated with A. rolfsii. A. rolfsii thrives under moist conditions. Therefore, thin existing gardens or space plants farther apart in new gardens to improve airflow and promote more rapid drying of foliage and soil.
For more information on Southern blight:
Contact the University of Wisconsin Plant Disease Diagnostics Clinic (PDDC) at (608) 262-2863 or pddc@wisc.edu.
An EEO/Affirmative Action employer, University of Wisconsin-Madison Division of Extension provides equal opportunities in employment and programming, including Title IX and ADA requirements. This document can be provided in an alternative format by calling Brian Hudelson at (608) 262-2863 (711 for Wisconsin Relay).
References to pesticide products in this publication are for your convenience and are not an endorsement or criticism of one product over similar products. You are responsible for using pesticides according to the manufacturer’s current label directions. Follow directions exactly to protect the environment and people from pesticide exposure. Failure to do so violates the law.
Thanks to Lynn Adams, Bryan Jensen, Mark Kopecky, Kaitlyn Lance, Mike Maddox, and Ann Wied for reviewing this document. Thanks also to Mike Maddox for supplying the photo.
A complete inventory of UW Plant Disease Facts is available at the University of Wisconsin-Madison Plant Disease Diagnostics Clinic website: https://pddc.qa.webhosting.cals.wisc.edu.
Authors: Brian Hudelson, UW-Madison Plant Pathology
Last Revised: 03/02/2024
D-number: D0110
What is tar spot?
Tar spot is a common, visually distinctive and primarily cosmetic fungal leaf spot disease. Tar spot can affect many species of maple, including (but not limited to) silver maple, sugar maple and Norway maple. Boxelder (also known as ash-leaved maple), willow, holly and tulip-tree can also be affected by tar spot.
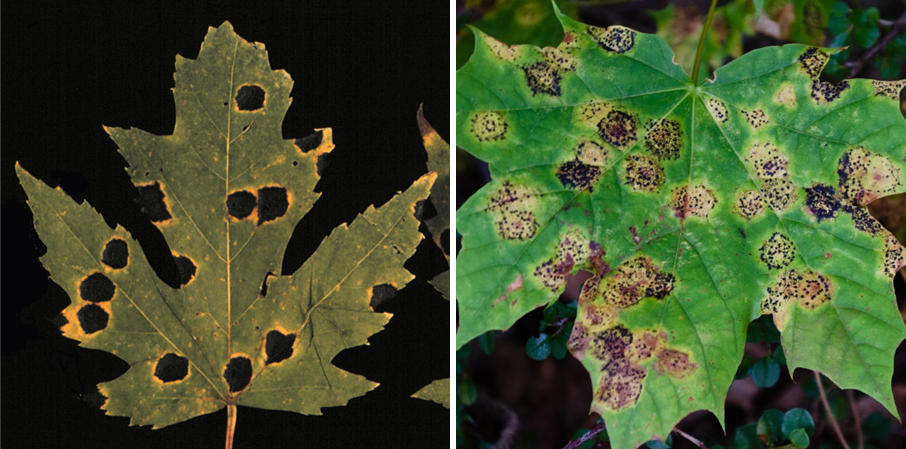
Symptoms of tar spot of silver maple caused by Rhytisma americanum (left) and tar spot of Norway maple caused by Rhytisma acerinum (right).
What does tar spot look like?
Initial symptoms of tar spot are small (approximately 1/8 inch) yellowish spots that form on infected leaves. These spots may remain relatively small, or may enlarge over the growing season to approximately 3/4 inch in diameter. As tar spot develops, black structures (resembling blobs of tar) form. On Norway maple, the black structures are typically numerous, small (approximately 1/8 inch in diameter), and clustered together. On silver maple, the black structures are often single, large (approximately 3/4 inch in diameter) and visibly raised. If you carefully examine the larger tar-like areas on silver maple, you will see convoluted line patterns that resemble fingerprints.
Where does tar spot come from?
Several fungi in the genus Rhytisma cause tar spot. On maples specifically, Rhytisma americanum, Rhytisma acerinum, and (less commonly) Rhytisma punctatum cause tar spot. Tar spot fungi commonly survive in leaf litter where they produce spores in the spring that lead to leaf infections.
How do I save a tree or shrub with tar spot?
DO NOT panic. For most maples and other susceptible trees and shrubs, tar spot is not a serious disease. It is a cosmetic disease that makes trees and shrubs look unsightly. Tar spot does not kill trees or shrubs, nor does it typically even cause serious defoliation.
How do I avoid problems with tar spot in the future?
You can reduce or even eliminate tar spot by simply collecting up and properly disposing of leaves from affected trees and shrubs each fall. These leaves can be burned (where allowed), buried or hot composted. When composting, make sure that your compost pile reaches a high temperature (approximately 140°F). Also, make sure that you routinely turn your compost pile so that leaves on the outside of the pile eventually end up in the center of the pile. The combination of high temperature and decay of leaf tissue in a compost pile helps eliminate tar spot fungi.
Fungicides containing copper, alone or in combination with mancozeb, are labeled for tar spot control in Wisconsin. However, fungicide treatments for this disease are rarely, if ever, warranted. Consult with your county Extension horticulture/agriculture agent to determine if your tree warrants preventative treatments. If warranted, three fungicide applications will be needed: one at bud break, one when leaves are half expanded, and one when leaves are fully expanded. Be sure to read and follow all label instructions of the fungicide that you select to ensure that you use the product in the safest and most effective manner possible.
For more information on tar spot of trees and shrubs:
Contact the University of Wisconsin Plant Disease Diagnostics Clinic (PDDC) at (608) 262-2863 or pddc@wisc.edu.
An EEO/Affirmative Action employer, University of Wisconsin-Madison Division of Extension provides equal opportunities in employment and programming, including Title IX and ADA requirements. This document can be provided in an alternative format by calling Brian Hudelson at (608) 262-2863 (711 for Wisconsin Relay).
References to pesticide products in this publication are for your convenience and are not an endorsement or criticism of one product over similar products. You are responsible for using pesticides according to the manufacturer’s current label directions. Follow directions exactly to protect the environment and people from pesticide exposure. Failure to do so violates the law.
Thanks to Lis Friemoth, Ann Joy and Mike Maddox for reviewing this document.
A complete inventory of UW Plant Disease Facts is available at the University of Wisconsin-Madison Plant Disease Diagnostics Clinic website: https://pddc.qa.webhosting.cals.wisc.edu.
Authors: Brian Hudelson, UW-Madison Plant Pathology
Last Revised: 02/28/2024
D-number: D0004
What is apple scab?
Apple scab is a potentially serious fungal disease of ornamental and fruit trees in the rose family. Trees that are most commonly and severely affected include crabapple, hawthorn, mountain-ash, apple and pear. In ornamental trees, leaf loss caused by apple scab can make trees unsightly and aesthetically unappealing. In fruit trees, leaf loss can reduce fruit yield. In addition, the presence of apple scab on fruits can make the fruit difficult, if not impossible, to market.
Leaf spots typical of apple scab on apple. Typical apple scab leaf spots (left) and fruit lesions (right). The disease can cause total defoliation and make fruit unmarketable.
What does apple scab look like?
Apple scab lesions (diseased areas) are often first noticed on leaves, where they most commonly occur on the upper leaf surface. Fruits are also very susceptible to infection. Lesions on both leaves and fruits are roughly circular with feathery edges and have an olive green to black color. Lesions can be as small as the size of a pinhead or as large a ½ inch in diameter. When disease is severe, lesions can merge and cover a large portion of the leaf or fruit surface. Defoliation of a tree (i.e., extensive leaf drop) often follows.
Where does apple scab come from?
Scab is caused primarily by the fungus Venturia inaequalis. Other species of Venturia can be involved in diseases similar to apple scab. In particular, Venturia pirina causes a very similar disease (called pear scab) on pear. Venturia inaequalis and its relatives survive the winter in leaf litter from infected trees. Scab is most severe in cool, wet years.
How do I save a tree with apple scab?
Apple scab is not a lethal disease, even when trees totally defoliate. Once symptoms are visible, it is too late to treat a tree. Proper long-term management of apple scab is important however. If left unchecked, defoliation due to apple scab year after year can stress a tree and make it more susceptible to other, more serious and lethal diseases and insect pests.
How do I avoid problems with apple scab in the future?
If your crabapple, apple or pear tree has a history of severe scab, consider replacing it with a resistant variety. See UW Bulletins A2105 (Apple Cultivars for Wisconsin), A2488 (Home Fruit Cultivars for Northern Wisconsin), and A2582 (Home Fruit Cultivars for Southern Wisconsin) for recommendations. These publications are all available at https://learningstore.extension.wisc.edu/.
If you have a susceptible tree that you want to maintain, carefully collect up and discard fallen, infected leaves each autumn. These leaves are a major source of spores that can infect leaves the following growing season. Also, be sure to routinely thin your trees to open up the canopy and allow better airflow. Thinning will promote more rapid drying of leaves, which is less favorable for apple scab development.
Even with proper fall leaf clean up and thinning, you may have to consider applying fungicide treatments to susceptible trees, particularly when the weather is cool and wet. Captan, chlorothalonil, mancozeb, myclobutanil, propiconazole, or thiophanate methyl, are available for apple scab control, although not all of these active ingredients can be used on trees where fruit will eventually be eaten. Be sure to read and follow all label instructions of the fungicide(s) that you select to ensure that you use the correct fungicide(s) in the safest and most effective manner possible. Typically, you will need to treat every seven to 14 days from bud break until wet weather subsides. DO NOT use myclobutanil, propiconazole, or thiophanate methyl as the sole active ingredient for all treatments. If you decide to use one of these active ingredients, alternate its use with at least one of the other active ingredients listed above to help minimize problems with fungicide-resistant strains of the apple and pear scab fungi.
For more information on apple scab:
Contact the University of Wisconsin Plant Disease Diagnostics Clinic (PDDC) at (608) 262-2863 or pddc@wisc.edu.
An EEO/Affirmative Action employer, University of Wisconsin-Madison Division of Extension provides equal opportunities in employment and programming, including Title IX and ADA requirements. This document can be provided in an alternative format by calling Brian Hudelson at (608) 262-2863 (711 for Wisconsin Relay).
References to pesticide products in this publication are for your convenience and are not an endorsement or criticism of one product over similar products. You are responsible for using pesticides according to the manufacturer’s current label directions. Follow directions exactly to protect the environment and people from pesticide exposure. Failure to do so violates the law.
Thanks to Paul Hartman, Laura Jull, Patti Nagai and Scott Reuss for reviewing this document.
A complete inventory of UW Plant Disease Facts is available at the University of Wisconsin-Madison Plant Disease Diagnostics Clinic website: https://pddc.qa.webhosting.cals.wisc.edu.
Eastern filbert blight is a potentially serious fungal disease found throughout the United States, including Wisconsin. It affects only Corylus species, commonly known as hazelnuts or filberts. On hazelnuts native to Wisconsin such as American hazelnut (Corylus americana) and beaked hazelnut (Corylus cornuta), the disease causes little significant damage, but on the commonly grown European hazelnut (Corylus avellana), including Harry Lauder’s walking stick (Corylus avellana ‘Contorta’), the disease is lethal. Turkish filbert (Corylus colurna) also appears to be highly susceptible.
Eastern filbert blight can cause small black cankers that form in rows, or deep gouges in the bark of severely infected trees/shrubs.
What does Eastern filbert blight look like?
Eastern filbert blight causes cankers (i.e., dead, collapsed areas) on branches or main trunks. Easily visible within the cankers are black, football-shaped stromata (the reproductive structures of the causal fungus). The stromata often form in rows of two. Cankers first appear on new twigs and expand over time. American hazelnut trees/shrubs are able to live almost indefinitely with Eastern filbert blight, forming a small number of slowly-expanding cankers (if any cankers form at all) that lead to limited branch dieback. On European hazelnut however, cankers will expand anywhere from one inch to three feet in a year, and can eventually form long, deep gouges or grooves on severely affected trees/shrubs. European hazelnuts typically die due to girdling from Eastern filbert blight within five to 10 years of initial infection.
Where does Eastern filbert blight come from?
Eastern filbert blight is caused by the fungus Anisogramma anomala.Stromata formed by the fungus produce spores that are spread short distances by water splash and over longer distances by wind. Humans also can spread Anisogramma anomala on their hands and clothing, on gardening tools, and by transporting wood from infected trees/shrubs. Unlike other canker fungi that infect through wounds, the Eastern filbert blight fungus primarily infects through immature tissue on actively growing shoots. Cankers appear 12 to 18 months after infection. Eastern filbert blight does not affect hazelnut leaves, fruits or nuts.
How do I save trees/shrubs with Eastern filbert blight?
There is no cure for Eastern filbert blight. If only a few branches on a tree/shrub are affected, prune these branches two to three feet below each canker. Decontaminate tools after each cut by treating them for at least 30 seconds with a 10% bleach solution or (preferably due to its less corrosive properties) 70% alcohol (e.g., rubbing alcohol, certain spray disinfectants).
If a tree/shrub is severely affected by Eastern filbert blight (e.g., when there are so many cankers on multiple branches that the tree/shrub would look ugly if pruned, when branch pruning would require removing part of the trunk, or when trunk cankers are present), removal of the tree/shrub is the preferred management strategy.
Pruned branches and removed trees/shrubs should be burned (where allowed by local ordinance), deep-buried, or chipped (as long as the chips are allowed to dry to kill the Eastern filbert blight fungus).
How do I avoid problems with Eastern filbert blight in the future?
Consider planting native species of hazelnut (e.g., American and beaked hazelnut) that are naturally resistant to the disease. If you decide to plant European hazelnut, select cultivars that have been bred for resistance. ‘Jefferson’, ‘Santiam’, ‘Yamhill’, and ‘Theta’ are resistant, nut-bearing cultivars. ‘Red Dragon’ is a resistant, ornamental cultivar. Note that these cultivars are not hardy in all hardiness zones in Wisconsin. Hybrid hazelnuts (crosses between American and European hazelnut) are becoming increasingly available, but should be used with caution because their susceptibility to Eastern filbert blight has not been adequately tested.
Once hazelnut trees/shrubs are established in your yard, routinely inspect the plants for infection and remove infected branches as they occur. Watch for dying branches in the summer and cankers (particularly on or near the youngest growth) in the winter. Inspecting trees during the winter is very important, because cankers are more visible at that time.
Fungicides can be used for management, but should only be used as a last resort. Not all fungicides that are approved for Eastern filbert blight control are particularly effective, but chlorothalonil has been shown to be an effective preventative treatment, although it will not cure existing infections. Note that not all formulations of chlorothalonil are approved for use on nut-bearing hazelnuts; many formulations can only be used on ornamental hazelnuts. Therefore, if you decide to use chlorothalonil, be sure to select the appropriate formulation for your particular situation. Apply the first treatment at bud break (i.e., when half the buds show a separation of leaves) and additional treatments (up to three) every two weeks thereafter. If you plan to eat nuts from your hazelnut tree, make sure that your last fungicide treatment is applied at least 120 days before anticipated nut harvest. For further details about recommended fungicides, spray rate recommendations, and diagrams of bud stages, see Pest Management Guide for Hazelnuts in the Willamette Valley, Oregon State University Extension Bulletin EM8328 available at https://catalog.extension.oregonstate.edu/em8328.
For more information on Eastern filbert blight:
Contact the University of Wisconsin Plant Disease Diagnostics Clinic (PDDC) at (608) 262-2863 or pddc@wisc.edu.
An EEO/Affirmative Action employer, University of Wisconsin-Madison Division of Extension provides equal opportunities in employment and programming, including Title IX and ADA requirements. This document can be provided in an alternative format by calling Brian Hudelson at (608) 262-2863 (711 for Wisconsin Relay).
References to pesticide products in this publication are for your convenience and are not an endorsement or criticism of one product over similar products. You are responsible for using pesticides according to the manufacturer’s current label directions. Follow directions exactly to protect the environment and people from pesticide exposure. Failure to do so violates the law.
Thanks to Jason Fischbach, Benjamin Gold, Laura Jull, Marian Lund, Ryan Morey, and Mary Pelzer for reviewing this document.
A complete inventory of UW Plant Disease Facts is available at the University of Wisconsin-Madison Plant Disease Diagnostics Clinic website: https://pddc.qa.webhosting.cals.wisc.edu.
Authors: David S. Jones*, UW-Madison Plant Pathology
Last Revised: 02/29/2024
D-number: D0028
What is cane blight?
Cane blight is a fungal disease that affects the health of canes (i.e., stems) of cultivated and wild Rubus species (e.g., raspberries and blackberries), wherever they are grown. Black and purple raspberries appear to be more susceptible to cane blight than red raspberries, but all commonly cultivated raspberry cultivars can get the disease. Although cane blight is not typically fatal, it may cause significant fruit yield losses if left unmanaged.
Cane death on a thornless blackberry caused by cane blight. Look for a dark brown infection line and dead/dying shoots above the point of infection. (Photo courtesy of Michael Ellis, The Ohio State University)
What does cane blight look like?
Symptoms of cane blight usually first appear in early summer after blossoming and leaf emergence, and in association with wounds caused by pruning or harvesting of fruit. Look for sudden death of side branches and tips of fruit-bearing canes, as well as dark brown or purple spots (called cankers) on the canes below the dieback. In wet weather, cankers may produce a grey ooze. In dry weather, the cankers may appear fuzzy or powdery. Dead canes may become brittle and snap off in windy conditions.
Where does cane blight come from?
Cane blight is caused by the fungus Leptosphaeria coniothyrium which survives the winter in infected canes. During wet periods, the fungus produces windborne spores and infects through open wounds on canes caused by pruning, harvest damage, insect damage, or abrasions from canes rubbing together. As the disease develops, the fungus produces additional spores that can spread to other wounds by wind and splashing water, leading to additional infections.
How do I save plants with cane blight?
DO NOT prune infected canes during the growing season as pruning wounds will provide the cane blight fungus easy entry into healthy tissue. Label symptomatic canes as you see them and prune the canes to the ground during the dormant season (i.e., mid- to late winter). Also prune any older cane stubs at this time to remove them as a source of abrasion and wounding for newer canes. Pruning when plants are dormant allows ample time for wounds to close at a time of year when spores of the cane blight fungus are not being produced. Use only sharp tools for pruning, and disinfest pruning tools after each cut by treating them for at least 30 seconds with 10% bleach or preferably (due to its less corrosive properties) 70% alcohol (e.g., rubbing alcohol or certain spray disinfectants). If you use bleach, be sure to thoroughly rinse and oil your tools after pruning to prevent rusting. Dispose of any canes that you prune by burning them (where allowed by local ordinance), burying them, or arranging to have them hauled away through municipal brush collection. Be patient as you attempt to get cane blight under control; it may take two or more years of pruning and good sanitation to reduce cane blight to negligible levels.
How can I prevent cane blight in the future?
When establishing a new raspberry patch, choose a site that is well-drained and sunny, and make sure that the distance between rows is approximately 18 inches. Also be sure to keep weeds under control. Proper site selection, row spacing and weed control will promote good airflow and drainage, and will reduce excessive moisture that is favorable for spore production by the cane blight fungus.
In addition, maintain optimum soil fertility. If you underfertilize plants, they will produce weak canes that are less able to fend off infections by the cane blight fungus. If you overfertilize plants (particularly with nitrogen), they will produce succulent new growth that is more prone to breakage and more prone to wounding by certain insects that will use the new growth as food. Remember that wounds of any kind can provide entry points for the cane blight fungus. For details on properly fertilizing raspberries, see UW Bulletin A1610, Growing Raspberries in Wisconsin (available at https://learningstore.extension.wisc.edu/).
For more information on cane blight:
Contact the University of Wisconsin Plant Disease Diagnostics Clinic (PDDC) at (608) 262-2863 or pddc@wisc.edu.
An EEO/Affirmative Action employer, University of Wisconsin-Madison Division of Extension provides equal opportunities in employment and programming, including Title IX and ADA requirements. This document can be provided in an alternative format by calling Brian Hudelson at (608) 262-2863 (711 for Wisconsin Relay).
References to pesticide products in this publication are for your convenience and are not an endorsement or criticism of one product over similar products. You are responsible for using pesticides according to the manufacturer’s current label directions. Follow directions exactly to protect the environment and people from pesticide exposure. Failure to do so violates the law.
Thanks to Anne Donnellan, Kris Gabert, Abigail Jones, Patty McManus, Craig Schreiner, and Lisa Schreiner for reviewing this document.
A complete inventory of UW Plant Disease Facts is available at the University of Wisconsin-Madison Plant Disease Diagnostics Clinic website: https://pddc.qa.webhosting.cals.wisc.edu.
Authors: Jane Cummings-Carlson and John Kyhl, Wisconsin Department of Natural Resources Gina Foreman and Brian Hudelson, UW-Madison Plant Pathology Last Revised: 03/02/2024 D-Number: D0128
What are the benefits of wood mulch?
Wood mulch is typically available as chipped wood, or shredded or chunked bark, and can contribute to tree health in many ways. When high quality, composted mulches are applied two to four inches deep in a ring three to six feet in diameter (or greater) from the trunk of a tree, mulch can help preserve moisture, control weeds, limit damage to the trunk from mowers and string trimmers and moderate the soil temperature. Use four inches of mulch when soils are light and well-drained, and two inches of mulch on heavier, clay soils.
Use of properly composted mulches can be beneficial to trees and shrubs in the landscape.
Can wood mulch harm trees?
Use of improperly composted mulches (some-times called “sour mulches”), can lead to tree nutrient deficiencies. Sour mulches can also produce gases like methane and ammonia that can be toxic to plants. Foliage on trees surrounded by sour mulches may initially turn yellow, then brown, die and fall off. If your mulch smells like vinegar, ammonia or sulfur, it is likely a sour mulch and should be removed. Replace the sour mulch with a high quality, composted mulch and consult with your local Extension agent about testing the soil for nutrient deficiencies. Fertilize appropriately based on the results of these tests.
Improper application of mulch can also lead to problems. Piling wood mulch up against the trunk of a tree can keep the bark underneath excessively wet. This wetness can contribute to bark decay. In addition, use of thick mulch layers (greater than four inches) can lead to overly wet soils that are favorable for development of root rots (see UW Plant Disease Facts D0094, Root and Crown Rot). To avoid these problems, make sure mulch is applied at least four inches away from the trunk of a tree and that the mulch layer is the appropriate thickness for the soil type in your landscape (see above).
Does woody mulch harbor or attract insects?
Insects such as earwigs [see UW Bulletin A3640, Controlling Earwigs (available at https://learningstore.extension.wisc.edu/)], centipedes (see University of Wisconsin Garden Facts XHT1113, Centipedes), millipedes (see University of Wisconsin Garden Facts XHT1108, Millipedes) and sowbugs (see University of Wisconsin Garden Facts XHT1110, Sowbugs) can feed on decaying organic matter in mulches. While these insects are often only nuisances, earwigs can feed on and cause damage to a variety of ornamentals, particularly to flowering plants. If mulch is used near entrances to a home or around basement windows, these unwanted insects may get inside. Termites ingest wood and can be attracted to wood mulch, but new termite colonies are not likely to become established due to use of wood mulches. Typically, termites are not a problem in Wisconsin, and when colonies are found, they occur only in the southern half of the state.
Carpenter ants [see UW Bulletin A3641, Controlling Carpenter Ants (available at https://learningstore.extension.wisc.edu/)] and powderpost beetles (see University of Wisconsin Garden Facts XHT1053, Powderpost Beetles) are unlikely to utilize mulch as a food source because conditions required for their development would not be satisfied by wood mulch. Carpenter ants do not ingest wood as a food source; instead, they chew non-living wood (in trees or landscape timbers, etc.) to excavate galleries in which they live and raise their young. Since wood mulch is composed of small wooden pieces, it would not serve as a home. To avoid potential insect problems, keep mulch as far away from the foundation of your home as possible and seal all holes and crevices that insects might use as entry points. Also, periodically inspect landscape timbers and the house for termites.
Does woody mulch harbor tree pathogens?
Wood mulch may come from many sources, including trees and shrubs that have died from a wide range of diseases. To be harmful to your trees, disease-causing organisms (pathogens) would have to survive in mulch and these organisms would have to move from the mulch either directly, or through the soil, to their new host – your tree. There is currently very little research on this topic.
Elm trees killed by Dutch elm disease (see UW Plant Disease Facts D0045, Dutch Elm Disease), can serve as breeding areas for native and European elm bark beetles. Bark beetles that breed in logs or firewood from these trees can pick up the fungi that cause Dutch elm disease (Ophiostoma ulmi and Ophiostoma novo-ulmi) and carry these fungi from tree to tree. Chipping infected elm trees creates an unfavorable environment for bark beetles yet there is no scientific literature that describes the level of risk of transmitting the Dutch elm disease fungi from wood chips or bark chunks to healthy elms.
Oak trees killed by oak wilt (see UW Plant Disease Facts D0075, Oak Wilt) can be attractive to several sap-feeding beetles that can potentially pick up the oak wilt fungus (Bretziella fagacearum) and move it in the landscape. This process is affected by moisture and temperature and would likely be disrupted by the chipping and composting process yet there is no scientific literature that describes the level of risk of transmitting the oak wilt disease fungus from wood chips or bark chunks to healthy oaks.
Research at the University of Wisconsin-Madison suggests that wood chip mulches produced from trees suffering from Verticillium wilt (see UW Plant Disease Facts D0121, Verticillium Wilt of Trees and Shrubs) can serve as a source of the fungus (Verticillium dahliae) that causes the disease. These studies show that Verticillium can survive for at least one year in mulch and that use of this contaminated mulch can lead to Verticillium wilt in both woody and herbaceous plants. Therefore use of mulches produced from trees with Verticillium wilt should be avoided.
For more information on wood mulch and tree health:
Contact the University of Wisconsin Plant Disease Diagnostics Clinic (PDDC) at (608) 262-2863 or pddc@wisc.edu.
An EEO/Affirmative Action employer, University of Wisconsin-Madison Division of Extension provides equal opportunities in employment and programming, including Title IX and ADA requirements. This document can be provided in an alternative format by calling Brian Hudelson at (608) 262-2863 (711 for Wisconsin Relay).
Thanks to Ann Joy, Laura Jull and Phil Pellitteri for reviewing this document.
A complete inventory of UW Plant Disease Facts is available at the University of Wisconsin-Madison Plant Disease Diagnostics Clinic website: https://pddc.qa.webhosting.cals.wisc.edu.
Winter burn is a common problem of evergreens including those with broad leaves (e.g., boxwood, holly, rhododendron), needles (e.g., fir, hemlock, pine, spruce, yew) and scale-like leaves (e.g., arborvitae, false cypress, juniper) grown in open, unprotected locations and exposed to severe winter conditions. Evergreen plants that are marginally hardy in a location (i.e., not well-adapted to local winter conditions) are at increased risk for winter burn. Winter burn can be so severe that affected plants may die and/or require replacement.
Browning due to winter burn on dwarf Alberta spruce.
What does winter burn look like?
Winter burn symptoms often become apparent as the snow melts and spring temperatures rise. Foliage starts to brown at the tips of branches with browning progressing inward toward the center of the plant. On broad-leaved evergreens, leaf edges typically brown first, followed by browning of entire leaves. Foliage facing south, southwest or west is most often affected. Symptomatic foliage often begins to drop off starting in spring and continuing through mid-summer as new foliage is produced. In extreme cases, entire plants can brown and die.
What causes winter burn?
There are many factors that can contribute to winter burn. In general, plants with shallow or poorly-developed root systems that do not efficiently take up water (e.g., recent transplants) are more prone to winter burn. Warm fall temperatures that delay the onset of plant dormancy can also contribute to winter burn. Under such conditions, plants are not prepared for the subsequent rapid onset of freezing winter temperatures, and as a result damage to foliage occurs. Similar cold injury can occur mid-winter when temperatures drop sharply at sunset causing foliage that has warmed during the day to rapidly cool and freeze. In addition, on sunny winter days, foliage (particularly foliage facing the sun) can begin to transpire (i.e., naturally lose water through the foliage). Because the ground is frozen, plant roots cannot take up water and replace the water that has been lost from the foliage. As a result, foliage dries and browns. Foliage under snow or facing away from the sun and direct winds is usually not damaged. Strong winter winds can lead to additional water loss making winter burn more severe. Colder than normal winter temperatures and longer than normal winters can also be factors in the development of winter burn, especially if below normal temperatures occur into April (the time of year when plants normally come out of dormancy and are most susceptible to winter injury). Finally, exposure of plants to salt used to de-ice roads, driveways and sideways during the winter can make plants more prone to winter burn injury.
How do I save a plant with winter burn?
For evergreens such as arborvitaes, boxwoods, junipers and yews, prune out dead, brown, damaged or dying tissue in mid-spring after new foliage is produced. If new foliage has not yet emerged by spring, scratch the bark on affected branches and look for green tissue underneath. Also gently peel back the bud scales to look for inner green bud tissue. If the stem or bud tissue is green, buds on the branch may still break to form new foliage. If the tissue is brown, the branch is most likely dead and you should prune the branch back to a live, lateral bud or branch. Such buds and branches may be far back inside the canopy and pruning may remove a substantial amount of the plant. Pines, spruces and firs typically produce new growth at branch tips in spring that will replace winter burn-damaged needles, and thus pruning may not be required on these evergreens. After a couple of growing seasons, new foliage will fill in the areas that were damaged. If an entire evergreen is brown, recovery is unlikely and the plant should be replaced with something (e.g., a deciduous shrub or tree) that is better-suited to the site.
How do I avoid problems with winter burn in the future?
Use a variety of strategies to prevent winter burn before winter arrives.
Plant the right plant in the right place.
Buy plants that are rated as cold hardy for your location and are well-adapted to local growing and soil conditions. Plants exposed to drying winter sun and winds are more likely to be injured. Therefore, avoid planting winter injury sensitive evergreens, particularly those that require shade or that are marginally cold-hardy, in exposed, sunny, windy areas. Plant them on the northeast or east side of a building or in a protected courtyard. Plant boxwoods, hemlocks, rhododendrons, and yews in partial shade to provide them added protection from winter sun and wind.
Plant evergreens at the right time of year.
Optimally, plant evergreens either in early spring (before buds break) or in late summer (i.e., August through September). Evergreens can be planted in the summer if you provide supplemental water. Avoid planting after early October in northern Wisconsin and after mid-October in southern Wisconsin as this will not allow sufficient time for roots to grow adequately before the ground freezes.
DO NOT prune evergreens in late summer or early fall.
Late season pruning of some non-native evergreens may encourage a flush of new growth that will not harden off properly before winter. See University of Wisconsin Garden Facts XHT1013, Pruning Evergreens, for details on when and how to prune specific evergreen trees and shrubs.
Mulch evergreens properly.
Apply two inches (on clay soils) to four inches (on sandy soils) of loose mulch (e.g., shredded hardwood, pine, or cedar bark; leaf compost; or wood chips) around the base of evergreens out to at least the drip line (e.g., the edge of where the branches extend). Keep mulch at least four inches away from the trunks of trees and the bases of shrubs. Proper mulch insulates roots from severe fluctuations of soil temperatures and reduces water loss. It also helps protect roots from injury due to heaving that occurs when soils go through cycles of freezing and thawing during the winter. Heaving can especially be a problem for shallow-rooted and newly planted evergreens. DO NOT mulch excessively or too close to plants as this can lead to damage by providing shelter for mice and voles (which can girdle trunks and branches) and by providing a favorable environment for disease development as well as insect activity and feeding.
Water plants properly.
Plants that are well-hydrated are less prone to winter burn. In particular, newly planted or young evergreens, especially those planted in open, exposed sites, those planted under eaves, or those planted in dry falls may suffer severe moisture loss during the winter and consequently severe winter burn. Established evergreens should receive approximately one inch of water per week and newly transplanted evergreens up to two inches of water per week during the growing season up until the soil freezes in the autumn or there is a significant snowfall. If supplemental watering is needed, use a soaker or drip hose to apply water near the drip lines of plants rather than using a sprinkler.
Avoid late summer or fall fertilization.
Applying quick-release, high-nitrogen fertilizers in late summer or fall could potentially stimulate growth of new foliage (particularly on some non-native evergreens) as well as inhibit proper onset of dormancy which can lead to damage over the winter. If you are concerned that your evergreens may need to be fertilized, submit a soil sample from around your plants to a professional soil testing lab that can provide specific information on what fertilizer to use and when to fertilize.
Protect plants during the winter.
Use burlap, canvas, snow fencing or other protective materials to create barriers that will protect plants from winter winds and sun. Install four to five foot tall stakes approximately two feet from the drip lines of plants especially on the south and west sides (or any side exposed to wind) and wrap protective materials around the stakes to create “fenced” barriers. Leave the top open. These barriers will deflect the wind and protect plants from direct exposure to the sun. Remove the barrier material promptly in spring. DO NOT tightly wrap individual plants with burlap as this can collect ice, trap moisture and make plants more susceptible to infection by disease-causing organisms. Use of anti-transpirant products to prevent water loss from foliage over the winter has been shown to have limited benefit. These materials degrade rapidly, require reapplication after each significant rain or snow event, and may not be effective in preventing water loss that can lead to winter burn.
For more information on winter burn:
Contact the University of Wisconsin Plant Disease Diagnostics Clinic (PDDC) at (608) 262-2863 or pddc@wisc.edu.
An EEO/Affirmative Action employer, University of Wisconsin-Madison Division of Extension provides equal opportunities in employment and programming, including Title IX and ADA requirements. This document can be provided in an alternative format by calling Brian Hudelson at (608) 262-2863 (711 for Wisconsin Relay).
Thanks to Linda Chalker – Scott, Bert Cregg and Jean Ferdinandsen for reviewing this document.
A complete inventory of UW Plant Disease Facts is available at the University of Wisconsin-Madison Plant Disease Diagnostics Clinic website: https://pddc.qa.webhosting.cals.wisc.edu.
Authors: Joseph Schwartz, UW-Madison Forest Ecology and Management and Glen R. Stanosz, Ph. D., UW Madison Plant Pathology
Last Revised: 03/02/2024
D-number: D0126
What is white pine blister rust?
White pine blister rust is a serious, tree-killing disease of eastern white pine and its close relatives (pines with needles in bundles of five). This disease is caused by the exotic (non-native) fungus Cronartium ribicola, which was introduced into North America in the early 1900’s. This pathogen is now found in most regions where pines grow in the United States, including Wisconsin. White pine blister rust affects trees of all ages, but perhaps most frequently and severely damages seedlings and saplings.
White pine blister rust cankers on branches and stems often have a cracked or blistered appearance and may bear yellow to orange spores in fruiting bodies of Cronartium ribicola.
Where does white pine blister rust come from?
White pine blister rust is caused by the fungus Cronartium ribicola, which requires two different plant hosts to complete its complex life cycle. Spores of the fungus produced on white pine are blown to alternate host plants in the genus Ribes (gooseberries and currants). After infecting gooseberry and currant bushes the fungus multiplies rapidly throughout the summer, repeatedly producing spores that germinate to result in additional gooseberry and currant infections. Spores produced in late summer on gooseberries and currants are spread by the wind to white pines, where needles that are moist from rain, fog, or dew are infected.
What does white pine blister rust look like?
Infection of needles by Cronartium ribicola results in development of yellow to brown spots and bands. The fungus slowly grows through pine needles and bark to eventually form cankers on twigs, branches, and trunks of trees. A canker is a localized diseased area (either swollen or sunken) that is surrounded by healthy tissues. A typical white pine blister rust canker has resinous margins, and may appear “blistered” before rupturing to expose fruiting bodies (reproductive structures) with yellow to bright orange spores of Cronartium ribicola. As a canker expands to completely encircle stems, all parts of the plant beyond the canker are killed. Dead white pine branches may temporarily retain their orange to red dead needles to form a bright “flag” that is a common symptom of this disease.
Can I save a tree affected by white pine blister rust?
There is no “cure” for a tree with a white pine blister rust canker on its main trunk or stem. As the canker expands to completely encircle the trunk, all parts above the canker will die. Branch cankers that extend to within four inches of the trunk, probably indicate that the trunk already is colonized by the fungus and future development of a main stem canker is likely. Pruning off branches on which cankers are located farther from the trunk, however, can prevent the fungus from growing into the trunk. These branch cankers can be removed by pruning at least six inches beyond any visible symptoms on the trunk side of the cankered branch. Removal of branch cankers and trees with main stem cankers prevents production of spores that are spread to gooseberries and currants. The fungus quickly dies in discarded branches and trunks and presents no further danger to either of its hosts.
How do I avoid future problems from white pine blister rust?
Infection of pine is most frequent near diseased gooseberries or currants. Therefore, removing these plants (especially within 200 feet) can greatly reduce the incidence of white pine blister rust. Gooseberries or currants can be killed by uprooting them or by application of herbicides in accordance with label directions.
Conditions that promote or prolong needle wetness should be avoided. These include use of sprinklers that wet the needles of ornamental trees, dense plantings, growth of weeds surrounding young trees, or planting white pines in low-lying, chronically moist areas near water or sites that lack good air movement. Growing white pines under a hardwood overstory that will intercept evening dew can help keep needles dry and reduce infection.
Regular inspection allows prompt detection and removal of cankered branches on young trees. Also, because infection very often occurs on needles of low branches, pruning to remove healthy branches (if aesthetically acceptable) will reduce the likelihood of this disease. When trees are five to seven years old, starting close to the ground, prune off all branches up to no more than one-third to one-half the height of the tree. Branch pruning can be continued every other year until the lower eight to nine feet of trunk is free of branches.
Planting or measures to encourage natural regeneration of conifer species other than white pines (including red or jack pines, spruces, firs, arborvitae, hemlock, and junipers) might be considered, especially where gooseberries or currants are prevalent and where moisture conditions favor infection.
Application of protectant fungicides may be a useful management practice in white pine production nurseries. Nursery stock should be carefully inspected, particularly just prior to sale, because the planting of diseased white pine seedlings is one way Cronartium ribicola has been spread into previously disease-free locations.
For more information on white pine blister rust:
Contact the University of Wisconsin Plant Disease Diagnostics Clinic (PDDC) at (608) 262-2863 or pddc@wisc.edu.
An EEO/Affirmative Action employer, University of Wisconsin-Madison Division of Extension provides equal opportunities in employment and programming, including Title IX and ADA requirements. This document can be provided in an alternative format by calling Brian Hudelson at (608) 262-2863 (711 for Wisconsin Relay).
References to pesticide products in this publication are for your convenience and are not an endorsement or criticism of one product over similar products. You are responsible for using pesticides according to the manufacturer’s current label directions. Follow directions exactly to protect the environment and people from pesticide exposure. Failure to do so violates the law.
Thanks to Ann Joy and Brian Hudelson for reviewing this document.
A complete inventory of UW Plant Disease Facts is available at the University of Wisconsin-Madison Plant Disease Diagnostics Clinic website: https://pddc.qa.webhosting.cals.wisc.edu.