I have recently seen comments and discussions on social media about reusing pots from greenhouse or nursery-purchased plants. In some instances, there has been discussion of returning pots to nurseries and greenhouses for businesses to reuse.
I’m definitely all for reusing pots whenever possible. It’s an environmentally sound thing to do. However, keep in mind that you need to be cautious when reusing pots as they potentially can be sources of disease-causing organisms. These pathogens may be carryovers from plants that you originally purchased in the pots, or they may be pathogens that the pots picked up later as the pots have be stored in your garden or elsewhere on your property. In particular, damping-off and root rot pathogens can be found in many garden soils, so anytime pots come in contact with garden soil (and it doesn’t have to be a lot), they can potentially become contaminated. And, it’s not just pathogens that can be an issue. Insect pests and (gulp!) jumping worms could also potentially be carried via contaminated soil on recycled pots.
So, if you have a collection of old pots and want to reuse them (or even more importantly want to give them to your local nursery or greenhouse), take some precautions prior to reuse or donation.
Clean your pots thoroughly with soapy water
to remove any bits of soil clinging to the surfaces of the pots that might be harboring pathogens. An added bonus of using an initial cleaning with soapy water is that this should help deactivate plant viruses that might be hanging out on your pots.
Soak your pots in a 1.0-1.5% sodium hypochlorite solution for 20-30 minutes
Sodium hypochlorite is the active ingredient in disinfecting bleach. This treatment will help kill pathogens that remain on the surfaces of the pots. Be cautious when using bleach to avoid contact with skin, eyes and clothing.
Thoroughly rinse the pots to remove bleach residues
that can be toxic to the new plants that you are trying to grow in the pots.
Note that the treatment outlined above may not be successful in all situations. Bleach treatments tend to work better on clay or ceramic pots but tend to be less successful for plastic pots. Be that as it may, seriously consider decontaminating you pots prior to reuse or donation to local businesses. This will help limit, as much as possible, plant pathogen carryover and spread.
Need more information?
For more information on plant diseases and their management, check out the UW Plant Disease Diagnostics Clinic website (https://pddc.qa.webhosting.cals.wisc.edu/) or contact PDDC staff at pddc@wisc.edu or (608) 262-2863.
I often talk about pruning as a method for disease management. Pruning branches with canker diseases (e.g., Nectria canker, Cytospora canker, golden canker) can be critical in keeping diseases in check and preventing pathogen spread. Pruning healthy trees and shrubs is also important to promote proper growth, reduce the risk of structural failure during extreme weather (e.g., high winds), and, in some instances, enhance flowering.
When pruning your trees and shrubs, consider the following:
Match your pruning technique to the specific tree or shrub you are pruning
Specific trees and shrubs have particular pruning needs, and you need to choose the right pruning technique for the trees and shrubs in your landscape. Check out the University of Wisconsin Garden Facts Pruning Deciduous Trees, Pruning Deciduous Shrubs, and Pruning Evergreensfor details.
Prune in the winter, when possible
From a disease standpoint, pruning in the winter is typically optimal. Disease-causing organisms and insects that carry them are not active, meaning there is less of a chance that infections will occur through pruning wounds. Are there exceptions? Absolutely! Some research indicates that pruning honeylocust in the summer can help reduce the incidence of Nectria canker. Also, pruning spring-flowering shrubs in the winter reduces flowering, so pruning these plants right after bloom is a better option.
Prune when it’s dry
If you prune during the growing season, prune when there’s a stretch of several dry days. Wet weather is a better environment for disease-causing organisms to infect.
Prune to minimize wound size
When removing large tree branches, be sure prune just outside the branch collar (i.e., the slightly swollen area where the branch attaches to the trunk). This will produce a smaller wound than cutting the branch flush with the trunk. Similarly, cut smaller branches perpendicular to the long axis of the branch (rather than at an angle). A smaller wound provides a smaller “target” that plant pathogens have to land on and infect. A smaller wound also means less time for a tree to produce protective tissue that grows over a pruning cut.
Avoid painting pruning cuts
Paint wounds (and do it immediately) only when pruning oaks and elms during the growing season. This reduces the risk of transmission of the oak wilt and Dutch elm disease fungi. Painting pruning cuts on other types of trees can slow development of the protective tissue described above.
Decontaminate, decontaminate, decontaminate
Optimally, decontaminate tools between every cut. Check out my January Plant Disease Pointers for details on what to use and how long to treat. Consider using two sets of pruning tools, one that you decontaminate, while you prune with the other. If decontaminating between every cut is not feasible, decontaminate as often as possible and definitely between plants.
And with that. . . Happy pruning!
Need more information?
For more information on plant diseases and their management, check out the UW Plant Disease Diagnostics Clinic website (https://pddc.qa.webhosting.cals.wisc.edu/), or contact PDDC staff at pddc@wisc.edu or (608) 262-2863.
Here at the Plant Disease Diagnostics Clinic (PDDC), we strive to provide the best possible diagnoses of plant disease problems. PDDC staff use a range of techniques to do this including visual and microscopic examination of plant tissue, incubation of tissue in moist chambers to coax fungal pathogens to sporulate, culturing techniques to grow pathogens from tissue, serological tests to detect proteins specific to certain pathogens, and DNA/RNA (i.e., genetic material) detection techniques. The PDDC’s ability to provide a high quality diagnoses using these techniques however, is dependent on receiving a high quality sample to work with.
Here are some pointers on how to provide an optimal sample so that PDDC staff can provide an accurate, timely diagnosis.
Submit a sample when you first see a problem
Diagnosing plant diseases as early as possible allows for greater flexibility in management of diseases once they are identified. So, contact PDDC staff as soon as you see a problem. That said, disease-causing organisms may not produce structures that we need to see to make a diagnosis (e.g., fruiting bodies, spores) early in disease development. We may need to work with you and have you repeatedly sample and submit materials over time to accurately diagnosis your plant disease problem.
Consider submitting photos prior to a physical sample
Sometimes, we can provide a reasonably accurate diagnosis based on photos (tar spot anyone?). If not, photos can provide useful information on the sort of physical sample that you can send to the PDDC for a more detailed analysis. You can use the online form at https://pddc.qa.webhosting.cals.wisc.edu/digital-diagnosis/ to submit photos. If for some reason that form doesn’t work for you, feel free to send photos to the clinic email address (pddc@wisc.edu). If we are able to provide a diagnosis from your photos, there will be a $20 digital diagnosis fee. If we make a preliminary diagnosis from the photos but suggest a follow-up physical sample submission for additional testing, the $20 digital fee will be credited towards any lab fees for your follow-up sample.
When submitting a physical sample, make sure you provide the appropriate plant part
If you have any questions about what to submit, contact the PDDC for advice. Submitting the wrong plant part can lead to an inaccurate or delayed diagnosis.
For herbaceous plants (e.g., herbaceous ornamentals, vegetables), sending in an entire plant may be the best course of action. In some situations, symptoms that you see on the leaves of plants are an indication of a problem in the root system. With trees and shrubs, submitting an entire plant is not practical. For these plants, submitting subsets of leaves/needles, branches and/or roots will likely be more appropriate.
Whatever you end up sending, send A LOT. Often, we need to perform multiple tests to diagnose a problem. We don’t want to run short on tissue. For leaves, send half a dozen to a dozen (or more) showing a range of symptoms. For branches, send three or more symptomatic branches (with attached leaves or needles where appropriate). For roots, send a large handful of the small, fibrous roots.
In particular, appropriate branch selection can be critical for accurately diagnosing vascular wilt diseases such as Dutch elm disease, oak wilt and Verticillium wilt. For these diseases, select branches that have recently wilted/died back. DO NOT submit branches that easily snap off. These branches have been dead too long and cannot be accurately tested for vascular wilt pathogens. If you suspect Verticillium wilt, select symptomatic branches from as low on the tree as possible as the pathogen that causes this disease infects through the roots. Choose branches that are roughly one inch in diameter. Larger diameter branches (particularly from oak trees) tend to have thick bark that is difficult to remove without contaminating underlying tissue where vascular wilt pathogens reside. This contamination will interfere with growing pathogens from branch tissue and can also interfere with DNA-based tests for pathogen detection. Sometimes, clients like to send in trunk sections for testing for vascular wilts. These sorts of samples can work, but only if the trunk slices are no more that about one inch thick. We need to be able to easily pop off the bark from these slices with minimal contamination of the wood underneath.
Submit your sample as quickly as possible to the PDDC
If possible, collect samples just before you mail them or drop them off in person. If there is going to be a delay in submission, keep samples as cool as possible. High temperatures can kill certain pathogens and can degrade herbaceous plant tissues, leading to what we not-so-affectionately refer to as “slime in a bag”. Degraded samples make diagnostic testing more difficult, if not impossible. Mail samples by overnight mail when possible. If mailing via regular mail, please mail early in the week (Monday or Tuesday) so that samples do not sit around in a mail facility over a weekend. Click here for details on how to package samples to make sure they arrive at the PDDC in good shape.
Help us, help you
Providing us with a high quality sample can go a long way in us providing you with a high quality diagnosis. Let’s work together to make this happen. If you have questions about submitting a sample (or about plant diseases in general), feel free to contact the PDDC by phone at (608) 262-2863 or email at pddc@wisc.edu. Also check out the PDDC website (https://pddc.qa.webhosting.cals.wisc.edu) for additional details on sample submission. Feel free to follow the PDDC on Twitter and Facebook (@UWPDDC) or email me to subscribe to the PDDC listserv, UWPDDCLearn, to receive updates on clinic services and educational materials.
When discussing plant diseases and their management, I often emphasize decontaminating pots, gardening tools and work surfaces as one part of a successful disease management strategy. To kill fungi and bacteria (and to a lesser extent viruses) I often recommend treating items for at least 30 seconds with alcohol, commercial disinfectants, or bleach.
When using alcohol, a 70% solution is optimal for decontamination. I use ethanol for decontaminating items in my lab, but rubbing (i.e., isopropyl) alcohol is a better option for home gardeners, as it is readily available at a local drugstore or grocery store. Rubbing alcohol is formulated as a 70% solution and can be used straight out of the bottle.
Commercial disinfectants come in many forms. I look for products that contain alcohol (you may see ethanol listed as an ingredient) and where the percentage of all active ingredients is as close to 70% as possible. If you opt to use a spray disinfectant, spray items until they drip and then allow them to air dry.
Bleach is probably the most challenging material to use for decontamination. Back when I started at the PDDC (almost 25 years ago), most bleach that you could buy at the grocery store was formulated to be 5.25% sodium hypochlorite (the active ingredient), and you just had to make a 10% solution (i.e., 1 part bleach and 9 parts water) to yield an approximate 0.5% solution that is optimal for decontaminating items. Nowadays, the bleach that you buy can contain very different concentrations of sodium hypochlorite (e.g., 1.8%, 5.25%, 7.5%, 8.25%), and you have to be more careful how you mix up your dilute bleach solution.
Here are some easy instructions on how to dilute the bleach that you buy (assuming it contains 1% or more sodium hypochlorite) to properly to yield a solution that is 0.5% sodium hypochlorite (or slightly higher):
Find the percentage of sodium hypochlorite in your bleach in the ingredient list;
Multiple that number by two (2);
Round the resulting number down to the nearest whole number;
Subtract one (1) from that rounded number.
This final number is the number of parts of water that you need to mix with one (1) part of your bleach to yield the diluted solution you need for decontaminating items.
When you use bleach on metal tools (alcohol is really a better option for treating metal items), be sure to rinse tools thoroughly with water after treating (to remove bleach residues) and then oil them. Bleach corrodes metal and will cause metal tools to rust if not used properly. Also use bleach carefully to prevent contact with your skin and clothing. Bleach can cause skin irritation/burns and eat holes in your clothes, if not used properly.
Now go forth and decontaminate!
Need more information?
For more information on plant diseases and their management, check out the UW Plant Disease Diagnostics Clinic website (https://pddc.qa.webhosting.cals.wisc.edu/) or contact PDDC staff at pddc@wisc.edu or (608) 262-2863.
Authors: Brian Hudelson, UW-Madison Plant Pathology and Laura Jull, UW-Horticulture
Last Revised: 03/01/2024
D-number: D0096
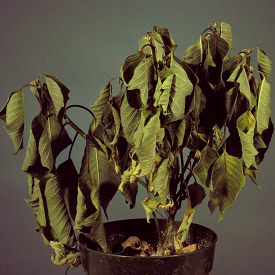
Wilting of poinsettia associated with Pythium root rot.
What is root rot?
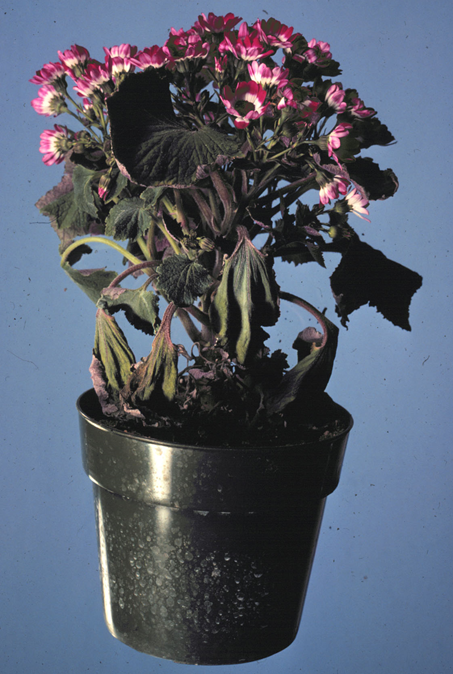
Root rot is a general term that describes any disease where the pathogen (causal organism) causes the deterioration of a plant’s root system. Most plants are susceptible to root rots, including both woody and herbaceous ornamentals. Root rots can be chronic diseases or, more commonly, are acute and can lead to the death of the plant.
How do you know if your plant has a root rot?
Homeowners often become aware of root rots when they note that a plant is wilted, even though the soil is wet. Plants with root rots are also often stunted, and may have leaves with a yellow or red color, symptoms that suggest a nutrient deficiency. Careful examination of the root systems of these plants reveals roots that are soft and brown. These roots may have a bad odor.
Where does root rot come from?
A large number of soil-borne fungi cause root rots. Pythium spp., Phytophthora spp., Rhizoctoniasolani, and Fusarium spp. are the most common root rot fungi. These fungi have wide host ranges, and thus can cause root rots on a wide variety of plants. Most root rot fungi prefer wet soil conditions and some, such as Pythium and Phytophthora produce spores that can survive for long periods in soil or plant debris.
How do I save a plant with root rot?
Often the best and most cost effective way of dealing with a plant with root rot is to throw it out. If you decide to keep a plant with root rot, REDUCE SOIL MOISTURE! Provide enough water to fulfill the plant’s growth needs and prevent drought stress, but DO NOT over-water.
Throw out plastic pots if plants grown in them have suffered from a root rot.
We DO NOT recommend use of chemical fungicides for control of root rots on houseplants because of the limited availability of products for use by homeowners, and because those products that are available tend to be expensive.
How do I avoid problems with root rots?
First, buy plants from a reputable source and make sure they are root rot-free prior to purchase. Second, replant your houseplants properly. Use a pot with drainage holes, but DO NOT put rocks or gravel at the bottom of the pot. The presence of rocks or gravel can actually inhibit drainage. Use a pasteurized commercial potting mix, NOT soil from your garden. Garden soils often contain root rot fungi. Add organic material (e.g., peat moss) to heavy potting mixes to increase drainage. Third, minimize potential contamination of your plants with root rot fungi. DO NOT reuse potting mix from your houseplants, or water that has drained from your plants, as both potentially can contain root rot fungi. After working with plants with root rot problems, disinfest tools, working surfaces and clay pots with a 10% bleach or detergent solution, or alcohol. DO NOT reuse plastic pots as they are often difficult to disinfest adequately. Finally and most importantly, moderate plant moisture. Provide enough water to fulfill your plants’ needs for growth and prevent drought stress, but DO NOT over-water. In particular, DO NOT allow plants to sit in drainage water. REMEMBER, root rot fungi grow and reproduce best in wet soils.
For more information on root rots:
Contact the University of Wisconsin Plant Disease Diagnostics Clinic (PDDC) at (608) 262-2863 or pddc@wisc.edu.
An EEO/Affirmative Action employer, University of Wisconsin-Madison Division of Extension provides equal opportunities in employment and programming, including Title IX and ADA requirements. This document can be provided in an alternative format by calling Brian Hudelson at (608) 262-2863 (711 for Wisconsin Relay).
References to pesticide products in this publication are for your convenience and are not an endorsement or criticism of one product over similar products. You are responsible for using pesticides according to the manufacturer’s current label directions. Follow directions exactly to protect the environment and people from pesticide exposure. Failure to do so violates the law.
Thanks to Karen Delahaut, Ann Joy and Sharon Morrisey for reviewing this document.
A complete inventory of UW Plant Disease Facts is available at the University of Wisconsin-Madison Plant Disease Diagnostics Clinic website: https://pddc.qa.webhosting.cals.wisc.edu.
Authors: Ken Frost* and Brian Hudelson, UW-Madison Plant Pathology
Last Revised: 03/01/2024
D-number: D0072
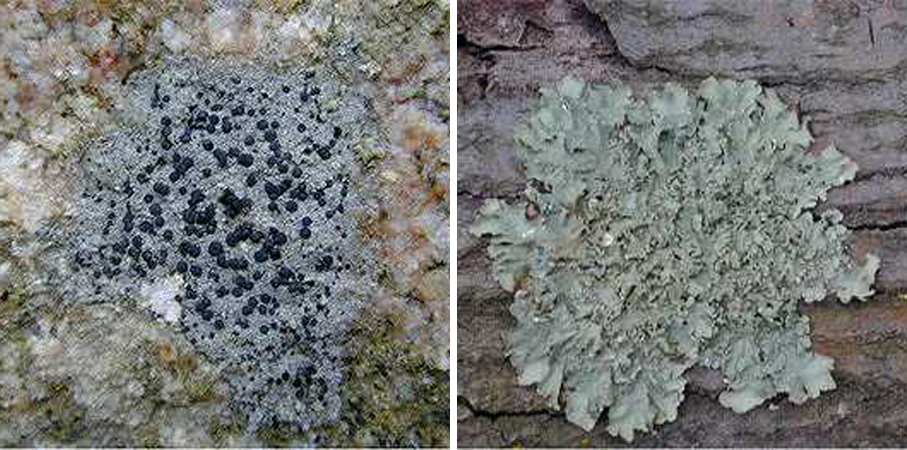
There are many types of lichens. Crustose lichens (left) are crust-like and adhere tightly to the surface upon which they grow. Foliose lichens (right) are leaf-like and composed of flat sheets of tissue that are not tightly bound.
What are lichens?
Lichens are organisms that arise from mutually beneficial interactions between certain filamentous fungi, algae and yeasts. The filamentous fungi provide the physical structures of the lichens, as well as protection for the algae and yeasts. The algae produce food for the fungi and yeasts via photosynthesis. The yeasts are thought to produce compounds to fend off disease-causing organisms and insect pests.
What do lichens look like?
Lichens come in four basic growth forms. Crustose lichens are crust-like and adhere tightly to the surface upon which they grow. Foliose lichens are leaf-like and composed of flat sheets of tissue that are not tightly bound together. Squamulose lichens are composed of scale-like parts. Fruticose lichens are composed of free-standing branching tubes.
Where do lichens come from?
Lichens are everywhere. There are an estimated 13,500 to 17,000 species of lichens, and lichens can be found growing in tropical, temperate and polar regions throughout the world. Lichens will grow on almost any surface that is stable and reasonably well-lit. In temperate regions, lichens can often be found growing on the bark of trees or old fence posts. Others lichens grow in less hospitable places, such as bare rock surfaces or old headstones in graveyards, where they aid in the breakdown of rocks and the formation of soil.
There are many types of lichens. Crustose lichens (left) are crust-like and adhere tightly to the surface upon which they grow. Foliose lichens (right) are leaf-like and composed of flat sheets of tissue that are not tightly bound.
How do I save a tree with lichens?
DO NOT PANIC! Lichens do not harm trees; they are not pathogens or parasites, and do not cause disease. Lichens are self-reliant, with the algal component of the lichen producing food for the organism via photosynthesis. Lichens absorb water and minerals from rainwater and the atmosphere, and because of this, they are extremely sensitive to air pollution. As a result, the presence or absence of certain lichen species can be used as an indicator of levels of atmospheric pollutants. Information on the abundance and species of lichens growing in an area can give a good indication of the local air quality.
For more information on lichens:
Contact the University of Wisconsin Plant Disease Diagnostics Clinic (PDDC) at (608) 262-2863 or pddc@wisc.edu.
*Completed as partial fulfillment of the requirements for Plant Pathology 875 – Plant Disease Diagnostics Clinic Internship at the University of Wisconsin Madison.
An EEO/Affirmative Action employer, University of Wisconsin-Madison Division of Extension provides equal opportunities in employment and programming, including Title IX and ADA requirements. This document can be provided in an alternative format by calling Brian Hudelson at (608) 262-2863 (711 for Wisconsin Relay).
Thanks to Lisa Johnson, Barb Larson and Mike Maddox for reviewing this document. Thanks also to the Wisconsin State Herbarium and Marie Trest for providing the photo.
A complete inventory of UW Plant Disease Facts is available at the University of Wisconsin-Madison Plant Disease Diagnostics Clinic website: https://pddc.qa.webhosting.cals.wisc.edu.
Authors: Brian Hudelson, UW-Madison Plant Pathology
Last Revised: 02/29/2024
D-number:D0041
Anthracnose Hosts: Most trees, commonly ash, maple and oak Pathogens:Gloeosporium spp. as well as other fungi Signs/Symptoms: Blotchy dead areas on leaves For more information see: UW Plant Disease Facts D0002
Purple-Bordered Leaf Spot Host: Amur, Japanese, red, silver and sugar maple Pathogen:Phyllosticta minima Signs/Symptoms: Discrete, circular leaf spots with purple borders For more information see: UW Plant Disease Facts D0089
Tubakia (Actinopelte) Leaf Spot Hosts: Oak Pathogen:Tubakia spp. (Actinopelte spp.) Signs/Symptoms: Discrete circular, or irregular blotchy dead areas on leaves For more information see: UW Plant Disease Facts D0118
Apple Scab Hosts: Apple, crabapple, pear, mountain-ash Pathogen:Venturia inaequalis, V. pirina Signs/Symptoms: Circular, black leaf spots with feathery edges; eventual leaf loss For more information see: UW Plant Disease Facts D0004
Gymnosporangium Rusts Hosts: Apple, crabapple, hawthorn Pathogens: Gymnosporangium spp. Signs/Symptoms: Bright yellow-orange, circular leaf spots For more information see: UW Plant Disease Facts D0058
Powdery Mildew Hosts: Most deciduous trees Pathogens: Several genera of powdery mildew fungi Signs/Symptoms: Uniform/blotchy powdery white areas on upper and lower leaf surfaces For more information see: UW Plant Disease Facts D0087
Downy Leaf Spot Hosts: Hickory, walnut Pathogen:Microstroma juglandis Signs/Symptoms: Discrete powdery white areas on lower leaf surfaces
Chlorosis Hosts: Oak, red maple Cause: Iron or manganese deficiency, often induced by high soil pH Signs/Symptoms: Yellow leaves with dark green veins For more information see: UW Plant Disease Facts D0030
Scorch Hosts: Most deciduous trees Cause: Water stress induced by drought, high soil salt content, or other water-limiting factors Signs/Symptoms: Dead tissue on leaf margins
Tatters Hosts: Most deciduous trees, but commonly oak Cause: Possible early season cold injury Signs/Symptoms: Lacy, tattered-looking leaves For more information see: UW Plant Disease Facts D0111
For more information on deciduous tree leaf diseases:
An EEO/Affirmative Action employer, University of Wisconsin-Madison Division of Extension provides equal opportunities in employment and programming, including Title IX and ADA requirements. This document can be provided in an alternative format by calling Brian Hudelson at (608) 262-2863 (711 for Wisconsin Relay).
Thanks to Diana Alfuth, Kristin Krokowski, and Patti Nagai for reviewing this document, and to Matt Hanson for supplying the powdery mildew photo
A complete inventory of UW Plant Disease Facts is available at the University of Wisconsin-Madison Plant Disease Diagnostics Clinic website: https://pddc.qa.webhosting.cals.wisc.edu.
Authors: Brian Hudelson, UW-Madison Plant Pathology
Last Revised: 02/29/2024
D-number: D0033
Root and Crown Rots Hosts: All conifers Pathogens: Assorted root rot fungi/water molds Signs/Symptoms: Poor growth, branch dieback, discolored and deteriorated roots For more information see: UW Plant Disease Facts D0094
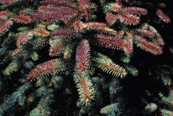
Rhizosphaera Needle Cast Hosts: Colorado blue spruce, other spruces Pathogen: Rhizosphaera kalkhoffii Signs/Symptoms: Browning/purpling of interior needles of lower branches, followed by needle drop For more information see: UW Plant Disease Facts D0093
Cytospora Canker Hosts: Colorado blue spruce, other spruces Pathogen: Cytospora kunzei Signs/Symptoms: Branch dieback with milky-white patches of dried sap on affected branches For more information see: UW Plant Disease Facts D0037
Spruce Needle Drop Hosts: Spruces Pathogen: Unknown (possibly Setomelannoma holmii) Signs/Symptoms: Needle loss and dieback at or near branch tips
Gymnosporangium Rusts Hosts: Juniper, apple, crabapple, hawthorn, quince Pathogen: Gymnosporangium spp. Signs/Symptoms: Brown blobs with orange gelatinous masses (juniper); yellow/orange leaf spots (other hosts) For more information see: UW Plant Disease Facts D0058
Phomopsis Tip Blight Hosts: Junipers Pathogen: Phomopsis juniperovora Signs/Symptoms: Browning and dieback of branch tips in spring and early summer as new growth emerges For more information see: UW Plant Disease Facts D0077
Diplodia Shoot Blight and Canker Hosts: Austrian pine, other pines Pathogen: Diplodia spp. Signs/Symptoms: Dieback of branch tips with dead needles showing uneven lengths For more information see: UW Plant Disease Facts D0042
Dothistroma Needle Blight Hosts: Austrian pine, other pines Pathogen: Dothistroma pini Signs/Symptoms: Needle tip browning and death with a distinct break between live and dead tissue For more information see: UW Plant Disease Facts D0043
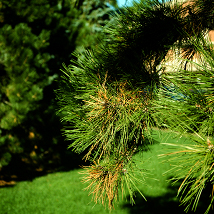
Drought Stress Hosts: All conifers Cause: Insufficient water Signs/Symptoms: Purpling/browning of needles near branch tips or higher up in plants during the summer
Winter Injury/Winter Burn Hosts: All conifers, particularly yew and juniper Cause: Insufficient water Signs/Symptoms: Needle browning/bleaching over winter or in spring as plants come out of dormancy For more information see: UW Plant Disease Facts D0127
Herbicide Damage Hosts: All conifers Cause: Exposure to herbicides Signs/Symptoms: Twisted or otherwise distorted growth, needle yellowing or browning, plant death For more information see: UW Plant Disease Facts D0060
An EEO/Affirmative Action employer, University of Wisconsin-Madison Division of Extension provides equal opportunities in employment and programming, including Title IX and ADA requirements. This document can be provided in an alternative format by calling Brian Hudelson at (608) 262-2863 (711 for Wisconsin Relay).
Thanks to Ann Joy, Patti Nagai and Ann Wied for reviewing this document and to Bria Radtke for supplying the photo of spruce needle drop.
A complete inventory of UW Plant Disease Facts is available at the University of Wisconsin-Madison Plant Disease Diagnostics Clinic website: https://pddc.qa.webhosting.cals.wisc.edu.
Authors: Patricia McManus and Brian Hudelson, UW-Madison Plant Pathology
Last Revised: 03/01/2024
D-number: D0076
What is peach leaf curl?
Peach leaf curl is a common disease of peach and nectarine trees throughout the Midwest and eastern U.S. Where the disease is severe, tree vigor and fruit quality and yield are reduced. Peach leaf curl often becomes more prevalent after relatively mild winters, which are more favorable for the survival of the organism that causes the disease. A related disease, plum pockets, affects plums.
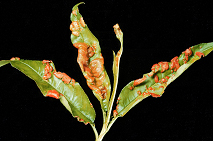
Leaf distortions and discoloration typical of peach leaf curl.
What does peach leaf curl look like?
Diseased leaves are distorted with puckered, thickened, twisted areas that can be light green, yellow, or reddish to purple in color. Leaves later turn brown and fall from the tree. Diseased shoots are stunted with small, yellowish leaves, or have leaves arranged in tight whorls (rosettes). Diseased flowers may abort, leading to reduced fruit set, while diseased fruit are bumpy, reddish in color, and fall prematurely.
Where does peach leaf curl come from?
Peach leaf curl is caused by the fungus Taphrina deformans, which overwinters in bark and bud scales of peach and nectarine trees. Fungal spores infect leaves and shoots in the spring while leaves are still in the bud and as they just begin to emerge. Mild (50 to 70°F), wet weather during this period favors infection. Additional spores form on the surface of diseased tissue, and these spores cause new infections if the weather remains mild and wet.
How do I save trees that have peach leaf curl?
Peach leaf curl is unlikely to kill a peach or nectarine tree on its own. However, if significant premature leaf drop occurs, trees will be susceptible to drought stress and winter injury. To help maintain tree vigor, apply water (approximately one inch per week) at the drip lines (i.e., the edges of where the branches extend) of peach and nectarine trees during dry periods. Also, fertilize trees with nitrogen, but avoid fertilizing after August 1; late season fertilization will prevent trees from hardening off properly before winter, making them prone to winter injury. Finally, thin fruit if the crop load is heavy.
How do I avoid problems with peach leaf curl in the future?
Because Taphrina deformans survives in bark and bud scales, removing diseased leaves in the fall will not reduce disease. To prevent serious problems with peach leaf curl, plant resistant or tolerant peach varieties (e.g., ‘Frost’, ‘Indian Free’, ‘Q-1-8’, varieties derived from ‘Redhaven’). Avoid growing susceptible varieties (e.g., those derived from ‘Redskin’). In addition, consider applying a single fungicide spray in the fall after leaf drop or in the spring before buds begin to swell to control peach leaf curl (and also plum pockets). Effective fungicide active ingredients include chlorothalonil, copper (e.g., Bordeaux mixture), and ferbam. Choose a fungicide that is labeled for use on edible fruit crops, and read and follow all label instructions to ensure that you use the product in the safest and most effective manner possible.
For more information on peach leaf curl:
Contact the University of Wisconsin Plant Disease Diagnostics Clinic (PDDC) at (608) 262-2863 or pddc@wisc.edu.
An EEO/Affirmative Action employer, University of Wisconsin-Madison Division of Extension provides equal opportunities in employment and programming, including Title IX and ADA requirements. This document can be provided in an alternative format by calling Brian Hudelson at (608) 262-2863 (711 for Wisconsin Relay).
References to pesticide products in this publication are for your convenience and are not an endorsement or criticism of one product over similar products. You are responsible for using pesticides according to the manufacturer’s current label directions. Follow directions exactly to protect the environment and people from pesticide exposure. Failure to do so violates the law.
Thanks to Patti Nagai, Teryl Roper, and Ann Wied for reviewing this document.
A complete inventory of UW Plant Disease Facts is available at the University of Wisconsin-Madison Plant Disease Diagnostics Clinic website: https://pddc.qa.webhosting.cals.wisc.edu.
Authors: Brian Hudelson, UW-Madison Plant Pathology
Last Revised: 02/29/2024
D-number: D0042
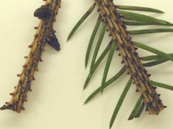
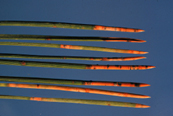
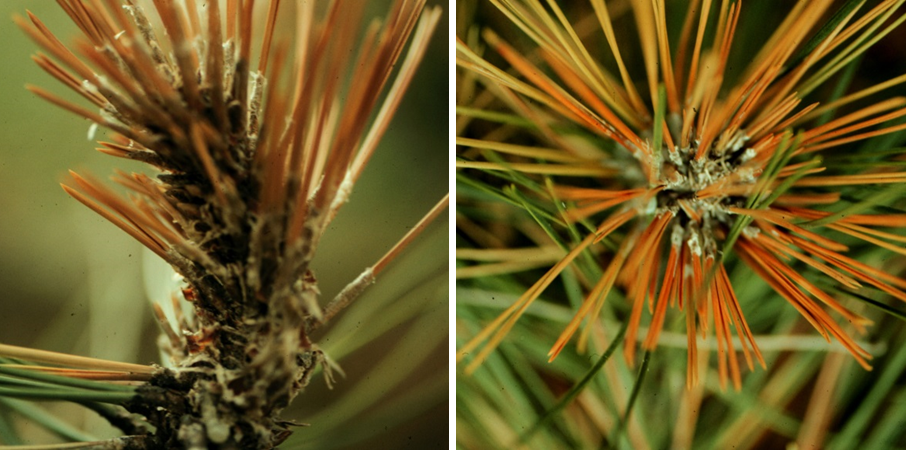
Diplodia shoot blight and canker killing branch tips of Austrian pine.
What is Diplodia shoot blight and canker?
Diplodia shoot blight and canker (formerly Sphaeropsis shoot blight and canker) is one of the most common fungal diseases of Austrian pine in Wisconsin. This disease can also affect other pines including red, jack, Scots and mugo pine, as well as other conifers including cedars, cypresses, firs, junipers and spruces.
What does Diplodia shoot blight and canker look like?
Initially, affected branch tips may ooze a large amount of resin. Eventually, these branch tips brown and die, with dead needles on these branches having varying lengths. As the disease progresses, sunken or swollen, discolored areas (called cankers) may form on infected twigs. Diplodia shoot blight and canker can be distinguished from damage from boring insects (where there also may be heavy resin flow) by an absence of any tunneling.
Where does Diplodia shoot blight and canker come from?
Diplodia shoot blight and canker is caused by several fungi in the genus Diplodia. These fungi include Diplodia sapinea (formerly known as Diplodia pinea and Sphaeropsis sapinea), which has historically been cited as the cause of the disease on Austrian pine. However, this fungus is only one of several Diplodia species that can cause problems on this host. Diplodia fungi survive in infected shoots and pinecones where they form small, black fruiting bodies (i.e., reproductive structures) that produce brown-colored spores.
How do I save a tree with Diplodia shoot blight and canker?
Immediately remove and destroy diseased branch tips. Also, where possible, remove and destroy pinecones that have fallen from infected trees. Dispose of these materials by burning (where allowed by local ordinance) or burying them.
When pruning, cut branches six to eight inches below the point where they are obviously infected. Prune only in dry weather. Between cuts, decontaminate pruning tools by treating them for at least 30 seconds with 70% alcohol (e.g., rubbing alcohol, certain spray disinfectants), or a 10% bleach solution (i.e., one part of a disinfecting bleach and nine parts water). Decontaminating tools is important to help prevent accidental movement of Diplodia fungi from branch to branch during pruning. If you decide to use bleach, be sure to rinse your tools thoroughly after pruning and then oil them to prevent rusting.
Needles of different lengths (left) and production of excessive resin on branch tips (right) are typical symptoms of Diplodia shoot blight and canker.
How do I avoid problems with Diplodia shoot blight and canker in the future?
Avoid planting Austrian pines; plant other types of evergreens instead. Minimize any stresses on established Austrian pines. Water trees adequately, particularly during dry periods. Established trees should receive approximately one inch of water per week from the time that the ground thaws in the spring, through the summer and into the fall up until the ground freezes or there is a significant snowfall. New transplants (i.e., conifers planted within three years) require approximately two inches of water per week. During periods with insufficient rain, apply water at the drip lines of trees (i.e., the edges of where the branches extend) using a drip or soaker hose.
When planting trees, be sure to allow ample space for roots to grow, avoid compacting the soil around trees, and make sure there is adequate soil drainage. Mulch trees to at least their drip lines with a high-quality mulch (e.g., shredded oak bark mulch, red cedar mulch). Use one to two inches on heavier (e.g., clay) soils. Use three to four inches on lighter (e.g., sandy) soils. Keep mulch approximately four inches from tree trunks. DO NOT fertilize new transplants, and fertilize established conifers only when a soil fertility test indicates that fertilization is needed. DO NOT overfertilize, particularly with nitrogen.
Finally, you may want to apply fungicides to help prevent infections. Apply fungicides only after you have pruned out diseased branches as described above. Fungicides prevent infections but do not cure existing infections. Alternate use of fungicides containing thiophanate-methyl and chlorothalonil that are labeled for use on conifers. Start applications at bud break and continue at 14 day intervals until full shoot elongation. DO NOT use thiophanate-methyl alone. Overuse of thiophanate-methyl can potentially select for variants of Diplodia that will no longer be controlled by this active ingredient. Be sure to read and follow all label instructions of the fungicides that you select to ensure that you use the products in the safest and most effective manner possible.
For more information on Diplodia shoot blight and canker:
Contact the University of Wisconsin Plant Disease Diagnostics Clinic (PDDC) at (608) 262-2863 or pddc@wisc.edu.
An EEO/Affirmative Action employer, University of Wisconsin-Madison Division of Extension provides equal opportunities in employment and programming, including Title IX and ADA requirements. This document can be provided in an alternative format by calling Brian Hudelson at (608) 262-2863 (711 for Wisconsin Relay).
References to pesticide products in this publication are for your convenience and are not an endorsement or criticism of one product over similar products. You are responsible for using pesticides according to the manufacturer’s current label directions. Follow directions exactly to protect the environment and people from pesticide exposure. Failure to do so violates the law.
Thanks to Diana Alfuth, Jean Ferdinandsen, Jason Gough, Phil Luedtke, Scott Reuss and Amy Sausen for reviewing this document.
A complete inventory of UW Plant Disease Facts is available at the University of Wisconsin-Madison Plant Disease Diagnostics Clinic website: https://pddc.qa.webhosting.cals.wisc.edu.
 I have recently seen comments and discussions on social media about reusing pots from greenhouse or nursery-purchased plants. In some instances, there has been discussion of returning pots to nurseries and greenhouses for businesses to reuse.