All posts by hudelson

Herbicide Damage

Extension Logo

UW Plant Disease Facts


Authors:   Brian Hudelson, UW-Madison Plant Pathology
Last Revised:   03/01/2024
D-number:   D0060

What is herbicide damage? 

Herbicide damage is any adverse, undesired effect on a plant that is caused by exposure of that plant to a pesticide designed for weed control (i.e., an herbicide).  Any plant can be subject to this problem.

Squash leaf distorted due to exposure to a common lawn herbicide.

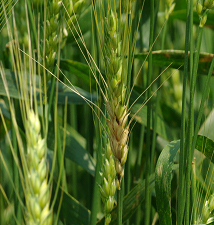
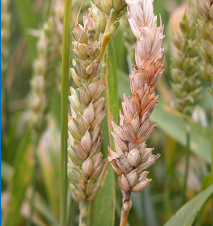
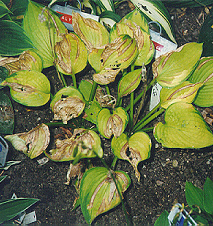
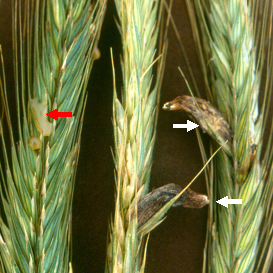
What does herbicide damage look like? 

Symptoms of herbicide damage vary depending upon the plant affected and the herbicide used.  Common symptoms include stems that are flattened, or that twist or corkscrew.  Leaves may have abnormal shapes, sizes or textures.  In addition, leaves or leaf veins may yellow or redden.  In severe cases, plants may brown and die.  Some plants, such as tomatoes and grapes, are particularly susceptible to herbicide damage and can be used as indicators of unwanted herbicide exposure.

How does herbicide damage occur? 

Herbicide damage results when an herbicide is misapplied.  Herbicides for control of broadleaf weeds are occasionally applied with fertilizers as part of a lawn care program.  If these products are applied too close to ornamentals or vegetables, or are applied when there is too much wind, then the herbicide can drift (move) from the area of application into a non-treated area.  Often, drifting herbicides are difficult to detect by eye because they are extremely fine mists.  They can better be detected by smell.  Some herbicides readily produce vapors that can begin to drift several hours after application.

How do I save a plant that has been damaged by herbicides?  

There is nothing you can do after plants have been exposed.  However, most plants accidentally exposed to broadleaf herbicides applied with lawn fertilizers do not receive a high enough dose to kill them.  Young growth exposed to the herbicide will be distorted and discolored, but subsequent growth will be normal.

How do I avoid problems with herbicide damage in the future?  

When using a lawn herbicide, follow the application directions exactly.  DO NOT apply the product too close to, or in a manner that will cause exposure to, non-target ornamentals or vegetables.  To avoid drift, apply the herbicide when there is as little wind as possible (< 5 mph).  Apply the herbicide at low pressure to minimize production of fine mists.  Finally, use amine forms rather than ester forms of herbicides as amine forms are less likely to produce vapors.

For more information on herbicide damage: 

Contact the University of Wisconsin Plant Disease Diagnostics Clinic (PDDC) at (608) 262-2863 or pddc@wisc.edu.


This Fact Sheet is also available in PDF format:

© 1999-2024 the Board of Regents of the University of Wisconsin System doing business as University of Wisconsin-Madison Division of Extension.

An EEO/Affirmative Action employer, University of Wisconsin-Madison Division of Extension provides equal opportunities in employment and programming, including Title IX and ADA requirements. This document can be provided in an alternative format by calling Brian Hudelson at (608) 262-2863 (711 for Wisconsin Relay).

References to pesticide products in this publication are for your convenience and are not an endorsement or criticism of one product over similar products. You are responsible for using pesticides according to the manufacturer’s current label directions. Follow directions exactly to protect the environment and people from pesticide exposure. Failure to do so violates the law.

Thanks to Sharon Morrisey, John Stier, Ann Wied and Chris Williamson for reviewing this document.

A complete inventory of UW Plant Disease Facts is available at the University of Wisconsin-Madison Plant Disease Diagnostics Clinic website: https://pddc.qa.webhosting.cals.wisc.edu.

Submit additional lawn, landscape, and gardening questions at https://hort.extension.wisc.edu/ask-a-gardening-question/.

Helminthosporium Turf Diseases

Extension Logo

UW Plant Disease Facts


Authors:   Hye Sook Kim* and Brian Hudelson, UW-Plant Pathology Geunhwa Jung, University of Massachusetts Amherst-Plant, Soil and Insect Sciences
Last Revised:   03/01/2024
D-number:   D0059

What are Helminthosporium turf diseases? 

Helminthosporium diseases of turf are a group of common, cool season turfgrass diseases (including Helminthosporium leaf spot and melting out) that occur throughout North America.  In residential settings, these diseases can severely reduce the aesthetic appeal of a lawn and can lead to expensive lawn replacements.

Helminthosporium turf diseases cause “eyespots”, round to oval spots with buff-colored centers surrounded by dark brown to dark purple margins.

What do Helminthosporium turf diseases look like? 

Symptoms of Helminthosporium turf diseases vary, depending upon the specific pathogen, grass species, weather conditions, and cultural conditions involved.  In general, the diseases lead to patches of thin, dead grass.  On Kentucky bluegrass, and fine and tall fescues, initial symptoms are small, dark purple to black spots on the leaf blades.  Older leaf spots on these hosts are often described as “eyespots” (i.e., round to oval spots with buff-colored centers surrounded by dark brown to dark purple margins).  Infected bentgrasses often initially have a smoky-blue, water-soaked and matted appearance.  As the disease progresses, infected leaves yellow and eventually die.

Where do Helminthosporium turf diseases come from? 

Helminthosporium turf diseases are caused by several fungi, all of which were at one time lumped within the fungal genus Helminthosporium.  More recently, these fungi have been reclassified into the genera Bipolaris, Drechslera, and Exserohilum.  These fungi overwinter in infected turfgrass and turfgrass debris (e.g., thatch, grass clippings), and throughout the growing season, they produce spores that can readily infect leaf blades that have been wet for several hours.  Disease development is favored during periods of high temperature when dry conditions alternate with prolonged stretches of cloudy, moist weather.

How do I save turf with Helminthosporium turf diseases? 

Fungicides containing azoxystrobin, captan, chlorothalonil, fludioxonil, fluoxastrobin, iprodione, maneb, mancozeb, myclobutanil, PCNB, polyoxin D, propiconazole, pyraclostrobin, thiophanate-methyl, trifloxystrobin, thiram and vinclozolin are labeled for control of Helminthosporium turf diseases.  These fungicides will not cure existing infections, but if they are applied early in disease development, may help prevent substantial losses.  If you decide to use fungicides for control, be sure to read and follow all label instructions of the fungicide that you select to ensure that you use the fungicide in the safest and most effective manner possible.

Helminthosporium turf diseases cause dead patches on intensively managed creeping bentgrass.

How do I avoid problems with Helminthosporium turf diseases in the future? 

Water, fertilize and mow your lawn properly to keep it healthy, and growing vigorously.  See UW Bulletin A3435, Lawn Maintenance (available at https://learningstore.extension.wisc.edu/) for details.  Turf requires approximately one inch of water per week from natural rain, supplemental irrigation or a combination of both.  If you must irrigate, make sure to water deeply, but infrequently, to avoid drought.  Avoid late afternoon and evening watering that can promote longer periods of moisture on leaves.  DO NOT overfertilize.  In particular, avoid heavy applications of nitrogen (especially fast-releasing forms of nitrogen such as urea), particularly during wet weather.  Test leaf tissue from your turf routinely to make sure that the nitrogen to potassium ratio (N:K) is approximately 1:2, and fertilize appropriately to maintain this ratio.  Keep your lawn mowed to between 2½ and 3½ inches, and never remove more than ⅓ of the existing growth when mowing.  Keep the blade on your mower sharp.  Ragged cuts, caused by dull mower blades, provide easier entry points for Helminthosporium turf disease fungi.  Collect and destroy (by composting, burying or burning) lawn clippings from infected plants and try to clean any contaminated clippings from your mower.  Helminthosporium turf disease fungi can survive and can easily be moved from place to place in grass clippings.  If Helminthosporium turf diseases have been a problem in your lawn, consider using a blend of resistant turfgrass cultivars or a mixture of cool-season turfgrasses when establishing a new lawn or over-seeding an existing lawn.  Resistant cultivars of Kentucky bluegrass include ‘Alpine’, ‘America’, ‘Boutique’, ‘Brilliant’, ‘Buckingham’, ‘Freedom II’, ‘Merion’, ‘Moonlight’, ‘Serene’, and ‘Unique’.  See UW Bulletin A3187, Turf Diseases of the Great Lakes Region (available at https://learningstore.extension.wisc.edu/), for details.

In summary, to avoid problems with Helminthosporium turf diseases:

  • Reduce leaf wetness (June to Sept.)
  • Avoid drought stress (July, Aug.)
  • Avoid excess N (May to Aug)
  • Balance fertility (N:K = 1:2) (Spring, Fall)
  • Mow at 2½ to 3½ in. (May to Nov.)
  • Keep mower blades sharp (May to Nov.)
  • Avoid mowing wet grass (May to Nov.)
  • Collect diseased clippings (Spring)
  • Plant resistant turf cultivars (Fall)
  • Follow fungicide label (Always)

For more information on Helminthosporium turf diseases: 

Contact the University of Wisconsin Turf Diagnostic Lab (TDL) at (608) 845-2535 or hockemeyer@wisc.edu.


This Fact Sheet is also available in PDF format:

*Completed as partial fulfillment of the requirements for the graduate course: “Plant Pathology 559: Diseases of Economic Crops.”

© 2008-2024 the Board of Regents of the University of Wisconsin System doing business as University of Wisconsin-Madison Division of Extension.

An EEO/Affirmative Action employer, University of Wisconsin-Madison Division of Extension provides equal opportunities in employment and programming, including Title IX and ADA requirements. This document can be provided in an alternative format by calling Brian Hudelson at (608) 262-2863 (711 for Wisconsin Relay).

References to pesticide products in this publication are for your convenience and are not an endorsement or criticism of one product over similar products. You are responsible for using pesticides according to the manufacturer’s current label directions. Follow directions exactly to protect the environment and people from pesticide exposure. Failure to do so violates the law.

Thanks to Diana Alfuth, Judy Reith-Rozelle and Deb Simons for reviewing this document.

A complete inventory of UW Plant Disease Facts is available at the University of Wisconsin-Madison Plant Disease Diagnostics Clinic website: https://pddc.qa.webhosting.cals.wisc.edu.

Submit additional lawn, landscape, and gardening questions at https://hort.extension.wisc.edu/ask-a-gardening-question/.


Guignardia Leaf Spot

Extension Logo

UW Plant Disease Facts


Authors:   Brian Hudelson, UW-Madison Plant Pathology
Last Revised:   03/01/2024
D-number:   D0057

What is Guignardia leaf spot? 

Guignardia leaf spot is a common fungal leaf disease that affects vining plants such as Boston ivy and Virginia-creeper.  The fungus that causes Guignardia leaf spot also causes a leaf spot and fruit rot of grape called black rot.

Roughly circular, red-bordered spots on Boston ivy typical of Guignardia leaf spot.

What does Guignardia leaf spot look like? 

Symptoms of Guignardia leaf spot include roughly circular, or sometimes angular (i.e., straight-edged), ¼ to ½ inch diameter dead spots on affected leaves.  Spots often have a purple-red border, and the centers may eventually fall out.  Young leaves are more susceptible to infection than mature leaves.  If infections occur before leaves have fully expanded, leaves can become puckered and distorted.  Within the spots, a diffuse ring of black dots (reproductive structures of the fungus) is typically visible.

Where does Guignardia leaf spot come from? 

Guignardia leaf spot is caused by the fungus Phyllosticta ampelicida (formerly Guignardia bidwellii), which survives in leaf litter.  Spores of the fungus are produced under cool, moist conditions and can be dispersed by wind or splashing water.

How do I save a plant with Guignardia leaf spot? 

DO NOT panic!  Guignardia leaf spot is most often a cosmetic disease, making an affected plant look a little ragged, but not killing the plant.  Only occasionally will the disease be more severe, resulting in defoliation.

How do I avoid problems with Guignardia leaf spot in the future?  

Remove and burn (where allowed by local ordinance), bury or hot compost fallen, infected leaves.  Thin plants to increase airflow and promote rapid drying of foliage.  This drier environment is less favorable for disease developments.  Water plants at the base using a soaker or drip hose to minimize wetting of leaves and reduce the movement of spores.  If a plant has been severely defoliated by Guignardia leaf spot for several years, preventative fungicide treatments may be necessary.  Make an initial fungicide application as leaves first begin to emerge.  If the weather is cool and wet, make additional applications at seven to 14 day intervals until hotter, drier weather develops or until leaves are fully expanded and mature.  Chlorothalonil, copper, mancozeb and thiophanate-methyl are labeled for Guignardia leaf spot control.  DO NOT use the same active ingredient for all treatments (particularly if you are using thiophanate-methyl).  Instead, alternate the use of at least two active ingredients.  This strategy will help minimize problems with fungicide-resistant strains of Phyllosticta ampelicida.  Be sure to read and follow all label instructions of the fungicide(s) that you select to ensure that you use the product(s) in the safest and most effective manner possible.

For more information on Guignardia leaf spot: 

Contact the University of Wisconsin Plant Disease Diagnostics Clinic (PDDC) at (608) 262-2863 or pddc@wisc.edu.


This Fact Sheet is also available in PDF format:

© 2003-2024 the Board of Regents of the University of Wisconsin System doing business as University of Wisconsin-Madison Division of Extension.

An EEO/Affirmative Action employer, University of Wisconsin-Madison Division of Extension provides equal opportunities in employment and programming, including Title IX and ADA requirements. This document can be provided in an alternative format by calling Brian Hudelson at (608) 262-2863 (711 for Wisconsin Relay).

References to pesticide products in this publication are for your convenience and are not an endorsement or criticism of one product over similar products. You are responsible for using pesticides according to the manufacturer’s current label directions. Follow directions exactly to protect the environment and people from pesticide exposure. Failure to do so violates the law.

Thanks to Lisa Johnson, Ann Joy and Patti Nagai for reviewing this document.

A complete inventory of UW Plant Disease Facts is available at the University of Wisconsin-Madison Plant Disease Diagnostics Clinic website: https://pddc.qa.webhosting.cals.wisc.edu.

Submit additional lawn, landscape, and gardening questions at https://hort.extension.wisc.edu/ask-a-gardening-question/.

Gray Mold (Botrytis Blight)

Extension Logo

UW Plant Disease Facts


Authors:   Jeffory Schraufnagel*, Milwaukee Area Technical College, Brian Hudelson, UW-Madison Plant Pathology
Last Revised:   03/01/2024
D-number:   D0056

What is gray mold? 

Gray mold (or Botrytis blight) is a common and often serious fungal disease that can affect plants of all kinds.  Gray mold is a particularly serious problem on flowering plants and plants grown in greenhouses.

Severe gray mold can prevent rose blossoms from developing properly.

What does gray mold look like? 

Gray mold causes brown spots on flower petals that enlarge, killing the petals and eventually the rest of the flower.  Early infections may prevent flowers from opening.  On plants such as tulips, crocus, and daffodils, gray mold may spread from flowers into the bulbs leading to bulb decay.  On leaves, Botrytis causes irregularly-shaped necrotic (dead) areas that may have a bull’s-eye pattern.  Botrytis can also cause stem cankers (localized sunken areas) that may eventually enlarge to girdle a stem.

Where does gray mold come from? 

Gray mold is caused by the fungus Botrytis cinerea, which survives on dead plant tissue as dark brown to black, multi-celled structures called sclerotia, and as thick, dark-walled, single-celled spores called chlamydospores.  Botrytis produces large numbers of dusty, gray reproductive spores that are spread by wind or splashing water.  These spores rapidly die when dried.  Botrytis most readily infects delicate tissues such as flower petals.  In order to infect tougher tissues such as healthy leaves, Botrytis spores require an external food source such as nutrients leaking from wounds or dead/dying tissues such as withered flower petals.

How do I save a plant with gray mold? 

Promptly remove diseased leaves and flowers.  Prune diseased branches four to six inches below the infection leaving a clean cut.  Decontaminate pruning tools between cuts by treating them for at least 30 seconds with a 10% bleach solution or (preferably due to its less corrosive properties) 70% alcohol (e.g., rubbing alcohol or certain spray disinfectants).  If you use bleach, thoroughly rinse and oil your tools after pruning to prevent rusting.

How do I avoid problems with gray mold in the future? 

Remove dead or dying tissue from plants and the soil surface.  Avoid wounding plants mechanically, or chemically by overfertilization or misuse of pesticide sprays.  Reduce humidity around plants and germinate seedlings under warm, relatively dry conditions.  Fungicides such as chlorothalonil and mancozeb can be used to prevent infections.  Be sure to read and follow all label instructions of the fungicide that you select to ensure that you use the fungicide in the safest and most effective manner possible.

For more information on gray mold: 

Contact the University of Wisconsin Plant Disease Diagnostics Clinic (PDDC) at (608) 262-2863 or pddc@wisc.edu.


This Fact Sheet is also available in PDF format:

*Completed as partial fulfillment of the requirements for an associate degree in Horticulture at the Milwaukee Area Technical College.

© 2003-2024 the Board of Regents of the University of Wisconsin System doing business as University of Wisconsin-Madison Division of Extension.

An EEO/Affirmative Action employer, University of Wisconsin-Madison Division of Extension provides equal opportunities in employment and programming, including Title IX and ADA requirements. This document can be provided in an alternative format by calling Brian Hudelson at (608) 262-2863 (711 for Wisconsin Relay).

References to pesticide products in this publication are for your convenience and are not an endorsement or criticism of one product over similar products. You are responsible for using pesticides according to the manufacturer’s current label directions. Follow directions exactly to protect the environment and people from pesticide exposure. Failure to do so violates the law.

A complete inventory of UW Plant Disease Facts is available at the University of Wisconsin-Madison Plant Disease Diagnostics Clinic website: https://pddc.qa.webhosting.cals.wisc.edu.

Submit additional lawn, landscape, and gardening questions at https://hort.extension.wisc.edu/ask-a-gardening-question/.

Golden Canker (Cryptodiaporthe Canker)

Extension Logo

UW Plant Disease Facts


Authors:   Brian Hudelson, UW-Madison Plant Pathology
Last Revised:   03/01/2024
D-number:   D0055

What is golden canker? 

Golden canker (officially known as Cryptodiaporthe canker) is a visually distinct and increasingly common disease of alternate-leafed dogwoods such as pagoda dogwood.  This disease can potentially be lethal if infections occur on the main trunk of a tree.

A yellow branch with orange spots typical of golden canker on pagoda dogwood.

What does golden canker look like? 

Initial symptoms of golden canker include wilting and death of leaves on infected branches, followed by branch dieback.  Infected branch tissue turns a bright, golden-yellow color.  Often, orange spots will be visible scattered over this yellow tissue.  These spots are fruiting bodies (reproductive structures) of the fungus that causes the disease.  If unchecked, golden canker can spread from infected branches to the main trunk, resulting in the death of the tree above the point of trunk infection.

Where does golden canker come from? 

Golden canker is caused by the fungus Cryptodiaporthe corni, which survives in infected branches.  The exact means by which this fungus is spread is not known.

How do I save a tree with golden canker? 

The only effective way of managing golden canker, once infections have occurred, is by removing diseased branches.  Prune four to six inches below the golden-yellow tissue on each infected branch.  To prevent accidental spread of the golden canker fungus from branch to branch, and from tree to tree, be sure to decontaminate pruning tools between each cut by treating them for at least 30 seconds with a 10% bleach solution or (preferably due to its less corrosive properties) 70% alcohol (e.g., rubbing alcohol, certain spray disinfectants).  Dispose of infected branches by burning (where allowed by local ordinance) or burying them.  There are no fungicide treatments for this disease.

How do I avoid problems with golden canker in the future?  

Reduce tree stress as much as possible.  When planting a new pagoda dogwood, place it in a cool, shaded site.  Remove turf from around the base of the tree out to at least the drip line of the tree (i.e., the edge of where the branches extend), and apply shredded hardwood, pine or cedar mulch in this area to help keep the tree’s root system cool and moist.  On heavy clay soils, use one to two inches of mulch.  On other soils, use three to four inches of mulch.  Be sure to keep mulch four inches from the main trunk of the tree.  Also, make sure the tree receives sufficient water (approximately two inches per week for newly transplanted trees; approximately one inch per week for established trees).  If rainfall is insufficient, use a drip hose or soaker hose to apply supplemental water at the drip line of the tree.  Fertilize trees as needed, but be sure to base any fertilization on a soil nutrient test.

For more information on golden canker: 

Contact the University of Wisconsin Plant Disease Diagnostics Clinic (PDDC) at (608) 262-2863 or pddc@wisc.edu.


This Fact Sheet is also available in PDF format:

© 2003-2024 the Board of Regents of the University of Wisconsin System doing business as University of Wisconsin-Madison Division of Extension.

An EEO/Affirmative Action employer, University of Wisconsin-Madison Division of Extension provides equal opportunities in employment and programming, including Title IX and ADA requirements. This document can be provided in an alternative format by calling Brian Hudelson at (608) 262-2863 (711 for Wisconsin Relay).

References to pesticide products in this publication are for your convenience and are not an endorsement or criticism of one product over similar products. You are responsible for using pesticides according to the manufacturer’s current label directions. Follow directions exactly to protect the environment and people from pesticide exposure. Failure to do so violates the law.

Thanks to Ann Joy, Mike Maddox and Ann Wied for reviewing this document.

A complete inventory of UW Plant Disease Facts is available at the University of Wisconsin-Madison Plant Disease Diagnostics Clinic website: https://pddc.qa.webhosting.cals.wisc.edu.

Submit additional lawn, landscape, and gardening questions at https://hort.extension.wisc.edu/ask-a-gardening-question/.

Fusarium Head Blight (Scab)

Extension Logo

UW Plant Disease Facts


Authors:   Damon Smith, Trenton Stanger*, and Craig Grau, UW-Madison Plant Pathology
Last Revised:   03/01/2024
D-number:   D0054
 
Bleached spikelets on a wheat grain head due to Fusarium head blight.

What is Fusarium head blight? 

Fusarium head blight (FHB) or scab is a fungal disease that affects wheat, barley, oats, and many grasses.  FHB is important, not only because it reduces yield, but because it reduces the quality and feeding value of grain.  In addition, the FHB fungus may produce mycotoxins, including deoxynivalenol (also known as DON or vomitoxin) that, when ingested, can adversely affect livestock and human health.  Maximum allowable levels of DON in feed for various animals (as set by the U.S. Food and Drug Administration) are ≤ 10 parts per million (ppm) for beef and feedlot cattle, ≤ 10 ppm for poultry, and ≤ 5 ppm for swine and all other animals.

What does Fusarium head blight look like? 

Diseased spikelets on an infected grain head die and bleach prematurely.  Healthy spikelets on the same head retain their normal green color.  Over time, premature bleaching of spikelets may progress throughout the entire grain head.  If infections occur on the stem immediately below the head, the entire head may die.  As symptoms progress, developing grains are colonized by the FHB fungus causing them to shrink and wrinkle.  Often, infected kernels have a rough, sunken appearance, and range in color from pink or soft gray, to light brown.

Where does Fusarium head blight come from? 

FHB is caused by the fungus Fusarium graminearum, which is not only a pathogen of wheat, but also of corn.  The fungus can overwinter in infested stubble and straw of cereals and weed grasses, and on stalks and rotted ears of corn.  The severity of FHB varies greatly from year to year.  Infection is favored by extended periods of high moisture or high (>90%) relative humidity, and moderately warm temperatures (59 to 86°F), particularly when these conditions occur just before or during wheat flowering (Feekes 10.5).  If favorable weather conditions persist, infections can continue to occur through the early dough stage (Feekes 11.2).  Extended periods of infection can be especially problematic in wheat stands where plants have varying levels of maturity.

Fusarium head blight can cause grain heads to become completely bleached.

Extension Logo

UW Plant Disease Facts


How can I save a small grain crop with Fusarium head blight? 

Fungicides are available for FHB control.  Triazole fungicides [Fungicide Resistance Action Committee (FRAC) class 3] are recommended.  In particular, fungicides containing prothioconazole and tebuconazole, or a mix of these two compounds, have provided the best control of FHB in university research trials.  Avoid using strobilurin fungicides (FRAC class 11) as research indicates that use of these products can result in an increase in DON levels in harvested grain.  A web-based FHB risk assessment tool (http://www.wheatscab.psu.edu) is available to help make decisions about fungicide applications.  The tool also provides real-time, local commentary by extension personnel about the status of diseases in wheat.  When using fungicides for FHB control, be sure to read and follow all label instructions to ensure that you use the product in the safest and most effective manner possible.

How can I avoid problems with Fusarium head blight in the future?  

DO NOT plant small grains into small grain or corn residue.  Also, avoid planting grain crops near areas where there are large amounts of small grain or corn residue on the soil surface.  When possible, plant small grains following a legume crop (e.g., soybeans), and maintain a rotation with two to three years between small grain crops.  Deep plow all infested plant debris, where feasible.  DO NOT apply manure containing infested straw or corn stalks onto fields planted to small grains.  Certain grain varieties have moderate levels of resistance to FHB.  Consider using these varieties as a means to reduce disease severity and increase grain quality.  Finally, plant several varieties of a small grain that vary in flowering date.  This will decrease the risk that an entire crop will be vulnerable to FHB when weather conditions favor the disease.

For more information on Fusarium head blight:  

Contact the University of Wisconsin Plant Disease Diagnostics Clinic (PDDC) at (608) 262-2863 or pddc@wisc.edu.


This Fact Sheet is also available in PDF format:

*The original version of this fact sheet was completed as partial fulfillment of the requirements for Plant Pathology 559 – Diseases of Economic Plants at the University of Wisconsin Madison.

© 2005-2024 the Board of Regents of the University of Wisconsin System doing business as University of Wisconsin-Madison Division of Extension.

An EEO/Affirmative Action employer, University of Wisconsin-Madison Division of Extension provides equal opportunities in employment and programming, including Title IX and ADA requirements. This document can be provided in an alternative format by calling Brian Hudelson at (608) 262-2863 (711 for Wisconsin Relay).

References to pesticide products in this publication are for your convenience and are not an endorsement or criticism of one product over similar products. You are responsible for using pesticides according to the manufacturer’s current label directions. Follow directions exactly to protect the environment and people from pesticide exposure. Failure to do so violates the law.

Thanks to Diana Alfuth, Bryan Jensen and Jim Stute for reviewing this document.

A complete inventory of UW Plant Disease Facts is available at the University of Wisconsin-Madison Plant Disease Diagnostics Clinic website: https://pddc.qa.webhosting.cals.wisc.edu.

Submit additional agriculture-related questions at https://extension.wisc.edu/agriculture/ask-an-agriculture-question/.

Foliar Nematodes

Extension Logo

UW Plant Disease Facts


Authors:   Megan Meyers* and Brian Hudelson, UW-Madison Plant Pathology
Last Revised:   03/01/2024
D-number:   D0053
 
Angular dead areas on Brunnera leaves typical of infections by foliar nematodes. (Photo courtesy of Monica Lewandowski, The Ohio State University Plant Pathology)

What are foliar nematodes? 

Foliar nematodes are microscopic worm-like organisms in the genus Aphelenchoides.  They live in and on the leaves (and other above-ground plants parts) of over 450 plant species in more than 75 plant families.  They are commonly found on hostas, but can affect other herbaceous ornamentals (e.g., African violet, anemone, begonia, chrysanthemum, fern, orchid, veronica) and woody ornamentals (e.g., azalea, elm, privet), as well as fruit crops (e.g., sour cherry, strawberry) and vegetable crops (e.g., broccoli, celery, lettuce, onion, pinto bean, potato, squash, tomato).  Damage from foliar nematode is usually cosmetic and non-lethal making ornamental plants less attractive and less saleable.  In severe cases and on particularly susceptible hosts (e.g., strawberry), foliar nematodes can cause extensive leaf injury and defoliation, and can interfere with and limit flowering.

What does foliar nematode damage look like? 

Unlike most other nematodes, which cause root damage, foliar nematodes cause damage to above-ground plant parts, especially leaves.  In young plants, foliar nematodes can cause new growth to curl, twist, and stunt.  In more mature plants, foliar nematodes cause small, discolored, angular (i.e., straight-edged) blotches on leaves.  The blotchy areas are typically bordered by veins.  Blotches eventually turn brown and dry, and may fall away, giving the leaf a “shot-holed” appearance.  Angular blotches often are not apparent until late in the growing season (e.g., August).

Where do foliar nematodes come from? 

Foliar nematodes are typically first introduced into a garden on infected/infested plants brought from another location.  Foliar nematodes can then be spread from infected/infested plants to healthy plants by water splash from rain or overhead watering.  Infections most often occur during periods of high humidity or when films of water form on leaves allowing for nematode movement.  Foliar nematodes can also be spread when infected/infested plants are vegetatively propagated (i.e., when cuttings are taken from infested plants).  Foliar nematodes can survive in dry leaves, dormant buds, and in soil, but not in plant roots.  They can survive in unfavorable (e.g., dry or freezing) conditions and quickly become active when moisture becomes available.

Striped dead areas on hosta leaves typical of infections by foliar nematodes.

How do I save a plant with foliar nematodes? 

Eliminating foliar nematodes is virtually impossible.  No chemical products are available for foliar nematode control in home gardens.  Hot water treatments have been developed to treat high-value plants but are not recommended for home gardeners.  Exact temperatures/timings for these treatments vary depending on the type of plant being treated, and missteps in timing/temperature can either kill plants or can lead to less than 100% control of the nematodes.  If you have plants infected with foliar nematodes, the best course of action is to dig them up, bag them and remove them from your garden as soon as you notice symptoms to reduce the risk of the nematodes spreading to healthy plants.  After working with infected plants, wash your hands with soap and water and decontaminate anything that has come into contact with the plants (e.g., tools, pots, bench surfaces, etc.) for 30 seconds with either 70% alcohol (e.g., rubbing alcohol, certain spray disinfectants) or 10% bleach.  If you use bleach, be sure to thoroughly rinse and oil metal tools to prevent rusting.  Because soil is virtually impossible to decontaminate, avoid planting susceptible hosts in an area where foliar nematodes have been a problem.

How do I avoid foliar nematode problems in the future? 

The easiest way to avoid problems with foliar nematodes is to not bring them into your garden.  Carefully inspect plants for nematode symptoms before purchase, but keep in mind that plants may not show symptoms early in the growing season.  Avoid using overhead sprinklers, as watering in this manner can splash foliar nematodes from plant to plant and promote spread.  Instead use a soaker or drip hose that applies water directly to the soil, rather than onto leaves.  Space plants far enough apart so that potential spread via water splash during natural rains is minimized, and avoid working with plants when they are wet.  DO NOT use foliar nematode-infected plants or even healthy-looking plants suspected to be infested with foliar nematodes when taking cuttings to propagate plants.

For more information on foliar nematodes: 

Contact the University of Wisconsin Plant Disease Diagnostics Clinic (PDDC) at (608) 262-2863 or pddc@wisc.edu.


This Fact Sheet is also available in PDF format:

*Completed as partial fulfillment of the requirements for a BS in Plant Pathology at the University of Wisconsin Madison.

© 2014-2024 the Board of Regents of the University of Wisconsin System doing business as University of Wisconsin-Madison Division of Extension.

An EEO/Affirmative Action employer, University of Wisconsin-Madison Division of Extension provides equal opportunities in employment and programming, including Title IX and ADA requirements. This document can be provided in an alternative format by calling Brian Hudelson at (608) 262-2863 (711 for Wisconsin Relay).

References to pesticide products in this publication are for your convenience and are not an endorsement or criticism of one product over similar products. You are responsible for using pesticides according to the manufacturer’s current label directions. Follow directions exactly to protect the environment and people from pesticide exposure. Failure to do so violates the law.

Thanks to Bryan Jensen, Anette Phibbs and Ken Williams for reviewing this document.

A complete inventory of UW Plant Disease Facts is available at the University of Wisconsin-Madison Plant Disease Diagnostics Clinic website: https://pddc.qa.webhosting.cals.wisc.edu.

Submit additional lawn, landscape, and gardening questions at https://hort.extension.wisc.edu/ask-a-gardening-question/.

Fire Blight

Extension Logo

UW Plant Disease Facts


Authors:   Ann Joy and Brian Hudelson, UW-Madison Plant Pathology
Last Revised:   03/01/2024
D-number:   D0052

What is fire blight? 

Fire blight is the most destructive bacterial disease affecting plants in the rose family, including apple, pear, crabapple, hawthorn, cotoneaster, mountain ash, quince, rose, firethorn (Pyracantha), and spirea.  It can disfigure or kill a tree or shrub, depending on the susceptibility of the host and weather conditions.

A shepherd’s crook at the end of an apple branch caused by fire blight.

What does fire blight look like? 

Blossoms, leaves, twigs, and branches of plants affected by fire blight can turn dark brown to black, giving them the appearance of having been scorched in a fire.  Blighted blossoms and leaves tend to stay on the tree instead of falling.  The current year’s twigs often wilt and bend approximately 180°, forming a “shepherd’s crook.”  Cankers (sunken, discolored areas) form on branches and stems, and emit a sticky bacterial ooze.  Sapwood under the bark around cankers can become reddish brown in color.  Fruits can develop brown, sunken or shriveled areas that can be sticky.

Where does fire blight come from? 

Fire blight is caused by the bacterium Erwinia amylovora, which overwinters on the margins of branch cankers and starts to multiply when temperatures rise in the spring.  A bacterium-laden ooze seeps from cankers, and splashing rain and insects disperse this material.  In particular, pollinators such as honeybees can feed on the ooze and then transport the fire blight bacterium to flowers as they collect pollen.  The fire blight bacterium multiplies in blossoms and eventually can spread to other plant parts where it penetrates through wounds and natural openings.  Once the bacterium enters a plant, it can spread rapidly through the plant’s water-conducting (vascular) system.

How do I save a plant with fire blight? 

There is no cure for fire blight, but its spread can be limited by pruning out diseased branches.  Because the fire blight bacterium can spread rapidly, prune as soon as possible after symptoms become visible.  Prune when branches are dry and when your local weather service predicts several days of dry weather.  When removing diseased branches, prune at least 12 inches below tissue showing visible symptoms.  Always disinfect pruning tools after each cut by treating them for at least 30 seconds with bleach [diluted to a final concentration of approximately 0.5% sodium hypochlorite (the active ingredient)] or (preferably) 70% alcohol (e.g., rubbing alcohol, certain spray disinfectants).  If you use bleach, be sure to thoroughly rinse and oil your tools after pruning to prevent rusting.  Burn or bury pruned branches.

How do I avoid problems with fire blight in the future? 

By far the most effective strategy is to choose plants with fire blight resistance.  Also, select a well-drained site with a soil pH of 5.5 to 6.5.  Avoid applying high levels of nitrogen fertilizer, as this may stimulate new, succulent growth that is more prone to damage and thus infection.  Consider treating with Bordeaux mixture (copper sulfate + lime) before buds open to reduce the level of the fire blight bacterium present on branches.  Make one or two applications, with four days between applications.

For more information on fire blight: 

Contact the University of Wisconsin Plant Disease Diagnostics Clinic (PDDC) at (608) 262-2863 or pddc@wisc.edu.


This Fact Sheet is also available in PDF format:

© 2002-2024 the Board of Regents of the University of Wisconsin System doing business as University of Wisconsin-Madison Division of Extension.

An EEO/Affirmative Action employer, University of Wisconsin-Madison Division of Extension provides equal opportunities in employment and programming, including Title IX and ADA requirements. This document can be provided in an alternative format by calling Brian Hudelson at (608) 262-2863 (711 for Wisconsin Relay).

Thanks to Teryl Roper, Patricia McManus, and Patti Nagai for reviewing this document.

A complete inventory of UW Plant Disease Facts is available at the University of Wisconsin-Madison Plant Disease Diagnostics Clinic website: https://pddc.qa.webhosting.cals.wisc.edu.

Submit additional lawn, landscape, and gardening questions at https://hort.extension.wisc.edu/ask-a-gardening-question/.

Ergot

Extension Logo

UW Plant Disease Facts


Authors:   Sarah Rosenthal*, UW-Plant Breeding and Genetics Dan Undersander, UW-Madison Agronomy Damon Smith, Craig Grau and Brian Hudelson, UW-Madison Plant Pathology
Last Revised:   02/29/2024
D-number:   D0050


Production of honeydew (red arrow) and sclerotia (white arrows) are typical of ergot.

What is ergot? 

Ergot is a fungal disease of worldwide distribution that is common in the northern two-thirds of North America.  Ergot affects wild and cultivated grasses, as well as small grain crops such as wheat, oats, barley and especially rye.  The ergot pathogen produces alkaloid toxins, many of which reduce blood flow in animals (e.g., cattle, sheep, swine, horses and even humans) that eat ergot-contaminated grain.  Ergot poisoning is cumulative.  Symptoms can develop rapidly if animals eat large quantities of ergot or more slowly if they eat small quantities of ergot on a regular basis.  In many animals (e.g., cattle), the first symptom of ergot poisoning is lameness that occurs two to four weeks after ergot is first eaten.  Gangrene in extremities (e.g., hooves and ears) follows.  Dairy cows that eat ergot-contaminated grain typically have a marked reduction in milk yield.  Other symptoms of ergot poisoning can include convulsions, hallucinations and death.  Symptom development is often more severe in very hot or very cold weather.  Interestingly, some ergot toxins, when purified and used at low dosages, have pharmaceutical applications (e.g., inducing labor and treating migraine headaches).

What does ergot look like? 

Signs of ergot first appear as droplets of a sticky exudate (called honeydew) on immature grain heads.  Honeydew contains asexual spores of the ergot fungus.  Over 40 species of insects are attracted to honeydew and can carry spores from infected to healthy plants.  After approximately two weeks, infected grains are replaced by dark (often purplish), compact fungal structures called sclerotia.  Sclerotia range in size from 1/16 to ¾ inches in length, and often look like seeds, rodent droppings, or insect parts.

Where does ergot come from? 

Ergot is caused by several species of the fungus Claviceps, most commonly Claviceps purpurea.  Sclerotia of these fungi survive in soil and harvested grain.  Sclerotia require a one to two month period of cold temperatures (32 to 50°F), after which they germinate to form small, mushroom-like structures that produce sexual spores (different from those produced in honeydew).  Germination occurs most commonly in cool (57 to 84°F), damp weather and is inhibited at higher temperatures.  Sexual spores are blown to developing grain heads where infection occurs.  Humid weather (> 90% relative humidity) contributes to honeydew production.  Ergot is also often more severe if frosts occur at the time of spore production.

Ergot sclerotia germinate to form mushroom-like, spore-producing structures.

How can I save a small grain crop with ergot? 

Fungicide treatments are not recommended to control ergot.  When ergot is a problem, you can attempt to remove sclerotia from grain using commercial seed-cleaning equipment.  However, if sclerotia are broken or are the same size as the grain itself, this may be difficult and costly, and may still result in grain that has a contamination level that is above marketable thresholds (tolerance for ergot sclerotia in harvested grain can be as low as 0.05% by weight).  Ultimately destroying the contaminated grain may be the best course of action.  Be sure to also destroy the hay from the affected field.  DO NOT use the hay as feed or for animal bedding.

How can I avoid problems with ergot in the future?  

Maintain a rotation with at least one year between small grain crops.  Use crops that are not susceptible to ergot (e.g., soybeans, alfalfa, corn) in years when small grains are not grown.  Plant grain seed that is free of ergot sclerotia.  Ergot-resistant varieties are not available, but avoid longer-flowering varieties as they tend to be more susceptible to infection.  Keep weed grasses under control.  Also, mow areas adjacent to small grain fields to prevent grasses from flowering and developing ergot.  In fields where ergot becomes a problem, consider clean, deep plowing that will bury ergot sclerotia to at least three to four inches, thus preventing sclerotia from germinating.  Mow, remove and destroy ergot-infected grasses from pastures and hayfields.  DO NOT allow animals to graze in these areas and DO NOT use the harvested material for feed or as bedding material.

For more information on ergot:  

Contact the University of Wisconsin Plant Disease Diagnostics Clinic (PDDC) at (608) 262-2863 or pddc@wisc.edu.


This Fact Sheet is also available in PDF format:

*The original version of this fact sheet was completed as partial fulfillment of the requirements for Plant Pathology 559 – Diseases of Economic Plants at the University of Wisconsin Madison.

© 2005-2024 the Board of Regents of the University of Wisconsin System doing business as University of Wisconsin-Madison Division of Extension.

An EEO/Affirmative Action employer, University of Wisconsin-Madison Division of Extension provides equal opportunities in employment and programming, including Title IX and ADA requirements. This document can be provided in an alternative format by calling Brian Hudelson at (608) 262-2863 (711 for Wisconsin Relay).

References to pesticide products in this publication are for your convenience and are not an endorsement or criticism of one product over similar products. You are responsible for using pesticides according to the manufacturer’s current label directions. Follow directions exactly to protect the environment and people from pesticide exposure. Failure to do so violates the law.

Thanks to Diana Alfuth, Bryan Jensen and Kevan Klingberg for reviewing this document.

A complete inventory of UW Plant Disease Facts is available at the University of Wisconsin-Madison Plant Disease Diagnostics Clinic website: https://pddc.qa.webhosting.cals.wisc.edu.

Submit additional agriculture-related questions at https://extension.wisc.edu/agriculture/ask-an-agriculture-question/.

Edema

Extension Logo

UW Plant Disease Facts


Authors:   Ann Joy and Brian Hudelson, UW-Madison Plant Pathology
Last Revised:   02/29/2024
D-number:   D0048

What is edema? 

Edema (or oedema) is a physiological disorder that frequently occurs in houseplants, greenhouse plants, and other plants sheltered under plastic.  This disorder also affects field-grown vegetable crops under certain environmental conditions.  Edema is often a cosmetic problem, but in extreme cases, edema can ruin a greenhouse crop and cause severe economic losses.

Edema pustules on the underside of a geranium leaf.

What does edema look like? 

Small translucent, fluid-filled blisters form on the undersides of mostly older leaves, often beginning at the leaf margins.  Blisters can also occur on stems and occasionally on flowers.  When observed against the light, edema lesions are lighter in color than the surrounding leaf tissue.  The blisters may increase in size or merge, burst, and then scar, turning tan in color and corky in texture.  Some or all leaves may eventually shrivel or roll, and fall off.  Extensive blistering and scarring may limit the plant’s ability to photosynthesize.

Where does edema come from? 

When the soil is warm and moist, water absorbed by a plant’s roots may exceed the water lost through a plant’s leaves.  Conditions preventing effective water loss include high relative humidity, low light intensity, cool air temperatures and poor ventilation.  Periods of cloudy weather, or an increase in relative humidity resulting from cooling air temperatures, can make plants susceptible to edema.  Edema has also been associated with the use of oil sprays that interfere with normal leaf water loss.

How do I save a plant with edema? 

Edema is typically not fatal but will make plants less attractive.  To limit problems with edema, water less frequently in cloudy periods or under low light intensity.  Water in the morning so that the soil in which plants are potted will drain by nightfall when cooling temperatures can lead to increased relative humidity.

How do I avoid problems with edema in the future? 

Use a growth medium that drains well.  Reduce relative humidity near leaf surfaces by increasing plant spacing and air circulation.  Increase light and air temperatures to help increase normal water loss.  Water less frequently during cool, humid weather.  Empty standing water in saucers under pots 30 minutes after watering.

For more information on edema: 

Contact the University of Wisconsin Plant Disease Diagnostics Clinic (PDDC) at (608) 262-2863 or pddc@wisc.edu.


This Fact Sheet is also available in PDF format:

© 2003-2024 the Board of Regents of the University of Wisconsin System doing business as University of Wisconsin-Madison Division of Extension.

An EEO/Affirmative Action employer, University of Wisconsin-Madison Division of Extension provides equal opportunities in employment and programming, including Title IX and ADA requirements. This document can be provided in an alternative format by calling Brian Hudelson at (608) 262-2863 (711 for Wisconsin Relay).

Thanks to Sr. Mary Francis Heimann, Kristin Kleeber ger and Ann Wied for reviewing this document.

A complete inventory of UW Plant Disease Facts is available at the University of Wisconsin-Madison Plant Disease Diagnostics Clinic website: https://pddc.qa.webhosting.cals.wisc.edu.

Submit additional lawn, landscape, and gardening questions at https://hort.extension.wisc.edu/ask-a-gardening-question/.